Beginner


Professional
Composition Light
Composition Pro
| Instruction manual - Pizzicato 3.6.2 | EN569 - Revision of 2013/05/29 |
Beginner |
Professional |
Composition Light |
Composition Pro |
The global view
Subjects covered:
How to open the global view? [Beginner] [Professional] [Composition Light] [Composition Pro]
The global view is not a new window. It is located inside the score view. It is an extension of the linear mode used to display the staves. The idea behind this new view is to have access to the most important tools existing in several different Pizzicato windows. By having these music controls and tools all inside the same window, you can compose music much easier, as you do not need to open and close several different windows, each time adjusting their positions to accomodate your screen and see what you need to display.
To open the global view, just open the normal score view. On the score window tool bar, you can select the Global item in the Linear/Page/Global menu.
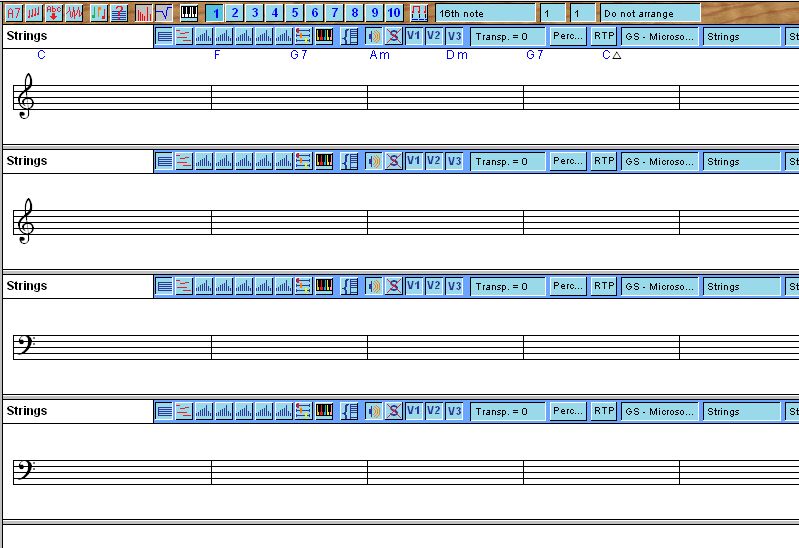
- Open the Ex092 document in the DataEN / Examples directory. You should see the score window in linear mode. In the Linear popup menu, select the Global item. The inner part of the window displays the global view:
In this lesson, we will explain the various parts of this window. You will notice that most of these parts duplicate the functions of another Pizzicato window or tool. So in explaining the various parts, we will make a summary of these functions and refer you to the lessons that give more details about them. The real contribution of this window is to assemble in one view most of the practical tools you need to compose music efficiently. It tries to offer you the best of the Pizzicato tools in one single window.
The main header bar [Beginner] [Professional] [Composition Light] [Composition Pro]
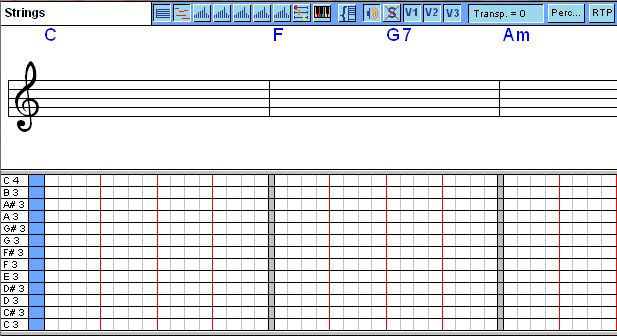
The main header bar is the upper part of the content of the window. It is located just below the main tool bar of the score window:
- Click on the
button. The global view will have a new area to display the chords progression associated to the score:
Each chord is displayed with 3 icons. You can modify and manipulate the chords in several ways:
- By clicking on the upper icon ("?"), you can edit the chord with the standard chord selection dialog of Pizzicato. You can learn how to use this dialog in the lesson entitled The Chord Tool.
- The second icon ("+") is used to add a chord after the current chord (the one on which you click this icon). The same chord dialog box appears and you can specify a chord that will be inserted after this chord. All the following chords are shifted to the right.
- The third icon ("X") will remove the current chord. All the following chords are shifted to the left.
- By moving the mouse over the separation line between two consecutive chords, the cursor will display a double-arrow. If you click and drag the mouse, the limit of the chords will move. This is the way to shift chords and change their duration. All following chords are shifted accordingly.
- You can add a chord by clicking on an area with no chord.
If you click again on the same
You can also double-click the
In Pizzicato Professional and Composition, you can also drag and drop an harmonic space from the library into the chords area. It will then be possible to select chords according to the rules of the harmonic space. With a right-click you can then select another chord that respects the rules to follow the previous chord. See the lesson on Harmonic spaces in the manual for all details (Pizzicato Professional and Composition only).
Regarding harmonic spaces, once you have added an harmonic space into the chord area, you can edit it with a CTRL+click on the
You can resize this area vertically by clicking and moving the gray bar just below this area.
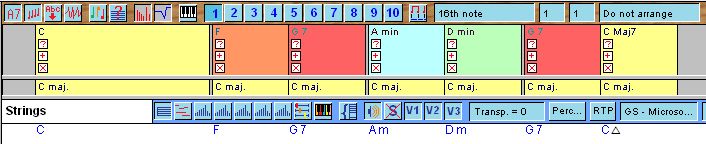
- Whenever you add or manipulate chords, Pizzicato associates a scale to each chord. Click the
button to display the associated scales and you will see the following (keep the chords area also visible):
These scales are assigned automatically, but with this global view, you can select which one to use by right-clicking on one of the scales. Pizzicato will list the main scales that fit the chord and you can then select it from the menu. These scales influence the coloring of notes and also several Pizzicato Professional and Composition tools.
In Pizzicato Professional and Composition Pro, you can also drag chords and scales from the music composition libraries (Conductor view) and drop them respectively in the chords and scale areas. You can double-click a scale in the scale area and change its root note.
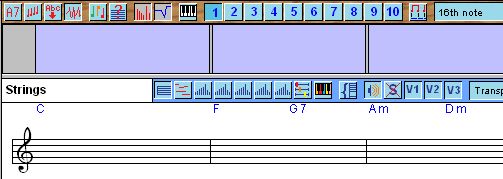
- Hide the chords and scales areas and click now on the
button. An additional area is displayed. It is the marker and measure number area:
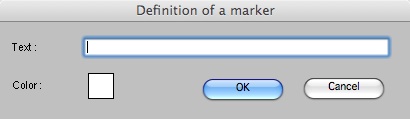
The measure numbers help you to locate measures. The upper gray lane above it may contain customized markers, with a name and a color. Double-click in that lane, around the beginning of measure 2. The following dialog appears:
Fill it with the text "Introduction" and select a green color in the small white square. Then click OK. The marker is displayed:
You can add markers with a double-click. If you right-click an existing marker, a contextual menu proposes to modify it (text and color) or delete it. You can also drag the left border of a marker to shift it in time.
Markers help you to locate various parts of your composition.
- Hide the marker area and click now on the
button. An additional area is displayed. It is now empty, but this is where you can add audio tracks that will be played together with the score:
The following operations may be performed inside this audio track area:
- Right-clicking and selecting of the Add an audio track... menu item. The audio file selection dialog appears, as explained in the lesson about The audio tracks. The audio tracks appear for instance like this when you have added one or more to the score:
Only Pizzicato Professional and Composition Pro can have more than one audio track.
- Right-clicking on an existing audio file and selecting the Remove audio track menu item will remove it from the score (but the corresponding WAV file on disk is not deleted).
- Right-clicking on an existing audio file and selecting the Edit audio track... menu item, or simply double-clicking an audio track will open the audio editor window as explained in the lesson entitled The audio editor.
- Right-clicking on an existing audio file and selecting the Audio track properties... menu item will open the audio track selection dialog, similar to the one used to add a new audio track.
- You can move an audio track left or right to shift its starting point in time in relation to the measures. Just click and move the track with the mouse.
- If you click on the
- The
button is a shortcut to note coloring according to the current scales and chords. When switched on, all notes of the score will be displayed in green if they are part of the current chord, in orange if they are part of the scale or in red otherwise.
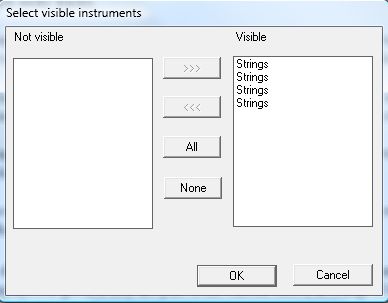
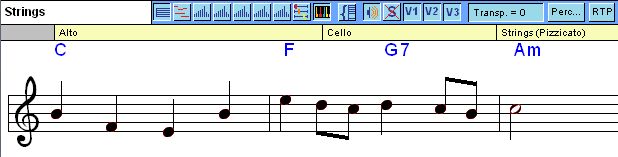
- Click on the
button. You will see a dialog with the list of all instruments. By default in the global view, all instrument staves are visible. In the above example, you have 4 staves. With this dialog, you can decide which staff is visible in the global view:
Here is a summary of how to use this dialog:
- Double clicking a line in one list will move it to the other list.
- The All button will put all staves in the visible staves list.
- The None button will put all staves in the invisible staves list.
- Using the ">>>" and "<<<" button will move the selected line from one list to the other.
When you validate the dialog, only the staves displayed in the right list will be displayed in the global view. This is used to decide for instance to display only the strings of an orchestral score when you want to work on them separately.
- The two icons
are used in relation to the musical effects areas, as we will see them further in this lesson. They enable respectively the display of effects from the MIDI tracks and/or from the graphic symbols added in the score (nuances, crescendo,...). See the lesson on the musical effects view.
- The
icon is used to call the instruments view, in the configuration where you can define the MIDI instruments. It is a shortcut to calling the Edit menu, Instruments item, and choosing the Instruments configuration.
- The
series of icons is used as a set of 10 memories. By default, the first memory is active.
This means that the aspect of the global view, as you choose which areas to display, is stored in this first memory. This includes the chords, scales and audio tracks areas as well as the selection of visible staves. This also includes all the setup of what is displayed within each staff, as we will explain further in this lesson. All this setup is stored in the current memory.
A memory setup is by default displaying all staves and nothing else. Once you have setup the global view to display for instance the chords and audio tracks, the brass and percussion staves of your orchestral composition, you may then click on the second memory button. This resets the global view to its default setup. You can then use the second memory for instance to work the woodwinds. Then you select memory setup 3 and prepare it for instance to see all volume effects, for each staff.
While working your music composition, you can switch between those three prepared configurations, just by using the above memory buttons.
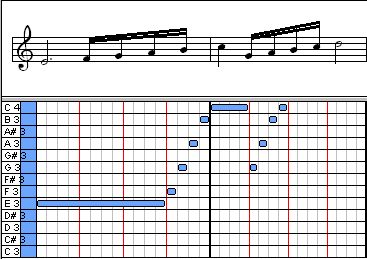
- The
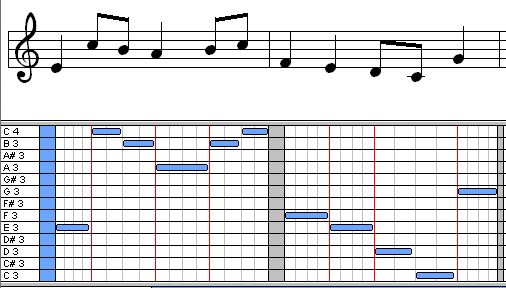
icon is used to display the graphic editor and the effects lanes in two different ways. The first one (by default) is to align the graphic editor and the effects on the beats as they are in the music notation of the measures. Here is an example:
The advantage is that everything is aligned horizontally. The beginning of the dotted half note is aligned with the beginning of the graphic line that represents it. Same for the 16th notes. The inconvenient is that the scale of the graphic editor is very different from beat to beat and it makes it harder to enter music using the graphic editor, as the width of each beat varies greatly to follow the music notation.
By activating the
The inconvenient is that the graphic lines are no more aligned with music notation. You can switch from one option to the other, according to the type of work you are doing. Usually, the second choice is more efficient to enter music with the graphic editor.
- The next three menus
determines the precision and the Tuplet ratio (for instance for a triplet, it is 3 / 2). used in the graphic editor. They correspond to the options that are available in the graphic editor.
- The last menu is used to enable the score arranger (Pizzicato Professional and Composition only). It will be explained in the lesson on the score arranger.
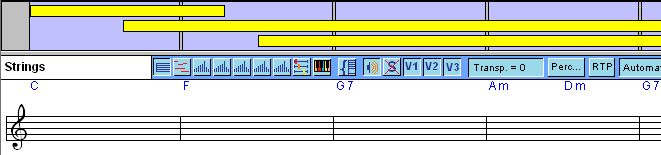
The staff header bar [Beginner] [Professional] [Composition Light] [Composition Pro]
Once you have decided which instruments to display, the rest of the global view will display a tool bar for each instrument. This tool bar is the following:
Some of these buttons are only visible in the advanced versions of Pizzicato.
- By default, the
icon is active. It means that the staff of the instrument is displayed in music notation, just below the tool bar. In this music notation area, you can use every Pizzicato tool that can be used in the linear or page view (except the page setup tools). You can enter the notes and edit your music in this area.
You can resize that area vertically by moving the lower separation gray bar. You can also zoom in and out to increase the precision level. All other areas will zoom in and out accordingly. By resizing an area while holding down the CTRL key, all other notation areas will be affected in the same way.
You can hide the staff and work only with other areas, as we will see below.
If you click on this icon while holding down the CTRL key, the modification (hiding or showing the staff) is applied to all visible instruments. You can quickly hide or show every staves.
- You can double-click the name of the instrument, on the left part of the toolbar. A dialog is displayed so that you can edit the instrument name as well as a short name that will be displayed in front of the second and following systems in page mode.
- By clicking on the name, you assign the MIDI echo to that staff, which means that any note played on a MIDI keyboard connected to the computer, will be played by the instrument of this staff. The staff that has the MIDI echo is marked by a small red square on the top left corner of the notation area, when the reference marks tool is activated (shortcut is ":").
- By double clicking the background color of the above tool bar (between buttons or to the far right, after the buttons), you can select the color assigned to that instrument (here it is blue).
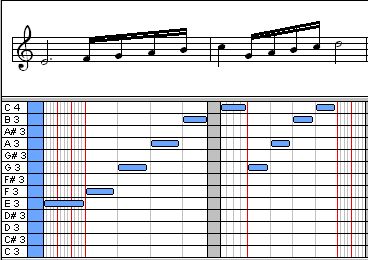
- Click on the
icon. Zoom in at 150 %. The graphical note editor is displayed for that instrument:
Basically, it is the same as the one described in the lesson on the graphic editor. When notes are present in the staff, this editor will look like this:
Here is a summary of the operations you can do with it:
- To add a note, click and drag the mouse to the right to extend the duration. The default definition is the 16th note. When releasing the mouse button, you will see the note translated into music notation on the staff.
- To move a note, click it and drag it to its new position, whether in the same measure or another measure of the same staff.
- To remove a note, click on it while holding down the CTRL key.
- To lengthen a given note, click on it while holding the SHIFT key and move the mouse to adjust its duration, then release the mouse button.
- By clicking and dragging inside the first blue column (the color is in fact the color associated to the instrument; it is here blue, but in other staves it may be a different color), you can hear the notes played by the instrument, as a reference to the ear. Note that in the case of percussion instruments, the note name is replaced by the name of the percussion instrument. This view is very useful to design drum patterns, as you may do the above operation while Pizzicato plays the score in loop so that you hear the resulting rhythm.
- By cliking and moving the left column vertically (the one with the note names), you can move the visible range of the notes, so as to cover any note areas. You can also resize the graphic editor view vertically, by moving the gray separation bar below the main area.
- If you hold down the CTRL key and then click and move vertically on a given note name, you can move all these notes appearing in the staff to another note. In other words, if you click on the C3 note name while holding down the CTRL key and then move it to the level of C3#, all C3 notes of that staff will be transposed to C3# notes in the measures. This is also easy to change a percussion instrument to another one.
- By activating the selection tool on the main palette, you can click and drag to draw a rectangle and select notes. You can then move this rectangle horizontally (shifts the notes in time) or vertically (transposes the notes) or both. You can achieve an Edit, Copy then draw another rectangle and do a Edit, Paste to it. You can also delete notes this way. You can draw more than one selection rectangle by using the SHIFT key to add a selection to the existing one.
If you click on the
- Hide the graphic editor now and click on the first
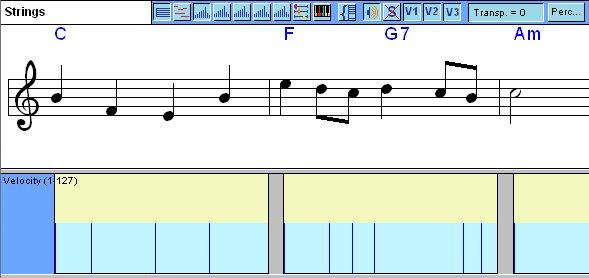
icon to display the first effect area. By default, this effect displays the velocity of the notes. Add a few notes in the score to have for instance:
Basically, it is very similar to the musical effect view. Here is a summary on how it works.
- If you double click on the
- You may have up to five effects displayed in the global view, for each instrument. By clicking one of the 5
- To modify the effect curve or to add a curve, just draw freely inside the area.
- If you click and drag inside the area while holding down the CTRL key, you draw a line that will create the controller content when you release it.
- If you click and drag inside the area while holding down the SHIFT key, you delete any controller present on that section.
- You can do the same as the three above operations, but with the right mouse button. In this case, you draw a curve not only in the current instrument, but also in all other same controllers for all visible instruments. This is particularly easy to create a full orchestral crescendo, with the volume controller areas.
- You can also resize the effect area vertically, using the separation gray bar below it.
- To set a precise vertical value when you draw a curve, you can use the up and down arrows of the computer keyboards. From there on, you can continue to draw and the vertical value stays the same. This is cancelled when you release the mouse button.
- Similarly, to set a value to its default value, you can hold down the SHIFT key while you are drawing. But push that SHIFT key only after clicking with the mouse, otherwise you remove the values, as explained here above.
- Hide the effect editor now and click on the
icon to display the slider area:
These sliders are represented as graphic areas. You can click in them and adjust the value of the green area to fix the value of the slider. These sliders and values are all duplicates of the instrument view. When they are displayed here, you can have an easy access to adjust these values.
If you click on the
- Hide the slider area now and click on the
icon to display the virtual instruments. This area is by default gray if no virtual instruments are associated to the score, but when some instruments are present, it looks like this:
You may drag and drop virtual instruments from the Pizzicato (Professional and Composition) music libraries to that area and you can double-click them to edit them. With the Beginner version, you can only see the associated instrument. You can assign virtual instruments to the staves with the Edit, Assign virtual instruments to staves... icon.
In the Professional and Composition versions, you can also move the limit between two virtual instruments, simply by dragging the limit with the mouse.
If you click on the
- The
icon simply calls the dialog of the characteristics of a staff. You can adjust the measure numbers, the staff lines, the brackets, the guitar tablature and many other specifications. See the lesson on the staves characteristics.
- The following icons
are duplicates of some useful columns of the instruments view. Here is a list of their meanings (from left to right):
- Play - Only the enabled instruments are played back by Pizzicato. You can mute an instrument by disabling it here.
- Solo - An easy way to hear only one instrument. Whenever there is at least one Solo instrument active, Pizzicato will only play these instruments and mute all others.
- V1 - V2 - V3 - Play or Mute the first three rhythmic voices of the staff.
- Transp. - This is a popup menu to select a transposition value that will be used (in half tones) to play back the score by Pizzicato. This can be used with transposing instruments written in their own tonality.
- Perc. [only in advanced versions] - Calls the percussion map dialog, as explained in the instruments view lesson.
- RTP - Real Time Playing. When active, this option will force Pizzicato to compute and play the associated virtual instruments in real time. This may require much more processor power to play the instruments.
- The next three menus are used to select the sound of the instrument. You can select the synthesizer, the familly and the instrument.
- The next menu shows the MIDI channel. You can select it as Automatic (by default), in which case Pizzicato will determine the channel itself, or you can select a given channel for a more advanced control of MIDI.
- Automatic [Only Pizzicato Professional and Composition] - This is the arranger mode assigned to this instrument when the score arranger is active. See the lesson on the score arranger.
- Arrange [Only Pizzicato Professional and Composition] - This option is also related to the score arranger. When it displays Arrange, the arranger may modify this instrument. If you click on it, a red cross is displayed and the arranger will never touch the notes of this staff.
Beginner |
Professional |
Composition Light |
Composition Pro |