Light


Beginner
Professional
Notation
Composition Light
Composition Pro
Drums and Percussion
Guitar
Choir
Keyboard
Soloist
| Instruction manual - Pizzicato 3.6.2 | EN410 - Revision of 2013/05/29 |
Light |
Beginner |
Professional |
Notation |
Composition Light |
Composition Pro |
Drums and Percussion |
Guitar |
Choir |
Keyboard |
Soloist |
The instruments view
Subjects covered:
Watch also the following videos:
The instruments view [Light] [Beginner] [Professional] [Notation] [Composition Light] [Composition Pro] [Drums and Percussion] [Guitar] [Choir] [Keyboard] [Soloist]
The instruments view lets you specify the name and playing characteristics associated to each staff of the score. Most parameters will influence the way in which Pizzicato and your synthesizer will play the score. You can access it with the Instruments item in the windows menu.
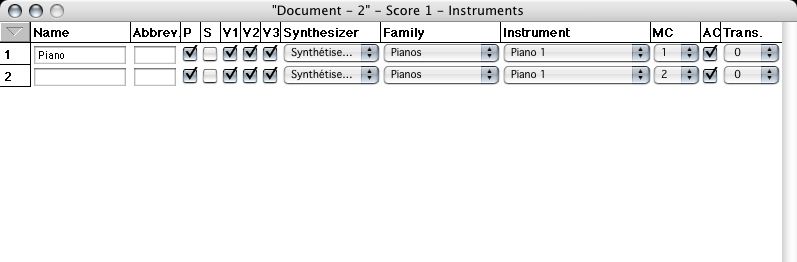
- Start Pizzicato and open the instruments view. The following window appears:
It can be moved, but its size is fixed. It can be closed by the usual closing box. Below its title bar, you find the title of each column. The window has one line for each staff of the score. We will examine each column in detail. Because the starting score has two staves here, there are two lines in the instruments view. This window may display 10 lines at the same time. When the score has more than 10 staves simultaneously played, the vertical scroll bar located to the right of the window lets you go down to access the other lines. The first column numbers the staves starting with 1.
- In the upper left corner you have the
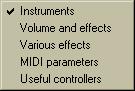
icon. Click on it and a configuration menu appears:
Each item represents a configuration of the instruments view, enabling you to visualize the various playing parameters. The current configuration is checked right in front of the name, like here, Instruments.
The instruments view title has 3 parts: the name of the document, the name of the musical score and the name of the configuration.
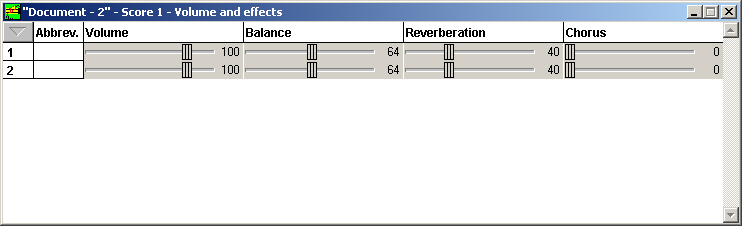
- Each configuration contains different aspects. Select the Volume and effects item of the above menu. The window resizes and is redrawn to display four series of sliders:
The third part of its title shows the name of the configuration : Volume and effects.
The elements of a line may be represented by a text box, a slider, a popup menu or a check box.
- Select the configurations one after the other in order to see what they contain. The first column always shows the sequence number of the staves and the second column indicates the abbreviated name, so as to easily locate an instrument.
Elements of the instruments view [Light] [Beginner] [Professional] [Notation] [Composition Light] [Composition Pro] [Drums and Percussion] [Guitar] [Choir] [Keyboard] [Soloist]
We now will examine the various elements composing the configurations, by explaining for each one the effect it produces on the playing score.
Open again the Instruments configuration:
- The first two columns display the staff name and the abbreviated name. As we have already seen it, you can modify this name by placing the text cursor in this area. When you add staves, the names and the abbreviations are initialized with the sequence number of the staff. These names are written in front of the score view and the sequencer view staves.
- The next column, called P for Play, shows if the corresponding staff must be played by Pizzicato. A check box lets you switch it on or off. By default a staff is played. If you want for example to listen to a score and play yourself the main melody, you can disable the staff which contains this melody so that Pizzicato will only play the other instruments.
- The next column, called S for Soloist, put a staff in solo play. By default, no box of this column is checked and all staves play according to the P column. When at least a soloist box is checked, only the associated staves are played by Pizzicato. You can easily listen to a soloist instrument in an orchestra by checking its S box. This column is complementary to the previous one, because you can also disable all the other instruments of the orchestra to achieve the same result.
- The three next columns are similar to column P, but they act on the individual rhythmic voices inside the staff. For instance, if you have two rhythmic voices inside the same staff, you may disable the V2 (=voice 2) check box to only listen to voice 1. By default, all voices are active.
- The two (three for the Professional and Composition Pro versions) next columns contain menus. They are used to select the instrument playing the notes of the staff on a synthesizer or sound card. Pizzicato Professional and Composition Pro first contain a menu used to select the MIDI output port where the notes will be sent. This menu contains the assigned name(s) of the MIDI ports installed in Pizzicato. Then (for all versions) a menu lets you select the instrument family. When this choice is made, the second menu lets you select among all the instruments belonging to this family. Families and instruments depend on your synthesizer or sound card. This method lets you quickly find a sound among all the sounds available in your synthesizer (sometimes several hundreds). If these menus are disabled, this means that the staff contains a virtual audio instrument, so the MIDI parameters to select the sound are no more active. See the lesson entitled "The virtual instruments".
- The next column indicates MC for MIDI Channel. The notes of a staff must be sent on one of your synthesizer's 16 MIDI channels to be heard. The menu lets you select a channel between 1 and 16 for each staff.
- The next column indicates AC for Automatic Channel. It is linked to the previous column. This box is checked by default. It specify that Pizzicato will handle the MIDI channel assignments. When this box is checked for all staves, you should not care about MIDI channels. Select the families and the instruments and Pizzicato will adapt the MIDI channels so that the notes are sent to the correct channels of your synthesizer. This assignment is not made when you change the instruments, but is automatically done just before playing. In some cases, it can be useful to select yourself the assigned MIDI channels. You then need to uncheck the AC column and Pizzicato will no more modify the MIDI channel of this staff. If you wish to manage MIDI channels yourself, be certain to understand the guiding principle of MIDI, otherwise you may obtain strange results. In most cases, an automatic management is the ideal solution.
- The next column indicates Trans. for transposition. The associated menu lets you specify a value between -24 and +24 half tones. By default, it is set to 0, which means no transposition. By selecting a value different from 0, Pizzicato automatically transpose all notes of the concerned staff by adding to it the indicated number of half tones. You can thus raise the notes up to 2 octaves (+24 half tones) or lower them up to 2 octaves (-24 half tones). This menu is used in particular for the transposing instruments.
Select now the Volume and effects item in the configurations menu (icon :
- The first column contains the abbreviation of the name in order to locate the instruments more easily.
- The next column has a slider to adjust the sound volume of this staff. The current value is displayed just to the right of the slider. It can vary from 0 to 127 and its default value is 100. By changing these values, you can balance the volumes of the various instruments, as on a mixing table. When you ask Pizzicato to play the score, the volume values of each staff are sent to the MIDI channels of the synthesizer.
- The next column is used to adjust the balance of instruments, i.e. the position of those instrument in the stereophonic space. By moving the slider to the left (the right), the sound will be more and more present in your left (right) loudspeaker and less and less present in your right (left) one. The central position is value 64, which is also the default value. You can this way simulate the distribution of a group or orchestra instruments on a scene.
- The next column lets you adjust the level of reverberation for the staff. It is a sound effect which makes the sound resound, by giving the impression you play in a large room. Its value may vary between 0 and 127, 40 being its default value. Used with moderation, it makes synthetic sounds more natural. Most synthesizers offer this effect, but not all of them. Pizzicato does not create itself the reverberation, it does nothing but to give orders to the synthesizer to modify the reverberation. If the synthesizer does not provide reverberation, this slider will remain without effect.
- The next column lets you adjust the level of chorus. It is a special effect which modifies the sound of the instrument by introducing vibrations in it. You can adjust it between 0 (default value) and 127.
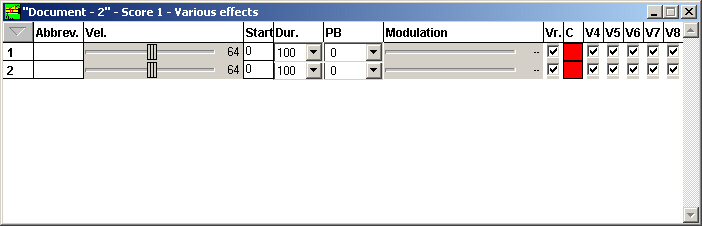
Select now the Various effects item in the configurations menu (icon
- The Vel. column (Velocity) has a slider allowing you to specify the value of the velocity used to play the notes. Its default value is 64 and it can vary between 0 and 127. It is the hit force of the note on the keyboard. The notes introduced using the mouse are played with this velocity. On the other hand, when a note is recorded in MIDI, the original velocity is memorized with the note and this slider has no effect for them.
- The next column indicates Start. It lets you time shift the attack of the notes by adding a fixed delay to it. This interval is determined by a menu with values from -480 to +480 units, which corresponds to the duration of a quarter note (in advance or late). Value 0 indicates that there is no shift. By slightly shifting some instruments, you can create a more realistic orchestral effect. The musicians of an orchestra never play with the exactitude of the computer and it is one of the reasons why a score encoded and played with the precision of a computer seems too monotonous and artificial. By adding slight shifts, you can improve this aspect. Use low values for the shift, otherwise the effect will be exaggerated.
- The next column is called Dur. and represents the Duration of the notes expressed as a percentage. The default value is 100 %. Pizzicato thus plays the total duration of each note. A quarter note will last exactly the duration of a quarter note. You can adjust this value between 5 and 200 %. If you take for example 85 %, the duration of the quarter note will be shortened by 15 %. A value of 50 % will transform all quarter notes of this staff into eighth notes, the 50 % surplus being replaced by a rest. It does not modify the speed of the play. The value you select with this menu is used only when you listen to the score and will not affect the measures.
- The column PB lets you fix the value of the Pitch Bend. On most synthesizer keyboards, you will find a wheel or a lever allowing to modify the pitch of the sound during the play. This effect is called the Pitch Bend. The value you select using this menu simulates this effect. Its default position is 0. The menu offers you a scale varying between -64 and +63, and the corresponding pitch variation goes from -2 half tones to + 2 half tones. By shifting this value slightly, you can detune an instrument compared to the others and to increase again the realism of an orchestral unit. By strongly shifting an instrument compared to another, you can compose music which uses the quarter tone system or even other divisions of the sound pitches. Use for example 5 staves with the same instrument and place 5 different values in the PB column. According to the staff where you write the notes, the notes will be played a fraction of a tone higher or lower.
- The next column also corresponds to a wheel or lever located on the synthesizers. It activates the modulation, which very often corresponds to a vibrato, i.e. a note having its pitch slightly moving around its normal level. It adds naturalness to the performance. Its default value is 0 and it can go up to 127.
- The VB column means Visible Bars. When you open the piano roll view, the notes are displayed in the shape of small coloured bars. Only the notes of the staves checked in this column will be visible in the piano roll view.
- The next column lets you determine the colour of the bars for each staff in the piano roll view. They are red by default. By clicking in this coloured area, the colour selection dialog box appears and invites you to select one of the available colours.
- The five next columns are the continuation of colums V1, V2 and V3, but for rhythmic voices 4 to 8 of a staff. It is quite rare that a measure contains more than 2 or 3 rhythmic voices, but in this case, columns V4 to V8 may be used to disable them.
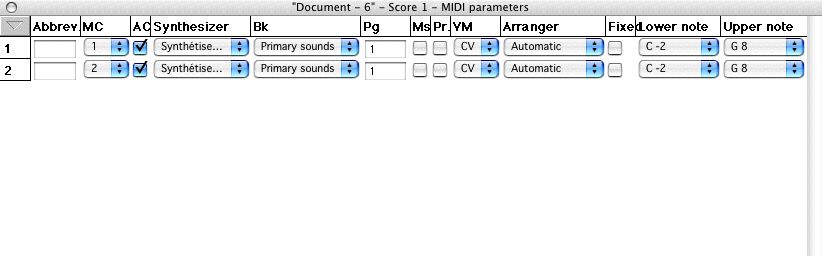
Select now the MIDI Parameters item in the configurations menu (icon
- The 2 columns following the abbreviated name duplicate the columns MC and AC already explained in the Instruments configuration.
- The next column displays the selection of the MIDI output port and is only available in Pizzicato Professional and Composition Pro (since the other versions only have one MIDI port). It is the same as in the Instruments configuration.
- The columns Bk (Bank) and Pg (Program) determine the sound to be played by the synthesizer. In most cases, you will not need to modify them, because Pizzicato calculates them according to the choice of the family, the instrument and the synthesizer. If you wish to modify them, you need to select the first line of the family menu (the line "------"). In this case Pizzicato will no more modify the Bk and Pg columns and you will be able to determine them yourself. This is only useful for very specialized applications because the system of families and instruments is a much more effective and user friendly method.
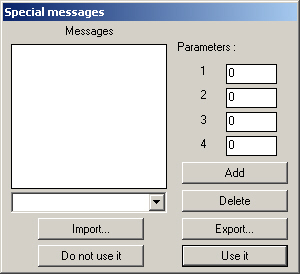
- The next column indicates Ms for Messages (Pizzicato Pro and Composition Pro). It has an unchecked box by default and is used to ask Pizzicato to send special messages to your synthesizer before starting to play. The type of messages that can be sent depends only of your synthesizer. By clicking on this box, you call the following dialog box:
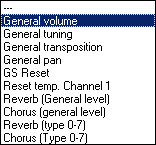
The list shows you the messages you send to your instrument. At first, none are present. Click the Add button. If your synthesizer has special messages, a line will appear in the list with the name of the message. The menu located just below the list is used to select the message to be sent. Here is the contents for the Roland Sc-55 synthesizer :
Four text boxes let you specify parameters for the message selected on the list. In the example above, the first parameter of the General Volume message lets you fix its value between 0 and 127. These parameters depend both of the message and the synthesizer.
In this way, you can add several messages with their parameters. To erase one of the messages, select it on the list and click Clear.
The Export button asks you to save your messages list so that you can use it later in another document. By clicking this button, you will be able to specify a name under which these messages will be recorded. The Import button executes the reversed operation by asking you to load a series of messages which you had previously saved.
By clicking in Use it, you validate your messages and Pizzicato will send them to the synthesizer as soon as you ask it to play the score. By clicking in Do not use it, the messages will be memorized but will not be sent to the synthesizer. In both cases, you return to the instruments view. The corresponding box is checked if the messages are used.
The use of these special messages is especially intended for the MIDI professionals. We will further see that you can create your own MIDI messages and then use them in this dialog box. They let you modify the internal configuration and the sounds of your synthesizer, but they require a very good knowledge of the MIDI system.
- The next box is called Pr for Percussions (Pizzicato Pro, Notation, Composition and Drums). It is used to configure the musical keyboard on the staff. By clicking on this box, you get the following dialog box:
When a synthesizer has percussions (battery, bongos, triangle, various effects,…), these instruments are usually distributed on the musical keyboard, so that they can be played with the corresponding notes. The default correspondence is often not practical when writing these notes on a staff, because the score takes a very complicated aspect because accidentals needs to be added unnecessarily. The resulting score is not really readable.
The above dialog box allows you to assign each notes of the staff to a musical keyboard key. Its use is not limited to the percussions. You can for example use it to create original keyboards where the higher notes are located to the left and lower notes to the right. By listening to a music score, it can give funny results. Try it…
On the left of the dialog box, you find the name of the notes from C to B, with all half tones. The octave displayed is determined by the menu located in the upper left corner of the dialog box, right to the word Octave. The octaves are numbered from -2 up. The octave 3 note C corresponds to the following note:
Beside each note, you find 3 menus. The first two associate a note and its octave. The third lets you directly select the name of a percussion instrument on your synthesizer, and Pizzicato associates the correct note automatically.
Let us take a practical example. You wish to create a percussion staff with the snare drum on the third line. In C clef, the third line corresponds to the octave 3, C note. The dialog box shows you that C 3 currently corresponds to High Bongo, that C # 3 corresponds to Low Bongo,… By default, the standard distribution of your synthesizer is used. The first two columns thus indicate the same note, C3, C#3…
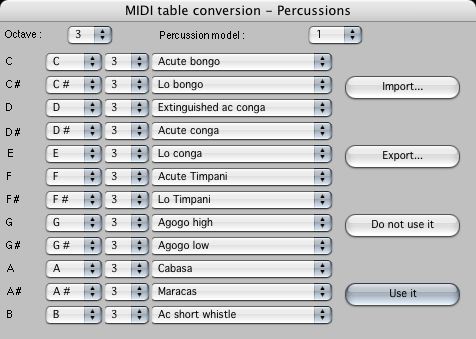
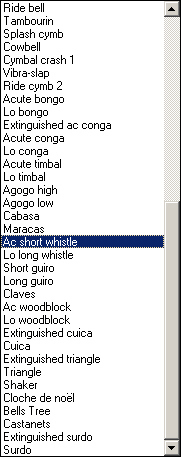
We wish to place the snare drum on the B 3 note. On the last line, click on the menu displaying Short High Whistle. It then displays your synthesizer percussion instruments list, of which here is an extract for the GM (general midi) synthesizers:
By going up to the top of the list and scrolling the menu, you will find the Snare drum 1 instrument. By selecting this line, the bottom of the dialog box will now display:
The first two columns indicate that the snare drum 1 actually corresponds to the D1 note for your synthesizer. The result of this is that all notes placed on the third line of this staff will automatically be transformed into D 1 that your synthesizer will play with a snare drum 1 sound.
You can in this manner build your percussion staff, so that its notation is readable and can be correctly played by the synthesizer. The synthesizers sometimes have several percussions models. The menu located at the upper right corner lets you change the current percussion model (Percussion model menu).
The Export button offers you to save your percussion configuration so as to be able to use it later in another document. The Import button does the reversed operation by asking you to load a percussion configuration previously saved.
By clicking on Use it, Pizzicato will use this percussion configuration for the notes of this staff. By clicking on Do not use it, the configuration will be memorized but will not be used in, playing. In both cases, you return to the instruments view. The corresponding box is checked if the percussion configuration is used.
As you will be able to see it in examples documents, in particular in the scores templates, Pizzicato offers you a whole of staves already prepared for most percussion instruments. The percussion reference card provided with Pizzicato gives you a precise description of it. We advise you to use them for your work and compositions.
- Column VM (Velocity Mode) has a 4 choices menu specifying how Pizzicato must use velocity. When you record a piece by playing it yourself on the keyboard, the hitting force of each key is memorized with each note, so as to be able to reproduce the performance accurately. In addition, the Velocity column of the Various effects configuration also provides a velocity, which can be modified during the play by graphic and MIDI symbols placed on the score. We thus have two values of velocity for each note: the recorded value (if any) and the value coming from the symbols.
- By taking the RV choice, Pizzicato will use the Recorded Velocity when it plays the notes.
- The SV specifies the use of the Symbols Velocity.
- The default choice, CV (Combined Velocity) takes the recorded velocity when available and when not, takes the symbols velocity.
- AV (Average Velocity) makes an average between the two velocities. This last choice lets you keep your original performance and influence it by symbols added on the score.
- The next two columns (Pizzicato Pro and Composition) are used with the arranger. They will be explained in the lesson on the score arranger.
- The next two columns are used to specify the range of the instrument. This feature will be used in future versions of Pizzicato. Presently they are used only by the score arranger.
- The column entitled Rtp means Real Time Play and is used to specify how the virtual audio instruments are played. See the lesson entitled The virtual instruments for a detailed explanation.
In the configurations menu (icon :
Important note
The configurations of the instruments view determine the value of the MIDI parameters at the beginning of the first measure and remain valid until a MIDI symbol appears in a measure. If you set for example the volume at 100, it means that the start of measure 1 will be done with a sound volume of 100. If you add a symbol decreasing the volume by 30 units in measure 3, starting from this measure the volume will thus be 70, up to the next change. This is valid for all MIDI effects influencing the performance.
Modifying the staves order [Light] [Beginner] [Professional] [Notation] [Composition Light] [Composition Pro] [Drums and Percussion] [Guitar] [Choir] [Keyboard] [Soloist]
The instruments view also lets you restructure the staves of the score by modifying their order. To move a staff, click in the number of the corresponding line (first column) and drag it to its new position. We will bring staff 2 at the position of staff 1. Click on number 2, in the left column and drag gently the mouse upwards. A rectangle accompanies your movement. Drag to the top until the cursor is at the height of the first line. Release the mouse. The order is reversed. The first column always indicates of course the sequence number and did not change. In the same manner, you can move a staff downwards. By releasing the mouse, the other staves go up automatically to fill the vacuum and the staff will be in the required location.
Light |
Beginner |
Professional |
Notation |
Composition Light |
Composition Pro |
Drums and Percussion |
Guitar |
Choir |
Keyboard |
Soloist |