Beginner


Professional
Notation
Composition Light
Composition Pro
Drums and Percussion
Guitar
Choir
Keyboard
Soloist
| Instruction manual - Pizzicato 3.6.2 | EN950 - Revision of 2013/05/29 |
Beginner |
Professional |
Notation |
Composition Light |
Composition Pro |
Drums and Percussion |
Guitar |
Choir |
Keyboard |
Soloist |
The audio/Midi/Score window
Subjects covered:
- The purpose of the audio/midi/score window
- Audio conversion - Example 1 - Guitar
- Audio conversion - Example 2 - Guitar
- Audio conversion - Example 3 - Flute
- Audio conversion - Example 4 - Piano
- Audio conversion - Example 5 - Polyphony
- Importing a MIDI file
- Selection of an audio or MIDI section
- Conversion parameters
The purpose of the audio/midi/score window [Beginner] [Professional] [Notation] [Composition Light] [Composition Pro] [Drums and Percussion] [Guitar] [Choir] [Keyboard] [Soloist]
The audio/midi/score window helps you to convert an audio file into a score and also helps you to transcribe a MIDI file or a free MIDI record (without metronome) to get a more precise result in music notation.
You can reach this window in multiple ways, according to the type of operation you want to perform.
To convert an existing audio WAV file into a score, you can:
- Call the File, Convert an audio file into a score... menu item.
- Open the audio file with the i, Open an audio file... menu item or double-click on the audio file in the document manager, and then right-click in the content of the audio window and select the Convert into a score... item.
- Right-click on the audio file in the document manager and select the Convert into a score... item.
To record an audio file from a microphone and convert it into a score, or to play the MIDI keyboard freely without metronome and work out the score of it:
- While holding down the CTRL key, click on the red record button in the score
window.
To convert a free MIDI file recorded without metronome, an additional option is available in the import MIDI file dialog box, entitled Manual adjustment. By checking this option, the MIDI file is open in the audio/midi/score window (but without the audio panel), which provides a more advanced tool to adjust the conversion into a score. The ways to open a MIDI file are multiple:
- With the File, Import MIDI file... menu item.
- By double-clicking on a MIDI file in the document manager.
- By right-clicking on a file in the document manager and then selecting the Create the score option.
- By dragging a MIDI file into the main Pizzicato Window, from Windows explorer or the Finder (on Mac).
This window offers you two different features that must be well understood and distinguished.
When you start from an audio WAV file (whether it already exists or you record it from a microphone), the first part of the work is to locate the notes played in that file.
Locating notes played in an audio file is a quite delicate task for a computer program. You must often help the software to make certain decisions and adjust the parameters of the conversion. It is sometimes needed to correct one note or adjust its exact duration. You can for instance specify where the notes start, which increases the general precision of the conversion. At this time, Pizzicato can handle a monodic melody (one note at a time) correctly. Even if Pizzicato has a polyphonic recognition tool, this tool is only helping you to transcribe, as an important part of the work must be done by you. We will see one example of it in this lesson.
The second part of the work is to transcribe the notes found into a score, by taking into account the duration, rhythm and measures used, so that the score looks readable and logical. Here also, this window offers you a set of tools to define the measures and beats, but the splitting into several voices and staves as well.
To explain the features of this window, we will take several practical examples.
Audio conversion - Example 1 - Guitar [Beginner] [Professional] [Notation] [Composition Light] [Composition Pro] [Drums and Percussion] [Guitar] [Choir] [Keyboard] [Soloist]
Let us start with a simple melody on the guitar.
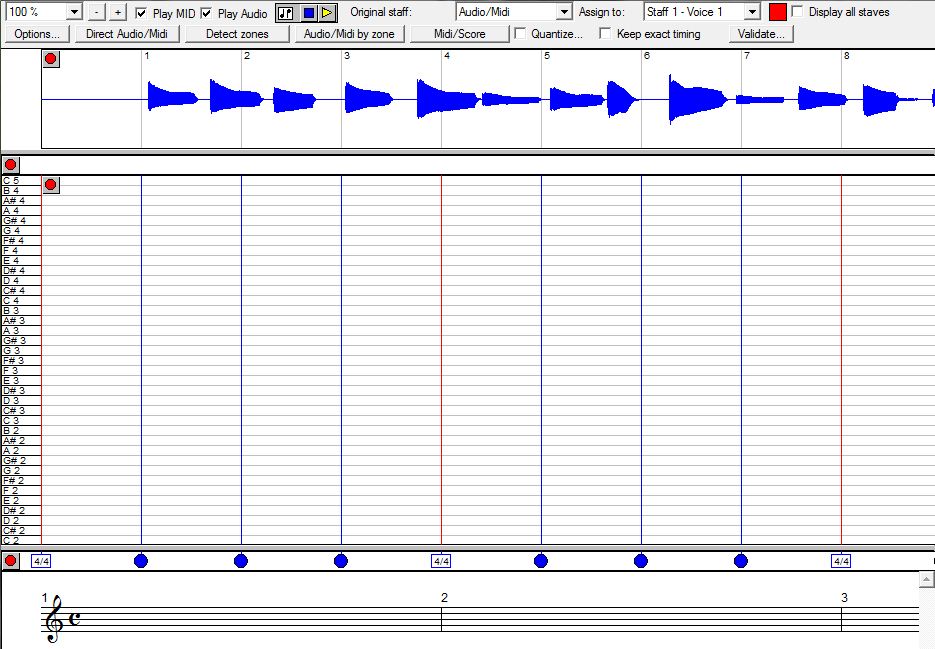
- In configuration 2 of the document manager (blue buttons in the upper left part of Pizzicato), open the examples and right-click on the example entitled Ex094.wav, then select the Convert into a score menu item. The audio/midi/score window appears as follows:
This window has the following areas (from top to bottom):
- The tool bar gives control over the main features of the window.
- The display area of the audio file. Here you see the audio file that we just opened, which contains a short melody played on a real guitar. This area can be resized by moving up or down the gray bar just below it.
- Just below this area is the audio transition area. It will display and/or help you to modify the moments when notes start and stop.
- The MIDI area, where the notes found in the audio file will be displayed. You can also modify, add or delete notes in that area. The note names are displayed in the left part and this left part can be dragged up or down to display a different range of pitches. It can also be resized by moving up or down the gray bar just below it.
- The area of measures and beats, where you can adjust the starting points of measures and the intermediate beats as well.
- The last area displays the score in music notation.
- Below the score, you can use a scroll bar to move to another part of the file, in case that the file needs more space to be displayed.
Here is a description of the various controls of the tool bar:
- A menu and two buttons are used to change the horizontal zoom. By zooming, you increase the precision of work.
- Two check boxes enable/disable the playback of MIDI (the result of the conversion) and audio (original file).
- The icon with two small notes may be dragged and dropped in a document of the document manager, at least for the Pizzicato versions that enable multiple scores in a document. The score dragged is the result of the conversion.
- The two next buttons are Stop and Start playback (audio and/or MIDI) used to hear the content of the working areas.
- The original staff only makes sense when you import a MIDI file and is used to specify which staff of this file you are working on in the MIDI area. For an imported audio file (as it is the case here), there is only one choice, Audio/Midi.
- The Assign to menu is by default on Staff 1 - Voice 1, which means that the notes found in audio and the edited notes in the MIDI area, will be transcribed as the first rhythmic voice of the first staff. The last choice of this menu is Other... is used to add a new assignment:
You can define either a second voice in the same staff or another staff. You can have up to 8 combinations on up to 3 staves to transcribe the notes from an audio file or from a track of a MIDI file. A color can be used for each, so as to make the work more easy in the MIDI area.
- The color of the assignment can be changed also in the next control box.
- The Display all staves check box is used to display all staves of the document in the lower part of the window. When it is not checked, only the staves resulting from the original staff of the MIDI file are displayed. In the case of an audio file, it is unused because there is only one audio track.
- The Options... button displays the dialog with the audio/MIDI recognition parameters. We will go into more details on this later in this lesson.
- The Direct Audio/Midi button starts a conversion. The conversion is done and the transition points are computed.
- The Detect zones button starts an analysis of the transitions between notes. You can then modify them before proceeding with the conversion itself.
- The Audio/Midi by zone starts a conversion that is based on the zones existing between the transitions of notes.
- The Quantize... button displays the quantize dialog box of Pizzicato. When you validate, the MIDI result will be quantized, which means adjusted on beats and divisions of beats, so as to remove the imprecision of the audio or of the MIDI recording. This options also deletes the human interpretation of the music. But if the recording is not precise, this option improves the rhythmic aspect.
- The Keep exact timing check box is more subtle. When you adapt the measures and beats so that they generate a more logic and readable transcription in music notation, if the result is played with the same tempo value, the original performance will be transformed according to the new measures/beats setup. To compensate for this, by enabling this check box, Pizzicato will add tempo variations in such a way that the original performance will be restored.
- The Validate... button saves the resulting score under a name you provide. The audio/midi/score window is then closed and the resulting score is opened in the score view of Pizzicato.
We will examine an example of the two ways to handle an audio/Midi conversion.
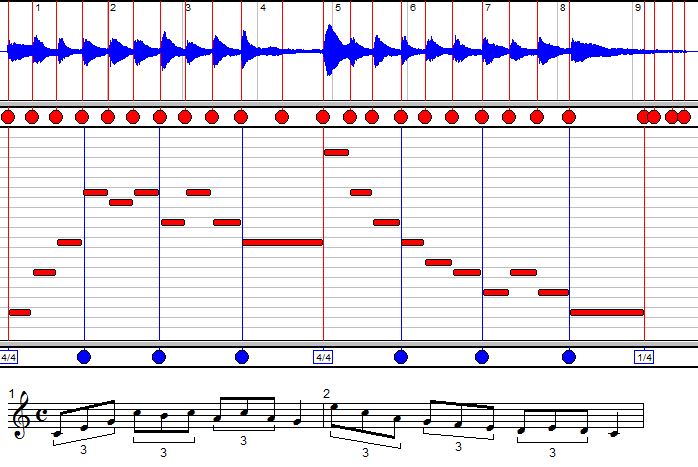
- Listen to the melody, played somehow irregularly by a beginning guitarist (me..!).
- Click the Direct Audio/Midi button. The following result appears:
- Listen to the MIDI playback, by disabling the audio playback.
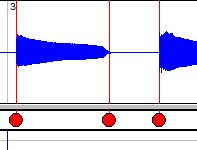
Three notes have a wrong section in them (up one octave), at the time references 3, 7 and 11 (in seconds). Notice that the program displays the transition found, by red circles in the transition area and by corresponding vertical lines in the audio area. To improve the result, you can edit the transitions. Most of the time, the program will find more transitions than it should, so the most obvious correction is to delete the transitions that do not correspond to a note. To do that, simply double-click inside the circle of a transition.
- For instance, double-click on the transition located in the middle of the note of time reference 3. Pizzicato adapts the conversion of the resulting note and displays:
- The final transition of this note as well as the starting transition of the next note are wrongly estimated and the result is that instead of displaying a rest, Pizzicato finds a lower harmonic of the previous notes. Move the two transitions (by clicking and dragging the circles) so as to get this (you can zoom in to increase the precision):
which removes the unwanted note in the MIDI area.
- For the note located between 7 and 8, delete the transition in the middle of these two notes.
- Similarly for the final note, delete the two unnecessary notes to display:
- In some cases, to have a smoother melody, you can clean up the unnecessary transitions. The important transitions are the ones that correspond to the real beginning of the note. For this example, you could get this:
To edit transitions, you can:
- Double-click an existing transition to delete it.
- Move a transition by clicking and dragging it left or right.
- Add a new transition by double-clicking where no transition exists.
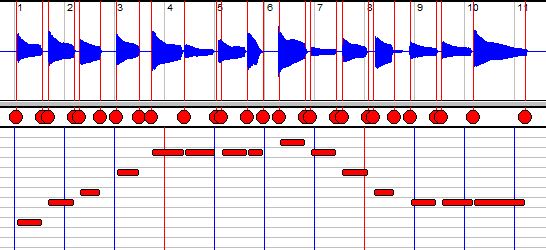
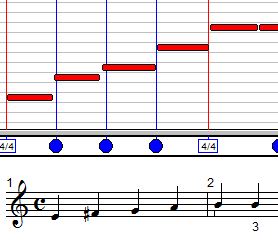
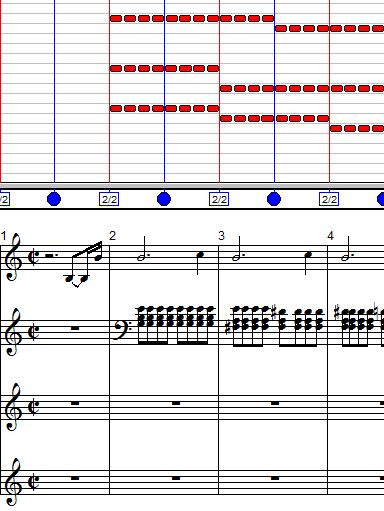
The next phase is to transcribe the notes into music notation in a way that is readable and logic. For the moment, we did not pay any attention to it and the staff displays the following in the score area:
The music seems confused, even if all notes and durations are present. This is because the notes are not synchronized (aligned) with measures and beats. This is where the measures and beats area takes its interest. It is located between the MIDI area and the score area. The starting points of the measures are displayed as blue rectangles (that also display the time signature) and the beats are displayed as blue circles. Here are the operation you can do in this area:
- Moving a measure by dragging its rectangle: the current measure and all the beats and starting points of the following measures moves accordingly. It is useful as you will often work from left to right to adjust the measures and beats. The beats of the previous measure are expanded or reduced accordingly. You can avoid these behavior as follows: by holding the SHIFT key, the previous measure is not modified and by holding the CTRL key, only that measure rectangle is moved.
- To delete a measure or a beat, double-click it.
- By double-clicking in a free area, a new beat is added.
- By double-clicking in a free area while holding down the CTRL key, a new measure is added. The measure is determined by the number of beats defined in it.
- By right-clicking a measure, you can change the type of measure between 1, 2, 4, 8, 16 or 32. To work in 6/8, select 8 and add 5 beats after it. If you hold down the CTRL key during this operation, all measures are affected by the change and if you hold down the SHIFT key, the current measure and the following measures are all affected.
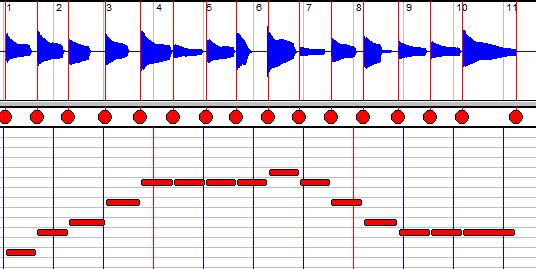
Here is how to adjust the score in a few clicks, based on the quarter note:
- Drag the first measure just in front of the first note. Be careful to place it just a bit before, otherwise the note is not taken into account and is replaced by a rest. The score displays the following:
- Drag the second measure to the left, so that it contains the first four notes. The beats also move to display:
The first measure is now readable as four quarter notes, even if the intermediate beats are not exactly positioned (this is caused by the imprecision of the recording or conversion). If the notation was wrong because of that, you could simply move the beats to align to the MIDI notes.
- Do the same with the next two measures so as to display:
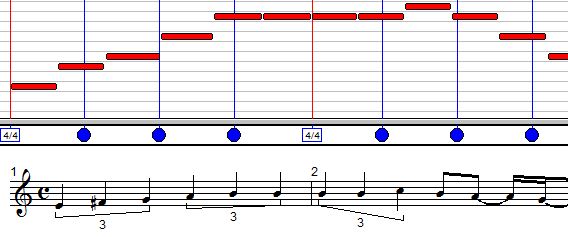
- For the last measure, there are no more beats and measures, so add three beats and one measure and adjust them to get:
Once the result is fine, you can click on the Validate... button and save it by giving it a name. Pizzicato opens it in the score editor and the audio/Midi/score conversion is finished.
Audio conversion - Example 2 - Guitar [Beginner] [Professional] [Notation] [Composition Light] [Composition Pro] [Drums and Percussion] [Guitar] [Choir] [Keyboard] [Soloist]
The second method to convert an audio file is to start working on the transitions and only then convert to MIDI. The fact of specifying the transition helps the program as it can then consider that there is one one between each transition. Let us take another small guitar melody to demonstrate this method.
- In configuration 2 of the document manager, open the examples and right-click on the example entitled Ex095.wav and select the Convert into a score... menu item. The audio/Midi/score window opens.
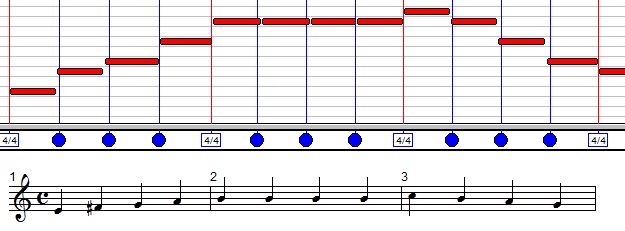
- Listen to the melody and then click on Detect zones. Pizzicato displays the following transitions that determines the zones:
- Clean up the unnecessary transitions, then click on Audio/Midi by zone. This button computes the notes located in each zone. Listen to the MIDI playback. You get the following:
- By adjusting the measures and beats as described in the previous example, you can easily get the following:
According to the audio record and the instrument, one or the other method will be better. Make some tests and use the more efficient one.
Audio conversion - Example 3 - Flute [Beginner] [Professional] [Notation] [Composition Light] [Composition Pro] [Drums and Percussion] [Guitar] [Choir] [Keyboard] [Soloist]
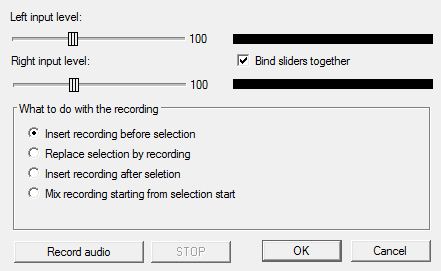
If you want to directly record an audio file and convert it, you can do it by clicking on the record button
Here is how it works:
- Click on Record audio to start recording. You can adjust the record level with the two sliders. The black bar graphs display the level of the signal in green. If there is not reaction on these bar graphs, check that the main Pizzicato audio input is well connected to the microphone or other input where the signal is available. Check this in the Options, Audio setup... menu item.
- Once the audio record is done, click on Stop.
- You can record again if you need it, the previous recording being automatically deleted if you start a new one.
- The OK button validates the last record and inserts it into the audio zone.
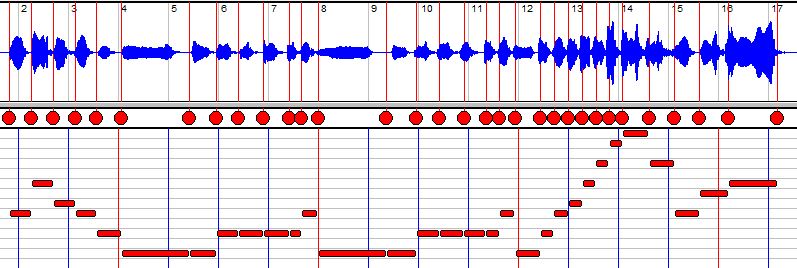
Here is an example of a flute audio record. It is example Ex096.wav that you can open as explained in the previous examples:
Let us explain another method, more natural, that you can use to specify the transitions of the above signal. The idea is that you can record them in real time by clicking with the mouse. Listen to the melody many times. In the case you record the melody yourself it will be more easy, as you know the melody because you played it yourself. Then the procedure is the follow (you can do it several times until you are satisfied with it):
- Click on the
- The playback starts and each time you click inside the transition area, a new transition is added. Do this for each note as well as for the end of the last note.
- Once this is done, transitions can be adjusted manually as previously explained. Here is what it could look like after a real time recording:
An important remark must be done. Windows very often has a latency time for the audio sound card of a PC. This delay happens between the moment when Pizzicato sends the audio samples to Windows and the moment they are really played by the sound card. Because of this, even if you click right when you hear the note, the transition will necessarily be displayed a little bit after the real note in the audio area. On Mac, the latency time is very small and so does not really interfere. This delay also explains why you hear the audio and MIDI with a slight delay when you play them together. There are two methods to handle this problem.
The first is to shift all transitions slightly to the left so that they are aligned with most of the audio notes. You can do that by dragging a transition while holding down the CTRL key. If you hold the SHIFT key, only the current and following transitions will be moved.
The other method is to determine this delay by experience and compensate for it in the Options, Midi play options... dialog box, with the slider displaying MIDI delay in milliseconds (correction for audio).
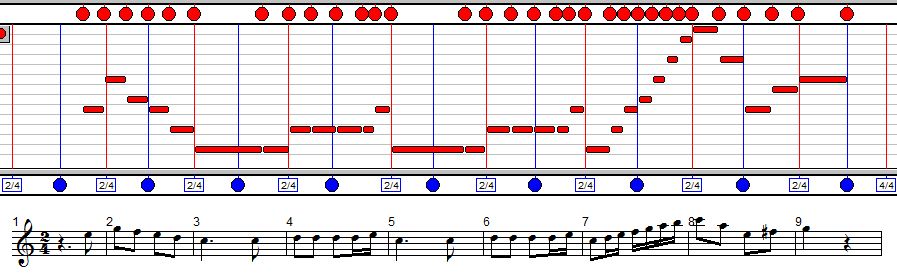
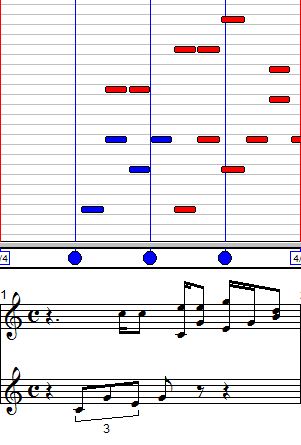
- You can also use the same principle to record the measures and beats. Click on the
- Click with the left button for a measure and with the right button for the intermediate beats.
- Adjust them manually if needed and you will get for instance:
In this case, the time signature is 2/4 (you could also transcribe it in 4/4) and the melody starts on an eighth note upbeat. So you must place a measure at the beginning and the next measure must start on the second note.
Notice that you can also record the MIDI from a MIDI keyboard directly in real time. You must use the
Audio conversion - Example 4 - Piano [Beginner] [Professional] [Notation] [Composition Light] [Composition Pro] [Drums and Percussion] [Guitar] [Choir] [Keyboard] [Soloist]
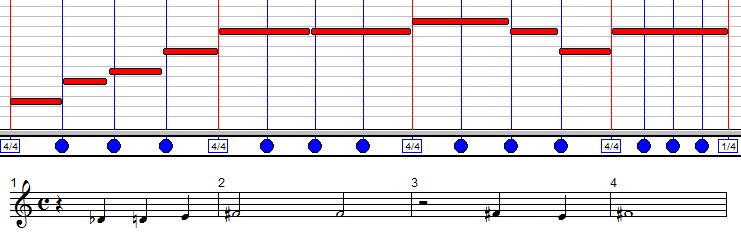
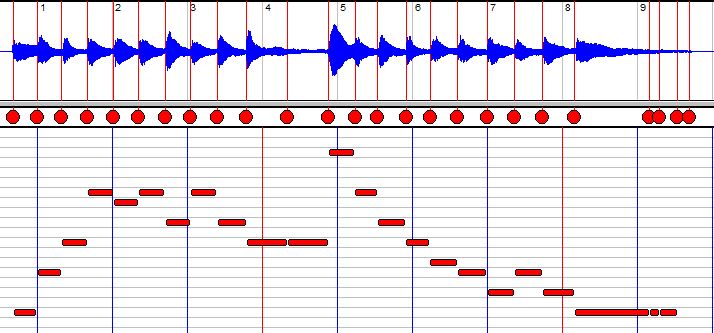
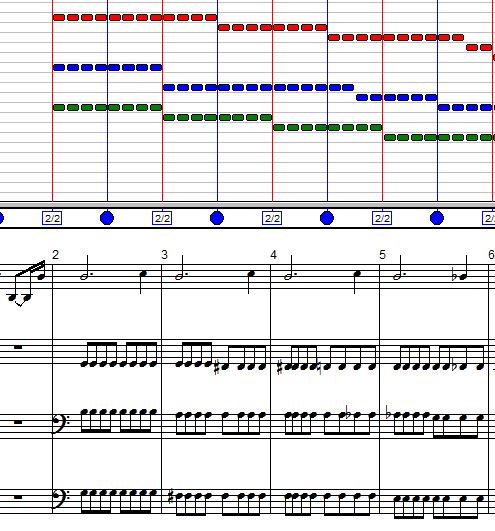
Let us take another example, to illustrate the possible correction in the MIDI area.
- Open the Ex097.wav example as explained before. Listen to the melody, click Detect zones and then audio/Midi by zone. You get the following:
The MIDI area provides tools for the following operations, that will influence the resulting score in the score area (make some tests in the above example):
- To delete a note (represented by a thick red line), click it while holding down the CTRL key.
- To move a note, click on it and drag it horizontally in time and/or vertically for transposition.
- By clicking on a note while holding down the SHIFT key, you can increase or decrease its duration by shifting horizontally.
- By clicking on a free location while holding down CTRL and SHIFT, you can add a new note and adjust its duration horizontally.
After removing the unnecessary transitions and adjusting the measures and beats, the transcription of this melody will look like this:
Audio conversion - Example 5 - Polyphony [Beginner] [Professional] [Notation] [Composition Light] [Composition Pro] [Drums and Percussion] [Guitar] [Choir] [Keyboard] [Soloist]
Here is a more delicate example, where Pizzicato can help you, but where an important part of the work must be done to transcribe a score correctly. We hope to improve this function in the future so that the manual part of the work will be reduced progressively.
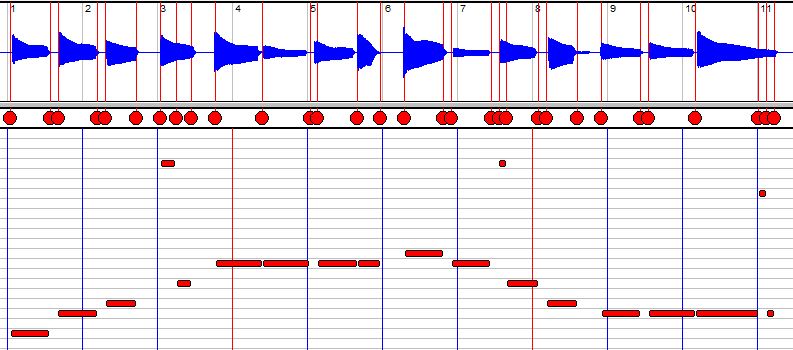
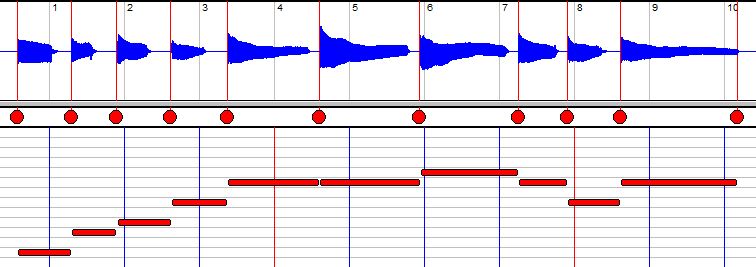
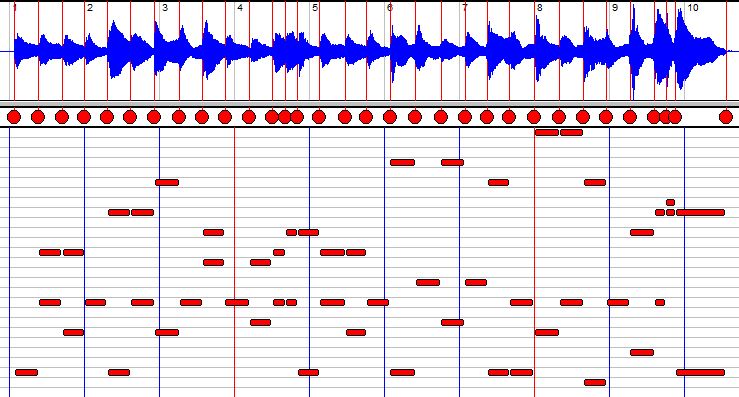
- Open the example entitled Ex098.wav and listen to the audio track.
- Click on the Options... button, change the Maximal polyphony value to 2 (by default it is 1, which means that only one note will be detected at a time), then validate by OK.
- Click on the Detect zones button. Another way would be to record the transitions in real time.
- Adjust the position of the transitions as best as you can, based on the peaks you see in the audio signal and then click on the Audio/Midi by zone button. You should get the following:
- Listen to the MIDI result and you will hear that most notes are there but an important clearing work must still be done. Let us take this example to illustrate how to assign some of the notes to another rhythmic voice or staff.
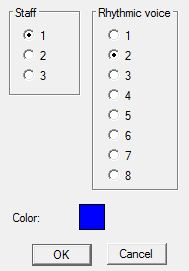
- In the Assign to menu, select the Other... item. In the following dialog box, select staff 2, voice 1. We need to separate the two hands of the piano recording into two staves.
- To assign a note in the MIDI area to the selection of the Assign to menu, you can simply click the note with the right button. The note then takes the color of the assignment (here in blue). For instance, click the first four lower notes to the right, then click the Midi/Score button and you get:
- Another method is to click with the right mouse button and drag a rectangle to cover the notes you want to assign to another staff or voice. Do it for the next four notes, to the right of the blue notes.
- A third method is to click with the right mouse, then press and hold the CTRL key and drag vertically, so as to cover a specific range for the whole area. Do it to assign all notes equal or lower than A3.
- If you use the tools to correct the notes in the MIDI area, then adjust the measures and beats (you can record them in real time, it is faster), and by comparing to the audio version, you can reach the follow result (after quite some work):
Importing a MIDI file [Beginner] [Professional] [Notation] [Composition Light] [Composition Pro] [Drums and Percussion] [Guitar] [Choir] [Keyboard] [Soloist]
The basic principle to import and edit MIDI files is similar to what has been explained here, except that there is no audio area.
- Right-click the example entitled Ex099.mid in the Examples folder of configuration 2 of the document manager, then select the Create the score menu item. In the following dialog box, check the Manual adjustment box, which forces the display of the audio/midi/score window, then click on Import.
- Listen to the music (beginning of a Chopin's Prelude).
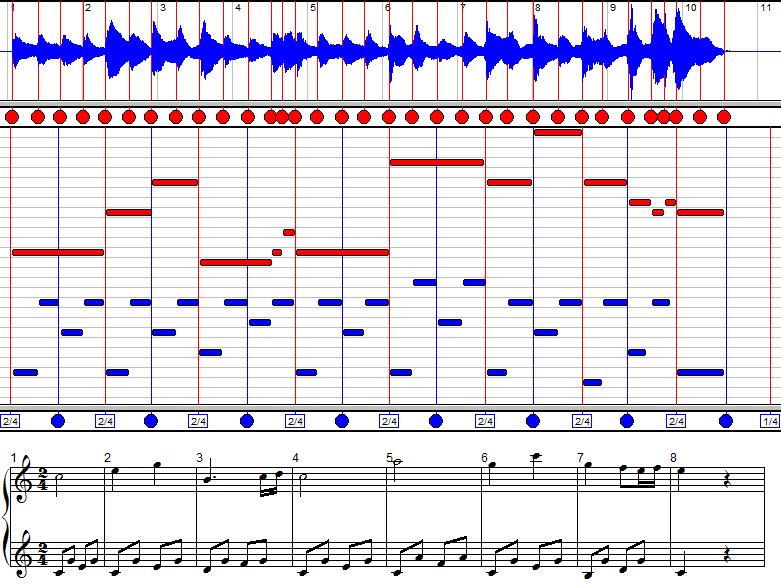
- In the Original staff menu, there are two lines for Piano, representing the two hands of the piano. The melody is played with the right hand and the left hand plays a series of chords made out of 3 notes each. Select the second Piano line in the Original staff menu and the left hand is displayed in the MIDI area. Check Display all staves so that both staves are displayed in the score area.
Let us use this example to show how you can separate voices. We will split the three notes of the chords into three separate staves.
- In the Assign to menu, select Other... and choose staff 2.
- Select Other... again and choose staff 3.
- If you reduce the zoom value, the beginning of the score is displayed like this:
- To assign the central notes to the next staff, select Staff 2 - Voice 1 in the Assign to menu. Then draw rectangles with the right mouse button, to cover the central line of notes. They are then displayed in blue.
- Do the same for the lower notes, by selection Staff 3 - Voice 1 in the menu and transfer the notes in the same way.
- Click on the Midi/Score button. The window must then look like this:
Selection of an audio or MIDI section [Beginner] [Professional] [Notation] [Composition Light] [Composition Pro] [Drums and Percussion] [Guitar] [Choir] [Keyboard] [Soloist]
In the MIDI and audio areas, you can also select an horizontal section. This is done by clicking and dragging. The selection is displayed with a light green background, in the audio area as well as in the MIDI area. The conversion operations as well as the playback and recording of audio, MIDI, transitions, measures and beats, will only be done inside that selection. To cancel the selection, simply click in the area.
When a selection is present, contextual menus are available with a right click:
- In the audio area, Delete content will replace the selected part of the signal with silence. This is useful to remove some noise or accidental note that should not be taken into account for the conversion.
- In the MIDI area, Delete notes will delete all notes inside the selection.
- In the audio and MIDI areas, Remove zone will remove the entire selected section. The section right to the selection will be moved close to the section before the selection.
- In the audio area, Delete transitions will simply delete the transitions which are displayed in the selected zone.
Conversion parameters [Beginner] [Professional] [Notation] [Composition Light] [Composition Pro] [Drums and Percussion] [Guitar] [Choir] [Keyboard] [Soloist]
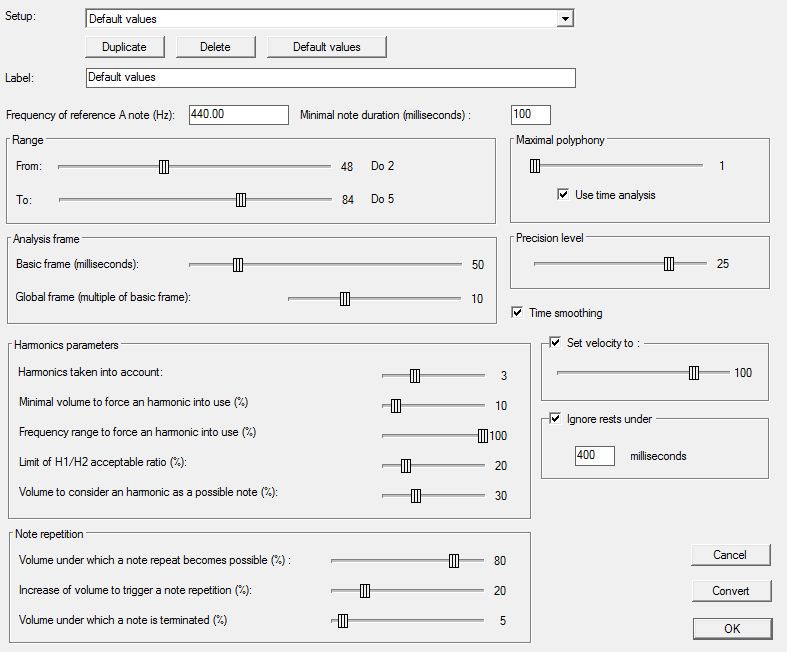
Clicking the Options... button opens the following dialog box:
You will find here the various parameters that define the way an audio/Midi conversion is done. Some parameters may be quite complex to explain and are related to signal processing and to the harmonics of a note. We won't get too technical about it. Here is an explanation of the main parameters.
The upper part of the dialog is used to save different configurations of parameters. At the beginning, only one configuration exists, named Default values. You can duplicate it with the Duplicate button and then rename it. You can create several configurations and go from one to the other easily, at least for users who want to experiment with these parameters. In most cases, the first configuration will work properly. The Delete button deletes the current configuration and the Default values button is used to restore the default values of the parameters in the current configuration. The Label text box is where you can rename the configuration. Configurations are automatically saved when you close the dialog. The current configuration is displayed by the Setup menu and it will be used for the conversions.
- Frequency of reference A note (Hz): you can specify the exact frequency of the A note, which is by default 440 Hz.
- Minimal note duration (milliseconds): by default, the notes shorter than 100 mSec (0.1 second) are ignored, as they are in most cases produced by the transitions of the signal. If you play a slow melody, you can even increase this value to improve the process.
- Range: by default, notes are searched for in three octaves (from C in second space in F clef to C two ledger lines up in G clef). If your melody is contained in a smaller range, you can adjust the limits, which may improve the results.
- Maximal polyphony: by default, the analysis is done for a monodic melody, that is, a melody with only one note at a time. In this case, two methods are possible and may give different results according to the instrument and record quality. When we search for several notes, only the method using spectral analysis may be used (the search is made on possible frequencies found in the signal). This method is consumes much processing power. While searching for only one note at a time, it is also possible to use the time analysis, where the period of the signal is analyzed and the frequency and note are derived. The value of the maximal polyphony is the maximum number of notes played together, that the program will search for.
- Analysis frame: for the spectral analysis, the program starts with a section of 10 x 50 milliseconds (0.5 seconds) and find the frequencies present. Then the analysis is done again for each 50 milliseconds to refine the real position of notes in that time frame. These durations may be changed here for experimentation.
- Time smoothing: this is used to "smooth" the starting points of notes so that they are played more regularly. For instance, if you play continuous eighth or sixteenth notes, the program may not locate their starting points exactly each time, so that the result is played irregularly. This option partly solves this problem.
- Harmonics parameters: these are internal parameters for the program, which influence the way notes are extracted from the set of frequencies found in the signal. As a note has several harmonics at multiples of its frequency, a possible error is that the program detects a note one octave too high or too low, because of the presence of harmonics. Here is a short description of each:
- Harmonics taken into account: the program analyses the notes based on this number of harmonics.
- Minimal volume to force an harmonic into use: below this level, the frequency is ignored.
- Frequency range to force an harmonic into use: by reducing this value, the frequency range is reduced around the note and if outside that range, the frequency is ignored.
- Limit of H1/H2 acceptable ratio: H1 and H2 are the detected levels for harmonics 1 and 2. It may happen that an instrument plays a note which has a level of harmonic 2 greater than harmonic 1 (its fundamental frequency). A value of 20 % means that Pizzicato will take this phenomenon into account up to the situation where the level of harmonic 2 will be less than 5 times the level of harmonic 1.
- Volume to consider an harmonic as a possible note: if this level is reached, the frequency may be analyzed as a main note (harmonic 1).
- Set velocity to: set the velocity of each note to the specified value (between 1 and 127). When this option is disabled, Pizzicato tries to determine the velocity of each note by computing the energy of the note.
- Ignore rests under: a rest that is shorter than this value is ignored, which means that the previous note will be lengthened to fill this rest.
A portion of the analysis work is related to detecting the presence of repeated notes or of the end of a note. The following parameters are used for that:
- Volume under which a note repeat becomes possible: if the level of a note decreases below this level, (compared to its maximal peak in the attack of the note), then a repeat (second attack of the note) may be searched for.
- Increase of volume to trigger a note repetition: if the volume of a note increases by this value, after it dropped below the previous parameter, then the note is repeated.
- Volume under which a note is terminated: if the note volume decreases below this value (compared to its first peak value), the note is terminated.
By clicking on OK, the parameters are saved and the current configuration will be used for the next conversions.
The Convert button also saves the parameters and starts a new conversion.
The Cancel button restores the parameter configurations that were used before opening this dialog box.
Beginner |
Professional |
Notation |
Composition Light |
Composition Pro |
Drums and Percussion |
Guitar |
Choir |
Keyboard |
Soloist |