Professional


Composition Light
Composition Pro
| Instruction manual - Pizzicato 3.6.2 | EN860 - Revision of 2013/05/29 |
Professional |
Composition Light |
Composition Pro |
Composition tools - Harmony and counterpoint
Subjects covered:
- About this program
- Purpose of this composition module
- How to choose a set of rules ?
- Creating a new composition module
- How to use the composition module ?
- The composition module window
- Using the module
- Example 1 - 4 parts harmony with bass line
- Example 2 - 4 parts harmony with a given melody
- Example 3 - Starting from an existing melody and chord progression
- Example 4 - 2 parts counterpoint with a given melody
- Example 5 - 3 parts counterpoint with dissonances and rhythmic transfer
- Example 6 - Checking for errors in an existing score
- Example 7 - Starting from a MIDI file
- What to do if the program finds no solution
About this program [Professional] [Composition Light] [Composition Pro]
Harmony and Counterpoint is a music software built on the Pizzicato music notation range of products.
It is natively included in the following versions of Pizzicato:
- Pizzicato Composition Light
- Pizzicato Composition Pro
- Pizzicato Professional
It can be purchased separately, in which case it includes Pizzicato Light (in fact a little more flexible version than Pizzicato Light).
The Harmony and Counterpoint software can also be used in combination with the following versions of Pizzicato, extending the score limitations and other features available within the program:
- Pizzicato Choir (targeted for choir music with 4 staves, unlimited measures and pages)
- Pizzicato Keyboard (targeted for piano, organ and synthesizer music, up to 4 staves)
- Pizzicato Guitar (up to 4 tablatures and/or staves)
- Pizzicato Beginner (general purpose music notation program, up to 16 staves)
- Pizzicato Notation (up to full orchestral scores)
This lesson is part of the general user's guide of Pizzicato but it is written as a standalone manual so that if you do not know how to use Pizzicato, you can however easily find your way to use the harmony and counterpoint features. For some topics, a reference to the full manual is given so that you know where to learn more about a specific tool used inside the program.
Purpose of this composition module [Professional] [Composition Light] [Composition Pro]
This software module has one main purpose, which is to help you to compose and/or arrange your music. It is not intended to compose for you. It will help you to master the main rules of composition, so as to avoid most of the errors that make a music passage sound wrong.
A composition module contains a set of musical rules that can be associated with a full score or only with a few measures or even a few beats in a score. It may include two or more instruments.
When adding a composition module into a score, an area is created where you can interact to arrange and/or create music in that score.
Each composition module can be considered as a context for music composition. The following composition modules are presently available:
- 4 parts harmony, using only fifth chords
- 4 parts harmony, using fifth and sixth chords
- 4 parts harmony, using fifth, sixth, sixth and fourth chords
- 4 parts harmony, using fifth, sixth, sixth and fourth, dominant seventh chords
- 4 parts harmony, using fifth, sixth, sixth and fourth, dominant seventh and the other seventh chords
- 2 parts counterpoint
- 3 parts counterpoint
- 4 parts counterpoint
When we say "part" or "voice" in this manual, it is not limited to the human voice and it may be any instrument, whether a classical acoustic instrument or an electronic synthesizer. It merely means "one melodic line, a time sequence of single notes".
Harmony is traditionally the art of sequencing various chords to reach the best possible musical effects. Counterpoint is traditionally the art of putting two or more melodies together to reach the best possible musical effects.
Harmony is mainly concerned with vertical analysis of the notes in the chords and counterpoint is more concerned about the horizontal structures of each melody. However, this limit is mainly theoretical as in both cases you will find that both horizontal and vertical rules will apply. It is mainly a question of which viewpoint you favour when you compose.
When you combine several melodies together, they inevitably result in a sequence of chords. Reversely, if you sequence a series of chords, the notes forming the chords inevitably result in creating various melodies. So both aspects are intimately related and not strictly separable in practice.
How to choose a set of rules ? [Professional] [Composition Light] [Composition Pro]
If you follow a hamony or counterpoint course, simply select the set of rules that corresponds to the type of exercise you are working on.
For free music composition, here are some guidelines:
- If you have a melody and/or bass line and need to find the other voice (or even when designing both at the same time), use 2 parts counterpoint, as you are more concerned with two melodic lines here
- If you want to harmonize a melody into a nice progression of chords, use 4 parts harmony
- The choice between the 5 sets of rules for harmony depends on the style of music you want to write.
- The first four harmony sets will sound very classical, but some minimalist electronic music may also take advantage of them.
- For entertainment music, rock and electronic music, choose the fourth and fifth sets of rules.
- The fifth set of harmony rules will introduce more dissonances in the music, and will easily sound more jazzy.
- Using 2, 3 and 4 parts counterpoint will give you more flexibility if you need independent rhythmic patterns for the melodic lines.
- The harmony rules will be more adequate when all parts have similar rhythmic patterns.
In any case, the interactive composition module area is never forcing you on how to compose music. You are controlling the process and you can ask the module to suggest combinations of notes that respect the generally agreed upon rules of music composition. In all possible combinations, you select the ones you prefer and you orient the composition process.
Creating a new composition module [Professional] [Composition Light] [Composition Pro]
The first step is to create a composition module. This section explains how to do it and the following sections will explain how to use it once it has been added to a score.
There are two ways to start working with a composition module. The first one is to start with the Harmony and counterpoint wizard which will help you to create a score with the required specification. The second method is to open any existing score (whether empty or with existing music material) and simply add a composition module in a specific area of that score. Let's take an example of each.
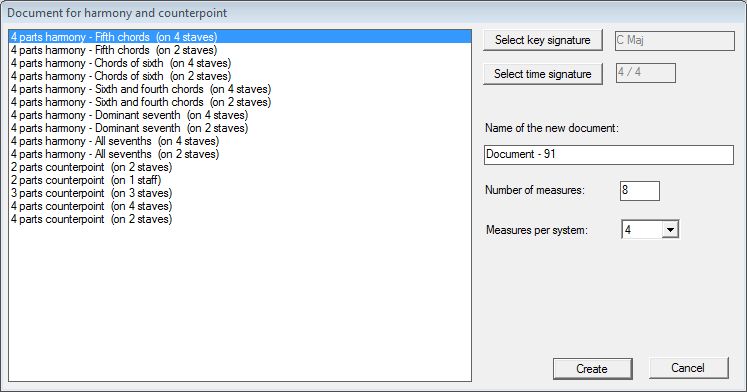
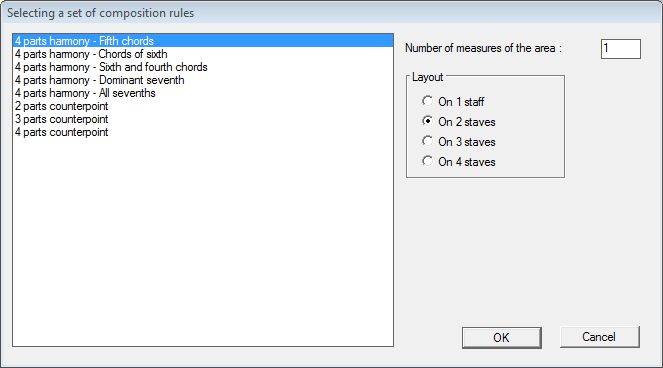
- In the File menu, select Harmony and couterpoint wizard... The following dialog box appears:
- The left part of the dialog lists the existing sets of rules as explained above, but with an additional option specifying how much staves we want to use. For instance, 4 parts harmony can be written either on a system of four staves with one part on each staff, or it can be written on two staves with two parts on each staff. Similar setups are proposed for counterpoint.
The harmony rules are listed by progressively including more types of chords into the music. The labels on the list specify the new chord type introduced by that line. For instance, the label "4 parts harmony - Dominant seventh (on 4 staves)" means it will use the dominant seventh chord, but also all the other chords of the previous lines.
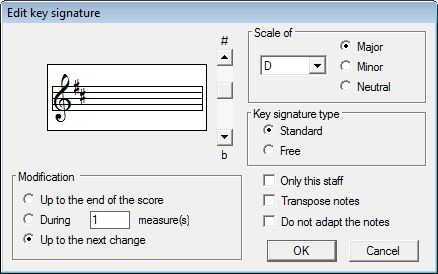
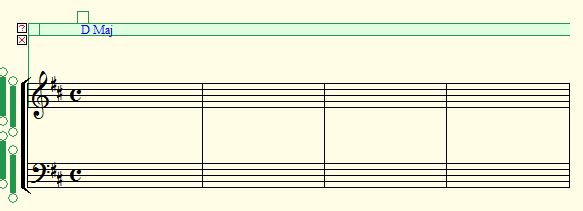
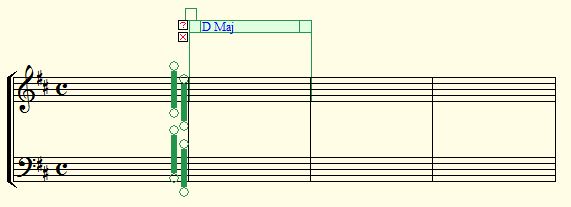
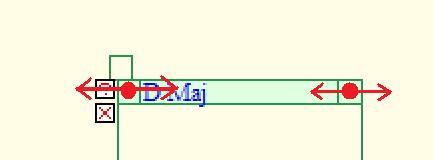
- The Select key signature button lets you select the scale in which you want to work, by specifiying the number of flats or sharps and by selecting the major or minor mode. If you select D Major, you get the following:
This dialog can also be used later in any score, if you need to change the key signature. More information on this tool can be found in the Help menu, Writing scores, Using key signature...
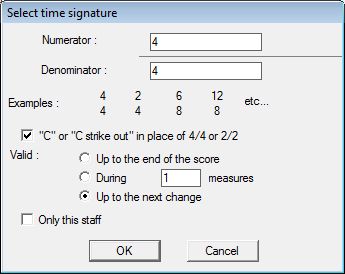
- The Select time signature button lets you choose the time signature by specifiying the numerator and denominator to be used:
This dialog can also be used later in any score, if you need to change the time signature. More information on this tool can be found in the Help menu, Writing scores, Changing the time signature...
- You may give the score a name under which the document will be automatically saved in the "My scores" default folder.
- You can also specify the number of measures of the score as well as how much measures you want per system.
Important note : If you are using the basic version of the Harmony and Counterpoint software, the product of staves by measures is limited to 60, like in Pizzicato Light. This means that a score of 4 staves is limited to 15 measures. A score of 2 staves is limited to 30 measures. In most cases, this is well enough to make exercises or to search for a melody and bass line with chords. Combined with more advanced versions of Pizzicato, this limitation disappears.
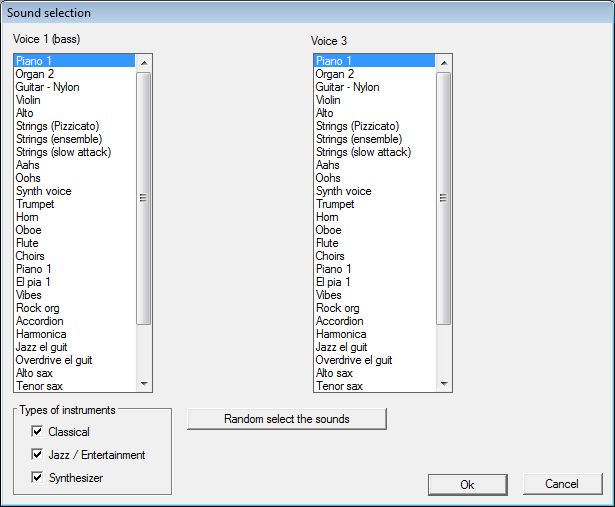
- Select the second choice in the list (4 parts harmony - Fifth chords on 2 staves) and click on Create. The next step is to select the instruments you want to use for playback. The following dialog appears:
In the lower left part of the dialog box you can filter the instruments according to the style of music. As we have decided to work on 2 staves, the dialog only proposes two lists of instruments. The left one will be used by the bass and the part just above the bass. The right one will be used for the two other parts.
This dialog can be called again later to change instruments. There is also a Random select the sounds button. Using it selects one instrument sound for each staff randomly within the selected styles. Use it to test various instrument configurations, once you start building your composition further.
In addition to that, the composition module window will be opened as a floating window. It will be described in details in the following sections.
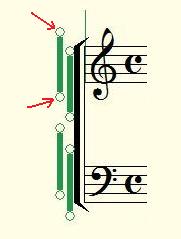
- The upper band (appearing as light green in the software) shows the limits of the composition area. The default area is the full score when you use the wizard.
- At the beginning of the composition area, each staff shows one or two thick green vertical lines with two handles. They show roughly the range of notes acceptable for each part. They can be used to increase or shift the range of the notes the composition module will suggest.
- At the beginning of the area, attached to the upper band, you will find two icons. The upper one (
) is used to open and close the corresponding composition module window. Click on it and the window disappears, as well as the upper band and the range indicators. Only the two icons stay visible, showing there is a composition module associated to that measure :
- By clicking again on the same icon (
- Click the second icon (
) and the composition module is removed from the score. This will only remove the associated composition module. Any note that has been generated by the module will stay in the score. A composition module is useful during the process of music composition, but once the notes are playing as you like, you can simply delete the module.
The other method to create a composition module is to right-click on a measure and select the contextual menu item Composition rules, Add...
- Be sure to remove the above composition module as explained in the last step. Now right-click on the second measure of the first staff and select Composition rules, Add... The following dialog box appears:
- Here you can also select the set of rules you want to use, but it will not influence the structure of the existing score. You can specify how much staves to use for the module (but only as much as there are staves in the score) as well as the number of measures that the composition module will cover. Click OK and the following appears:
- By dragging horizontally the two squares at both sides of the green band, you can adjust the time interval covered by the composition module.
You can also drag it vertically to adjust its position, for instance in the case it would collide with the above system or with chord symbols or for any other graphic reason. To extend the area to the next system, simply drag it vertically down and set it above the target system. The composition module area is extended and the green band is displayed above all the covered measures.
You can have more than one composition module in the same score. However, be careful to avoid that two composition modules overlap each other, as this may cause unexpected behaviour and influences.
By right-clicking inside the measures of a composition module, the Composition rules... menu also offers the Modify... item which will simply open the composition module window in the same way as clicking the (
How to use the composition module ? [Professional] [Composition Light] [Composition Pro]
There are mainly three ways you can use a composition module, only one of them being really creative.
The first way to use it is to enter a full melody (or import it from a MIDI file) and ask the program to do it all alone. Even if the proposed solution may not sound too bad, it will lack aesthetic direction and coherence.
Composition rules are like the syntax of a phrase in English. The computer can check for the syntax but not for the meaning of the phrase. You can have a phrase like "It ate the song from the house inside the ice shirt" with a correct syntax but without sensible meaning. Using the composition module in this way will give you in most cases the impression of a lack of meaning or direction in the music.
In a similar way, you can ask the program to compose one or more measures totally freely, without giving it a first melody. The result will of course be even more lacking in direction. However, by applying some constraints and for short rhythmic patterns, this may give interesting results, as the program can easily generate hundreds of them and you can select one that you like by simply listening to it. One or more solutions may contain some original combinations that you can then refine and develop. In other words, the process itself of using the composition module may stimulate your inspiration.
The second and most creative way to use the composition module is the step by step research of solutions. You can start from an existing melody and/or freely design the melody at the same time as the other parts. You work the music note by note or with small groups of notes.
In this way, the number of solutions for each step is mathematically limited and you can easily listen to each one of them until you feel the music goes in the direction you want. You can then go to the next step and do the same. You can backtrack at any moment and restart or adjust some notes. You do not need to obey the rules. Sometimes the module will propose a solution and by listening to it you will have another idea for a variation. You can simply fix your solution, even if it violates rules. The rules are only there to help you but never to force you against your musical feelings.
A third way to use the composition module is as a support when you follow a harmony or counterpoint course. You can do the assigned exercises given by your teacher directly inside the software, by using the simple note entry tools. You can hear the results as you progress through the exercises, but there are two other major advantages included.
One advantage is that you can ask the program at any time to detect and show you the most common errors like parallel and direct fifths and octaves, exceeding the range of voices, using dissonant intervals or incomplete chords,... The second advantage is that at any moment in your exercise, if you can't find a solution, the program may suggest you the various possible combinations of notes in the step mode, so that you can analyse them and hear how they sound. Sometimes beginners will feel blocked by one situation and using this feature may help them to extend their thinking process by exploring solutions they did not thought about.
In using the composition module with the purpose of learning harmony and counterpoint, you should first follow the directions given by your teacher and of course not ask the program to do your assignements by itself ! For the reasons explained above, the final solution would most probably not be acceptable to your teacher, as it would lack musical direction and meaning. The program is there to help you better feel and forecast all the valid possibilities and sort the ones that will sound the best.
We will now examine the main window that helps you to interact with the composition area.
The composition module window [Professional] [Composition Light] [Composition Pro]
There is one composition window associated to each composition area in the score. The window can be visible or hidden (in which case the composition module is not active).
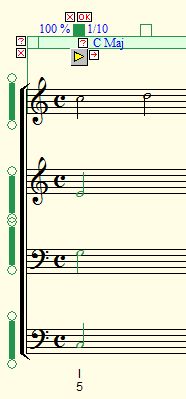
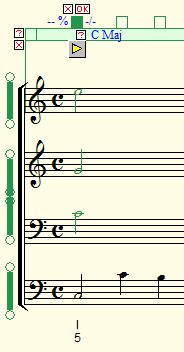
- Go in the File menu and select Harmony and counterpoint wizard... Then validate the two dialogs with the default values. A score with 4 staves is created, which contains a composition module. The composition module window is automatically displayed as follows:
There are 4 main sections of the window that can be reached by clicking one of the 4 blue buttons on top of the window:
Solutions - This is the main part of the window, that is used to adjust various options and to apply the suggested notes or groups of notes.
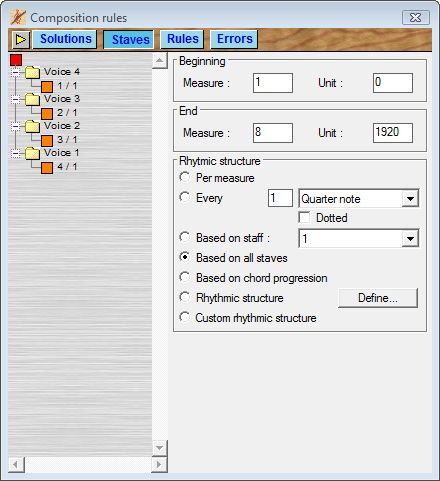
Staves - This section is used to specify the mapping of the parts to each staff in the score. You can also determine the rhythmic structure to be used. Here is how it looks like:
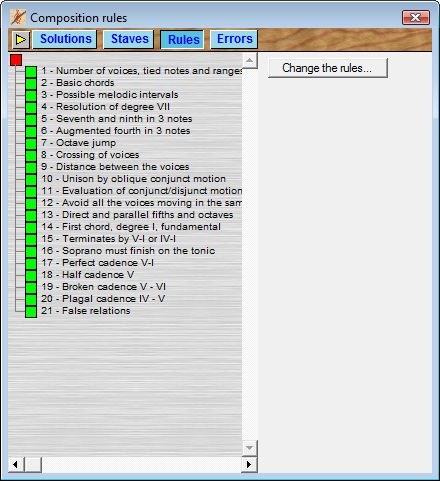
Rules - This is the list of the main rules used for composition. The list depends of the choice you made while selecting a set of rules. However, in each case you may disable one or more of the rules, simply by clicking on one of the small green squares (it then becomes red, meaning that the rule is temporarily disabled).
Errors - Once you have notes in the composition area, you can ask the program to check for errors, against the list of rules.
We will now create a few short application examples and in the next section we will explain these 4 window parts in more details. The first example is to automatically arrange a short phrase.
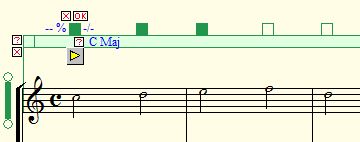
In the first staff of the score, enter the following notes:
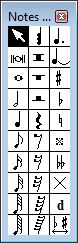
To do that, open the Notes and rests palette in the Tools menu:
To enter a note, select its rhythmic duration on the palette and then click on the staff. You can move the notes up or down. You can easily delete a note by dragging it left or right through the bar line. The same is valid for rests. You can learn more about entering the notes by going in the Help menu and choosing Writing scores... Introduction of notes and rests (1) to (5).
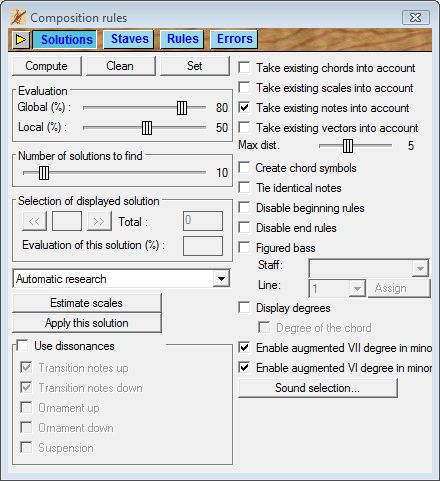
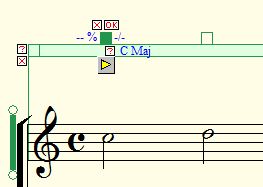
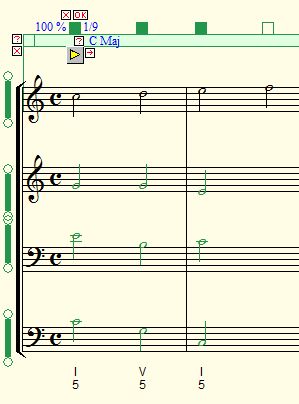
- In the Solution section of the window, enable the two check boxes Figured bass and Display degree. This will force the program to also display the degree and figured bass for the notes that will be added.
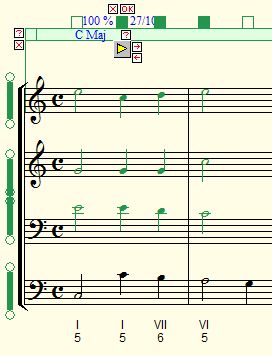
- You can ask the program to propose a solution without further direction from you. This is the method explained above, that may be useful for exploring many possibilities for a short passage. Click on the Compute button. The program will compute and display one of the possible solutions that fits with the given melody, for instance:
Each time when you press that button, you may get a different solution. You will notice that the added notes are displayed in green, which means that they are suggested notes. The original melody is never modified by the program.
At any moment, you can play the music by clicking on the
icon displayed on the upper left part of the composition window. Using it a second time stops the playback. This playback control will start playing at the beginning of the composition area.
If you click on a green note (or if you move it), the note becomes black, which means that the note will no more be changed by further suggestions. If you want to free a note again, right-click on it and select Free the note. It will then become green again and the next suggestion may change that note.
Click on the Clean button. This button will remove any green note from the active composition area and leave the original melody untouched.
Let's see now how you can work step by step, which is in fact the most interesting way to use the composition module to compose your own music, because you give direction to the music at any moment according to your inspiration and feeling of musical aesthetics.
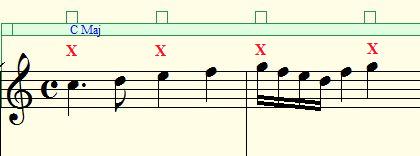
- Above the main green band, you will observe that the program displays empty squares that correspond to each note found in the original melody:
They correspond to the various time slots where the program will analyse the music and suggest the missing notes according to the set of rules present. They can be used to specify a local selection of one or more time slots where the suggested notes will be added, so that the analysis is only applied to that local area inside the whole composition area. This is the step by step mode. Here is how to do it.
- Click inside the first empty square above the C note in the first measure. The square is now filled with green and various icons appear around it:
Each icon is in fact a shortcut to an important button inside the Solutions section of the main window. As they will be used intensively in the step by step mode, they are assembled above the chord so that you can easily access them without the need to move the mouse back and forth between the main window and the selection of the time slots you want to work on.
- Click on the small (
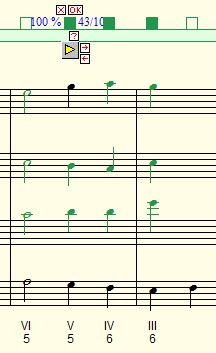
Note that the solution you will see on your screen may not be the same as shown above. The program uses a random number to suggest one of the possible solutions, so that each time you can have another one. However, if there are for instance only 5 possible solutions, the five solutions will always be the same, but they may present themselves in a different order.
As you can see, only the first chord has been suggested. No other notes outside the limited area has been changed. The green square limits the area of the suggested notes. Here is an explanation of the icons found near the green square:
- The (
- The (
) will fix the notes of the limited area. The notes are displayed in black and they will no more be changed by further suggestions.
- 100 % - This is displayed to the left of the green square. It is an evaluation of the current solution displayed. 100 % means that all rules and constraints has been totally satisfied. You will often see less than 100 %, as evaluations are also done according to the quality of the melodic lines (too much disjunct motions deteriorates the evaluation of the solution, even if the solution may still be valid according to the other rules). You can consider this number as a comparative value of the quality of a solution.
- 1 / 10 - This is displayed to the right of the green square. It means that the displayed solution is the first on a set of 10 solutions found.
- Click on the (
) icon. This will display the next solution that was found during the last computing of solutions. The number of the solution will now display 2 / 10. Click a few time on this icon and examine the other proposed solutions.
- You can listen to the current solution by clicking on the (
- Clicking on the (
) displays the previous solution (the icon is not shown when the first solution is displayed).
So after deciding which solution we prefer (by listening to them), we can now click on the second square (above the second note of the melody and then click its (
According to the context, there may be one or more solutions, but sometimes there can be no possible solution. In such a case, you can go back and use another solution for the previous note. Further in this manual, you will find a section that explains what you can do when the program does not find any solution to a given musical situation.
In any case you can always click on the (
In this way you can proceed further and continue through the arrangement of the melody.
When you get into a situation where there is no possible solution and where you must go backwards to change the previous solution, there is an easier way to explore the possible combinations around a small group of notes. Here is how to do it.
- Click on the first square to select it. Then click on the third square while holding down the SHIFT key of the keyboard. This extends the limited area to include the first three notes of the melody:
If you now click on the (
In this case the program found 9 different solutions. You can simply browse through them and play them as explained above, so that you can select the one that gives the best result according to your own musical direction and feelings.
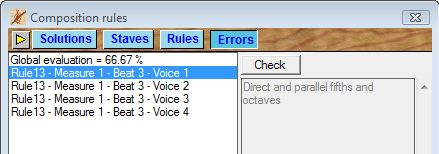
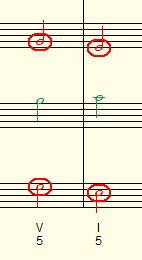
- Click on the Errors button of the main window. Click on the Check button. As the program has generated the solution by using the rules, there are no errors detected in the composition area. Let's move for instance the first bass note of the second measure from C to E just above it. Click now on Check again and then on the first line of errors in the list. The window will display for instance (it may be different, as the above solution may be different) :
When you click on the error line, the score will also show the notes that are related to the error, in this case parallel octaves, with red circles:
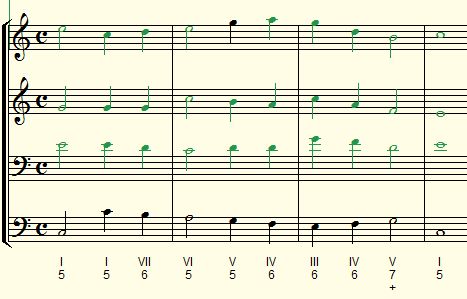
The set of rules used here was the simplest one : only fifth chords in their fundamental position, but it nevertheless gave you an overview of the most important actions involved in the process of interactively compose and arrange your music using this module. We will now explain the various options of the main window.
Using the module [Professional] [Composition Light] [Composition Pro]
This section explains each option of the composition window. Let us start with the Solutions panel of the composition window.
- The Compute button will start an analysis to find the missing notes of a given passage (as selected by the green squares) or of the whole composition area (if no green square is selected). Previous green notes are not taken into account. If one or more solutions are found, then the first solution is displayed in the score. Suggested notes are displayed in green and original black notes are not modified.
You can specify fixed notes anywhere in the parts. For instance, you could write the melody of the first measure and the bass of the second measure and let the program fill the missing notes.
- The Clean button is used to delete all suggested (green) notes that are present in the area (or limited area if green squares are selected).
- The Set button will fix the existing green notes. The notes become normal notes written in black and the composition module will no more change them.
- The Evaluation frame contains two sliders with global and local evaluation minimal values. Most of the time, you should keep the default values. When the program builds the solutions, it computes an evaluation for each chord, each transition as well as other qualities of the chords and the melodic lines. The resulting evaluation is the global evaluation of a solution. If this global evaluation is less than the value of the first slider, the solution is considered too bad to be counted and it is ignored. Even when the global evaluation of the solution is fine, there could be some specific item of the solution (chord, melodic interval,...) that can have a lower evaluation. If any element has a local evaluation lower than the second slider, the program abandons that solution.
By increasing the Global evaluation value, you increase the global quality of the solutions that will be presented. By increasing the Local evaluation value, you prevent the various elements of the solutions to have a lower local quality. You can play with these values for instance when there are too many solutions proposed and you want to filter them. By decreasing the values, the program can find solutions where it could not find any with the default values of these evaluation values.
- The frame entitled Number of solutions to find is set by default to 10. You can increase it up to 100 if you need a large choice of proposed solutions. This is the maximum number of solutions the program will try to find in an integral research (see further for integral or progressive research).
- The next frame is used to browse through the solutions found by the program after the research was completed. It displays the total number of solutions found as well as the number of the solution that is actually displayed on the screen. Two buttons let you display the next or previous solution. The global evaluation of the current solution is also shown.
- The next choice is set by default to Automatic research. The program can in fact use two different methods to search for valid solutions. The first is an integral research, where the program will examine all possible combinations.
With a few chords only, it is quite easy and fast to examine all possible combinations and evaluate the resulting solutions to find the best ones. When the number of notes of a melody increases, the number of possible combinations increases very fast to millions of millions of possible solutions.
In this case, even a fast computer will take more and more time to complete the research and another method, the progressive research method may be used. This method is more similar to the way a human being would process when trying to solve the same problem:
- It starts with the first time slot, list all the possibilities for that time slot and find which is best (highest evaluation)
- It goes to the next time slot and list all the possibilities for that time slot. It then removes the solutions that violates the rules because of the notes present in the previous time slots (for instance if it finds a combination that presents parallel fifths). It keeps the solution that has the best evaluation value.
- If at some point the program finds no possible solution, it goes back to the previous time slot, marks that solution as impossible and take the next best one. It then continues the process until the end of the area.
You will often see this process in action when you ask the program to harmonize more than a few measures at a time. The dialog showing the progress bar will increase and sometimes go back, until it finally reaches 100 %. If there is really a problem in the original melody that is impossible to resolve without disabling a rule, the program may take hours to try all the possible paths. In this case you can click the Cancel button of the progress dialog and the longest valid solution that was found until then will be displayed.
The default value is Automatic research, which means that the program will first evaluate the number of possibilities that must be examined. If there are more than one billion, it will automatically use the progressive method. Otherwise it will use the integral method. Note that in progressive mode, it will only find one solution, even if the "Number of solutions to find" slider is set to more than one. If you want to examine other solutions, you can simply click the Compute button again, as the program uses random generators to order the solutions.
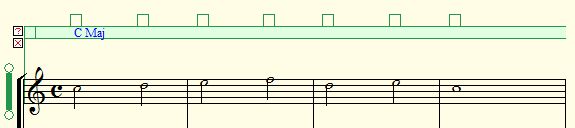
- The Estimate scales button is used to force the program to analyse which scales will fit the key signature and the melody. It will detect most of the modulations that can occur within a melody and display the scales accordingly in the green upper band.
You can also decide yourself which scale must be used at which point of the score. To do this, simply right-click inside an empty green square marking a time slot. A contextual menu lets you change or remove the scale specification at the point in time. However, if you click again the Estimate scales button, all scales will come back to their default values according to the key signature and the notes of the melody.
- The Apply this solution button is simply a way to force the program to display the current solution again. For instance if you have modified the proposed solution and you want to come back to it. It does not analyse the score again but simply display the current solution from the memory.
- The next check box is entitled Use dissonances. This is mainly for use in the counterpoint modules, while using different rhythmic values for different parts. In that case, the program may or may not generate the dissonances shown in the frame:
- Transition notes up or down : in a C Maj chord, this would be [ C, D, E ] where D is the transition note up, a note that is not part of the chord and that is played between two notes of the chord.
- Ornament up or down : in a C Maj chord, this would be [ C, D, C ] where D is the ornament up. The note of the chord escapes to a note that is not in the chord and then comes back to it (up or down).
- Suspension : the note of a chord of the previous measure is hold within a new chord that does not contain that note.
If the program suggests dissonances, they will be displayed in orange.
The second column of controls have the following options.
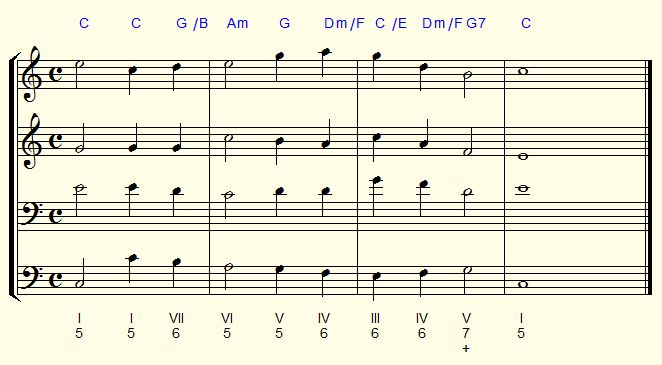
- Take existing chords into account - If you add chord symbols to the score, the composition module may take them to structure the harmony of the composition area. This would be the case for instance if you have a melody together with a chord progression (for instance C, F, Dmin, G7, C) and you want to put this into a nice harmonization. You can use the chord symbol tool of Pizzicato and add the chords symbols on the measures. By checking this box and asking for suggestions, the program take them into account to arrange the different voices.
You can learn how to add chord symbols above the measures in the Help menu, at Writing scores, The chord tool...
- Take existing scales into account - This is only valid with Pizzicato Professional, Pizzicato Composition Pro and Composition Light. These versions have a specific handling of custom scales and may be used to influence the choice of the scales used in the composition area.
- Take existing notes into account - Most of the time you will keep this option active, as it prevents the program from modifying the notes you have entered. If you disable it, all existing notes (in black) will be ignored and the module will suggest notes for all parts.
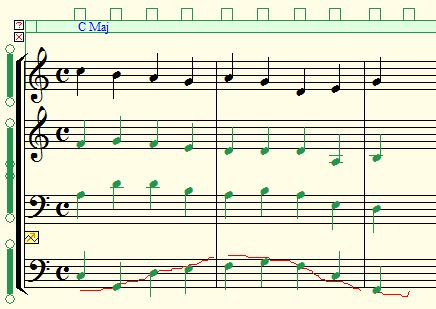
- Take existing vectors into account - This is only valid with Pizzicato Professional and Pizzicato Composition Pro. Music vectors let you draw a curve within the staff, that roughly represents the shape of the melodic line you want to achieve. By enabling this box, the composition module will try to fit the melodic line to the given graphic shape. The associated slider specifies the maximal distance (in half tones) to which the melodic line must follow the graphic shape. By increasing it, you give more freedom to the program. Here is a small example of it:
Graphic musical vectors are further explained in the Help menu, in Intuitive music composition... Composition tools - The graphic vector...
- Create chords symbols - If this check box is enabled, the program will generate the standard chord symbols above the staff, for the area of research (symbols like CMaj, Dm, G7,...).
- Tie identical notes - If checked, the program will tie notes of the same pitches. It may also group rhythmic values like two quarter notes into a half note.
- Disable beginning rules - In any set of rules, there is one or more rules that specify conditions about the first chord to use. For instance, in most cases the first chord must be on the first degree, on its fundamental position. When you use the composition module for a whole exercise that must respect such rules, this is fine. But when you use it to adjust or edit some limited passage of a full composition, these rules may not apply. By checking this box, they will be ignored.
- Disable end rules - The same principle applies for rules concerning the last chord of a composition. If you are using the composition module to edit a passage of a whole composition, check it to disable these end rules.
Beginning and end rules only apply to the start and end of the composition area. When you select a few green squares to suggest notes in a limited area, these rules do not apply to the beginning and end of the limited area (except if the limited area starts at the beginning of the area or stops at the end of it).
- Figured bass - By checking this box, the program will generate the classic figured bass. The resulting text is in fact placed into the lyrics associated to each note. The following popup menus are used to specify on which staff and on which lyrics line the figured bass is added.
- Assign - This button forces the program to assign the figured bass to the selected composition area, for instance in case you did not check the option before or if you entered all notes yourself. Clicking this button will place the figured bass on the notes.
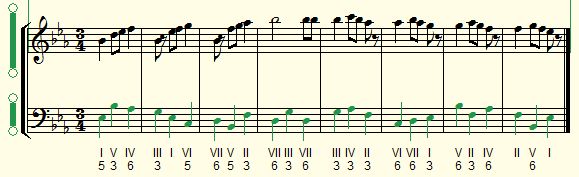
- Display degrees - This option will display the degree of the bass note in the context of the current scale. In C, degree I will be C, degree II will be D,...
- Degree of the chord - If checked, this option will display the degree of the chord used in its fundamental position. For instance, a chord inversion like E, G, C has the E note at the bass, but the real degree on which the chord is based is C, so with this option enabled, it would be numbered degree I.
- The next two options ( Enable augmented VII degree in minor and Enable augmented VI degree in minor ) are used for harmony in the case of a minor scale. The original melody as well as the suggested notes may or may not use these augmented degrees, according to these options.
- Sound selection... - This button calls the sound selection dialog box explained in the beginning of this lesson. It is a quick way to modify the sounds assigned to the parts of the composition module. You may find more advanced options and more sounds by using the Instruments item of the Windows menu. Learn more about this in the Help menu, in Writing scores, The instruments view...
Let us now examine the Staves section of the main window.
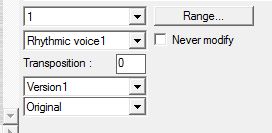
- The left tree of this section is a list of the parts used by the composition module. In harmony, you will find 4 yellow folders and in counterpoint from 2 to 4. The parts (or voices) are numbered from the bass up. The bass always has number 1. In harmony, the soprano voice has number 4, alto has number 3 and tenor has number 2.
Inside each folder, there is by default one assigned staff in the score. If you click for instance on the first square (in the first folder), you will see the following additional options:
Here are the details:
- The first popup menu contains the list of the staves available in the score. If there is no instrument name assigned in front of a staff, the staff is listed with its ordering number (1 here above means it is the first staff of the score).
- The second choice is the rhythmic voice inside the staff. In Pizzicato, there can be up to 8 different rhythmic voices in a staff.
By using 4 parts harmony on 4 staves, only the first rhythmic voice is used in each staff. By using 4 parts harmony on 2 staves, here is how the parts are assigned to the staves and rhythmic voices :
When you need to enter notes in the score with the note tools, you can specify which voice you edit by the small popup menu found in the upper left part of the main tool bar above the score. By default it displays "1-8" which means that the voices will be automatically assigned. You can learn more about rhythmic voices in the Help menu, in Writing scores... Introduction of notes and rests (4).
- The check box Never modify is used to totally secure one of the voices, so that the composition module will never modify any note in that part. It will only take them in consideration while analysing the combinations, but never change it. If the notes are written with the standard notes and rests tools, and if the Take existing notes into account option is checked, there is no need to use this option.
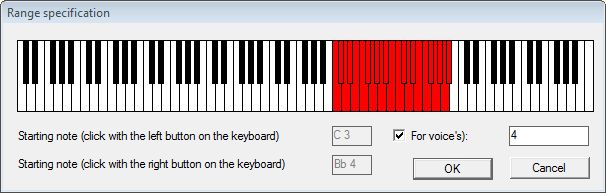
- The Range button is used to specify the exact range of notes in that part. It displays the following dialog box:
You can specify the limits by using the left and right mouse click on the displayed keyboard.
You can also specify the range of notes by moving up or down the handles above and below the thick green bars that appear in front of each part in the score :
These bars roughly show the range of the notes that can be used in the current clef of the part.
- The next 3 items are used with more advanced versions of Pizzicato. The purpose is to be able to edit the 4 parts in a simple form that clearly shows the harmony used, as we have seen here above. Once this structure is stable (or even during its development), you can assign new staves to each part, that will in fact use that part to generate rhythmic patterns. This can be used to assign the four parts to a woodwind section as well as to a string quartet and hear the resulting ensemble as an orchestra. In electronic music, the bass part can be assigned to a dynamic rhythmic bass that will then follow the bass line. Combinations are numerous and they can be used to stimulate the composition process because when you hear the result resembling more to the final effect you want to achieve, it becomes itself more inspiring.
To assign a new staff to one of the parts, simply right-click on the folder of that part (in the above left tree of parts) and select the Add a staff item. You can then specify which staff you want to use in the existing score (the staff must already exist in the score). Right-clicking a staff in the tree will remove it from that part (but not from the score).
By default, the Original choice is selected, meaning that the suggested notes will be applied directly to the related staff. The Rhythmic choice will in fact keep any rhythmic value present in the destination staff but will replace the note pitches by the one from the composition part. In that case, it can also use a transposition value that is added to the original note (so that you can assign one part to multiple instruments in the orchestra).
There are two other modes that will in fact arrange the melody already present in the score, based on the scale or the chords proposed by the suggested notes.
The Version number is by default 1. Pizzicato handles several versions of the music in one measure. You can find more information about this in the Help menu, in Advanced features... Measure versions...
The right part of that window shows the following options:
- You can specify the beginning and end measures of the composition area. It is the same as manually moving the squares at the beginning and end of the upper green band. You can also specify here the exact point inside the measure, with units (480 units is one quarter note).
- The rhythmic structure is quite important to understand. By default it is set to Based on all staves. The rhythmic structure determines the time slots where the program will do the analysis to suggest missing notes.
Each time slot is shown by a green square above it. The program only takes into consideration the notes that begin on a time slot for the analysis. For instance, if you have a melody with the following time slots arrangements, only the notes marked in red will be taken into account and the others will be considered as transition notes:
Here are the various possible ways to structure time in the composition area:
- Per measure - One time slot is defined per measure. It covers the whole measure and only one note will be generated for each part.
- Every ... Rhythmic value - A time slot will be created for each multiple of the given rhythmic value. A check box may be enabled for a dotted rhythmic value (for instance, in 6/8, you can set it to 1 dotted quarter note to have two notes per measure).
- Based on staff ... - Each note present in that staff will determine the beginning of a new time slot.
- Based on all staves - A time slot will be created for each note found in any staff of the score.
- Based on chord progression - If you start the composition by entering a chord progression (with the chord tool mentioned above), one time slot will be associated to each new chord.
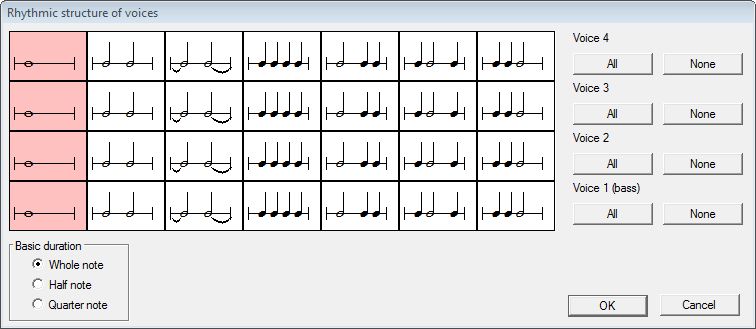
- Rhythmic structure - This option lets you define the rhythmic structure used by each voice. Click on that button and the following dialog appears:
This is mainly used for the exercises in couterpoint. You can determine the species of the counterpoint (whole notes against whole notes, half notes against whole notes,...). For each voice, you can select one or more of the above rhythmic patterns, simply by clicking on them. If there are fixed notes in the score, they will not be modified by the rhythmic patterns.
You can select the basic duration (the whole note by default).
- Custom rhythmic structure - When you select this choice, the existing time slots keep their present values and you can then modify the time structure as you want by the following actions :
- To remove one of the time slots, right-click in its green square above the staff and select Remove this time marker.
- To add a new time slot, right-click in the green band, at the time position you want and select Add a time marker.
Warning : whenever you select another choice in the rhythmic structure frame, all custom editing of the time structure will be lost and the time structure will be set back to the new one you have selected.
The Rules section of the main window contains the list of rules that are present in the composition module:
Some of the rules are expressed as limitations (like direct and parallel fifths and octaves) and some contain items that can be used, like chords. You can disable one specific rule by simply clicking on it. The square becomes red, showing that the rule will be ignored for analysis.
The set of rules used is determined when you create the composition template or add it to an existing score, but you can at any time select another set by clicking in the Change the rules... button.
Notice : In the more advanced versions of Pizzicato (Pizzicato Professional and Pizzicato Composition Pro), you can examine the details of the rules and even modify or add new sets of rules. Doing so is however a more complex process and requires a good knowledge of music and computer logic. The document that contains all the rules is located in the third configuration of the document manager, under Libraries / Music libraries / Basic libraries / Composition. This manual does not detail the structure of the rules but any person with good knowledge of music and computer logic can examine the existing rules and their definitions so as to modify them or create new sets of rules.
The Errors section of the window lets you click on the Check error. The program analyses the composition area against the active rules and make a list of the errors found. By clicking on one error in the list, the corresponding notes are shown in red in the score itself:
When you have finished a composition, you can export it to an audio WAV file, to a MusicXML file (so that you can read it and arrange it in your favorite music software), to a MIDI file or to a PDF file. These options are available in the File, Export... menu.
Now that we have explained every option of the composition module, we will demonstrate their use with a few practical examples.
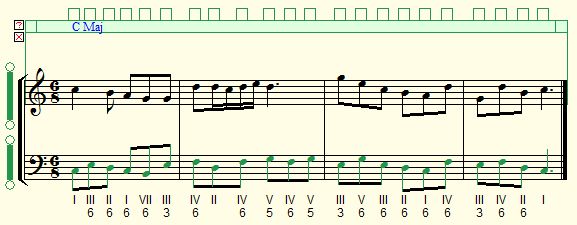
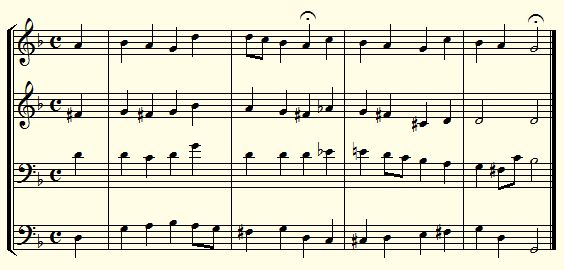
Example 1 - 4 parts harmony with bass line [Professional] [Composition Light] [Composition Pro]
- Open the example number 100. To open an example, click on the second blue button present in the upper left part of the main score window. Expand the Examples folder and go down with the scroll bar to find the example. Click on the small "+" in front of it and then double-click on the name of the score found in it :
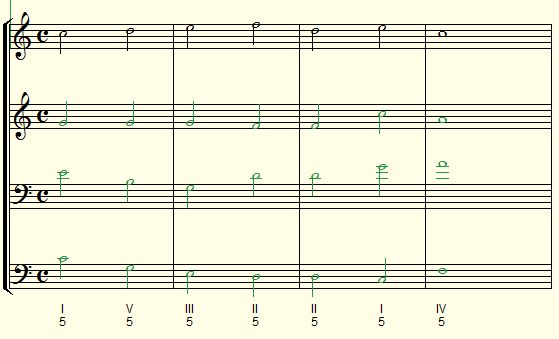
- Example 100 displays 4 measures with a bass line:
Here is how to find a harmony based on it.
- Right-click on the first measure of the upper staff and select Composition rules, Add...
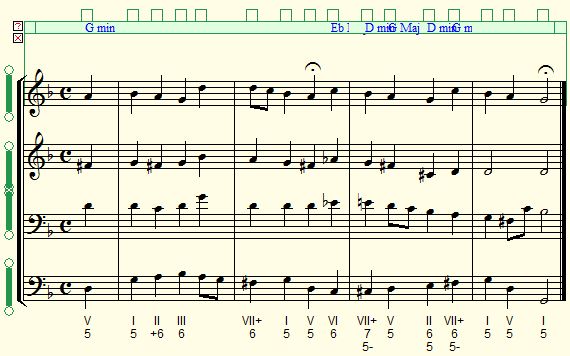
- In the list of composition rules, select the 4 parts harmony - Dominant seventh. Set the number of measures to 4, so that it comprises the whole score. Click OK. The composition area appears as well as the composition window.
- Enable the Figured bass and Display degrees check boxes in the composition window, so that the program will display them when suggesting notes.
- We will first try several chord configurations for the first note. Click on the first empty green square, above the first note :
- Click on the small (
- You will notice that 10 solutions were found. There can be in fact more solutions, but as the default limit is set to 10, you can for instance increase the limit to 100 by setting the slider entitled Number of solutions to find in the composition window. Click again on the (
As it is the first chord of the score and as we are in the key of C Major, the chord is always built on the first degree and the program only changes the way the 3 parts can be arranged on that chord. Check some of the suggested possibilities and select one that sounds good to you for a first entry. Here is one example, but you can choose the one you prefer:
From here on, you can either continue step by step or with a small group of notes.
- For instance, click on the second time slot and then on the fourth time slot while holding down the SHIFT key. The next 3 notes are then covered and by clicking the (
You can of course also directly decide and test notes of the melody. Let's say that by hearing the above solution, you suddenly feel that the next note should be the G note above the staff. Let's try it.
- With the notes and rests palette, select the quarter note and add the note, then select the next 3 green squares and ask the program to find solutions for that section, taking your added note into account. Then browse the solutions and find which one you prefer. Here would be an example:
There may be cases when you select a note that will prevent any solution to be found. In that case, you can also change the bass line if needed (for free composition) and/or reduce the number of rules. See the section entitled What to do if the program finds no solution.
- To finish this example, you can select the last 3 steps and choose your preferred solution. Here is what you could get:
- You can also ask the program to display the standard chord symbols above the system. Click the Create chord symbols check box and then click the Assign button in the composition window. Once you have decided that this solution is the final one, then you can click the Set button and all notes become fixed (displayed in black). You can close the composition window and even delete it with the (
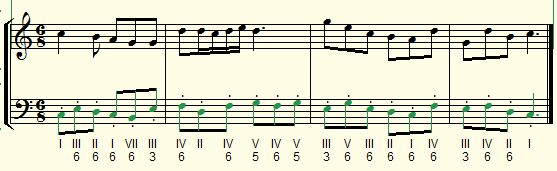
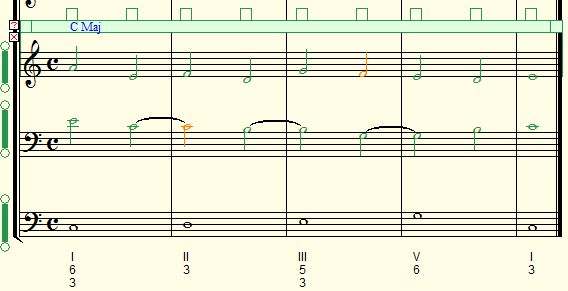
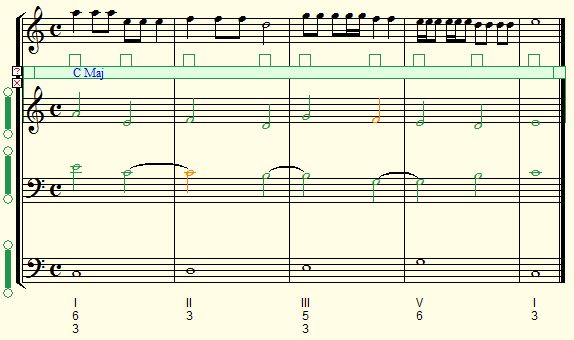
Example 2 - 4 parts harmony with a given melody [Professional] [Composition Light] [Composition Pro]
- Open the example number 101:
- Right-click on the first measure of the upper staff and select Composition rules, Add...
- In the list of composition rules, select the 4 parts harmony - Dominant seventh. Set the number of measures to 4, so that it comprise the whole score. The program has automatically selected that it will happen on 2 staves. Click OK and listen to the example.
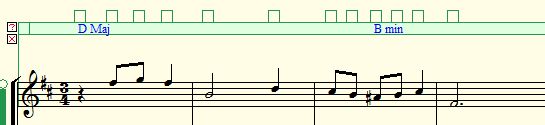
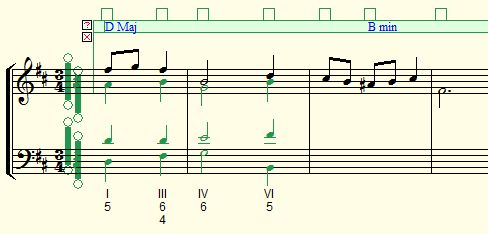
This musical phrase is written in the key of D (with two sharps) and an A# appears in measure 3, which can be seen as the augmented 7th degree of the relative minor scale of B. As you can see it in the green band, the program has detected the scale change (the key signature was forced into D Major and not B minor) :
- As the phrase starts with a rest, we want the first chord on the second beat. Drag the beginning of the composition area slightly to the right until it starts with the first note, like this:
If you do not shift it, the program would suggest nothing for the first rest, but the point is that the beginning rules would then no more be applied to the first chord of the composition and could then start on any degree. You can do it, but you have to know this.
- Enable the Figured bass and Display degrees check boxes and set the Number of solutions to find to the maximum.
As you can feel when you listen to this phrase, it is just the beginning of a phrase. The last note does not finalize the musical idea. For this reason, we will disable the end rules by checking the corresponding box Disable end rules. You can do that whenever you analyse only a part of a phrase. If the phrase is not the beginning of an idea, you can also disable the beginning rules.
The program proposes several time slots to do an analysis. In this phrase, we only want a new chord on the main notes and not on transition notes. We will use the custom time structure.
- In the Staves section of the composition window, select the Custom rhythmic structure. You can now remove the time slots you do not want, by right-clicking the corresponding empty green squares and selecting Remove this time marker, to get the following:
Let's change the sound used for this piece to string ensembles. Click the Sound selection... button in the Solution section of the window, select the Strings (ensemble) for both staves and click OK.
- We can now start harmonizing the beginning of the phrase. By selecting the first three time slots you will see that the program suggests 100 solutions, which means there are probably more (as 100 is the maximum). In this case, to keep a close control of the direction of the music, it better to go step by step, starting with only the first time slot. The program suggests 5 solutions. Select the one you like and continue up to the second mesure. This could result for instance in:
If you go further, you will notice that the program will find no solution that satisfies the next measure. There are several ways to handle this situation and they are explained in the section entitled What to do if the program finds no solution.
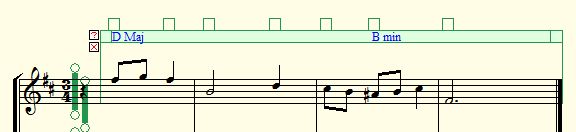
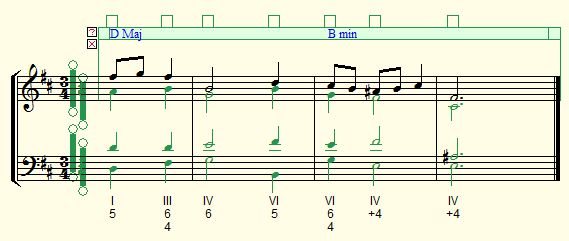
- As there is a change of scale right in the middle of the measure because of the A#, we can try to force the new scale to start earlier than on the second beat. To do that, right-click in the time slot of the first beat and select Change the scale... Minor scale ... B min.
You can then easily continue the arrangement and find a solution you like. One example would be:
As this example shows, you can use the composition module to find a harmony for a part of any phrase. This may be useful if you have composed a melody with some chords, but you want to explore other possibilities. The above melody would obviously require a second part as it leaves the listener in suspension.
- There is one very practical tool of Pizzicato that you can use while composing and searching for chords sequences. The Music-Touch tool is located in the main palette (Tools menu) :
When this tool is selected on the palette, you can click anywhere on the score and the program will play all the instruments at this location. By holding the mouse button down and moving horizontally, you can hear carefully the chord transitions, go backward and forward and even sequence chords that are not consecutive, simply to test them. By holding the CTRL key, you can click on a chord and it will be hold until you click elsewhere on another chord. It is like a magnifying glass but for music.
There is also a shortcut to use this tool without selecting it : click in the score while holding down both SHIFT and CTRL keys of the computer keyboard.
Example 3 - Starting from an existing melody and chord progression [Professional] [Composition Light] [Composition Pro]
In this example, we will examine a different situation. Here you have an existing melody as well as the chords progression. This is for instance the case when you want to custom arrange an existing song.
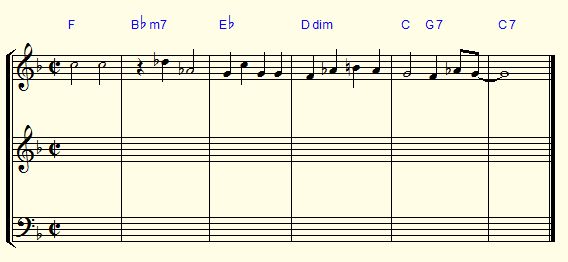
- Open the example number 102. This is a small excerpt of Michelle (The Beatles):
In such chord progressions, you will often find more modulations and chord variations than in scolar harmony. If you keep the standard parameters, the program may find no solution that satisfies the rules. We will see how to handle this situation.
As the melody and the chords are fixed, we do not want the program to modify them. We will use the two empty staves to create a string arrangement that will play the chords.
- Right-click the first measure of the second staff and select Composition rules, Add... Select 4 parts harmony - All sevenths and specify 6 measures for the composition area, with a layout of 2 staves.
You need to use a set of rules that contains all the chords present, otherwise the program will not find solutions for all chords. The above set of rules contains all major and minor chords, as well as the 5 types of seventh chords. If your melody uses other chords like 9th, you should simplify them for this type of harmonization, as this program presently only handles the sevenths chords.
This time, the green band appears below the first staff. You can adjust its vertical position by dragging one of the squares present at both sides of the band, so that it does not hide a part of the melody.
- The melody is not part of the composition area and we will only take the chord symbols into account. Check the box entitled Take existing chords into account and disable the box entitled Take existing notes into account.
- As it is only the beginning of a song written in F major, check the box entitled Disable end rules. As you can see, the last chord is not on the first degree (which would be F) and by keeping this end rule, the program could never assign an F Maj chord at the end.
- If you need to see the details of the chords suggested, check the Figured bass and Display degrees boxes.
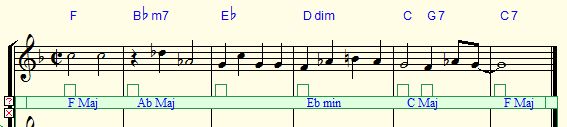
- In the Staves section of the composition window, select the rhythmic structure to be Based on chord progression. We need one chord position suggestion for each original chord. You will see that there is now one time slot for each original chord.
- The chords progression has several modulations. Click on the Estimate scales button, in the Solutions section of the window. The score displays the proposed scales in the green band:
The scales are proposed so that all the notes of the original chords will correspond. There may be other possible configurations and you can modify them by right-clicking on the time slots and modify or delete a scale.
This would also be the case if we were using a modulating melody inside the composition area. The program would try to find the best scales that contain the notes of the melody.
This is an important step to remember, as if you do not adjust the scales, the program may never find solutions for the time slots where the scale is not adjusted to the notes or chords.
- You may try to click on Compute or to work step by step, but you will notice that the program will not find any solution except for the first time slot.
This is because this type of chords progression goes outside the standard range of classical harmony and for this type of music, some rules are too restrictive. In this case, there are many abrupt and non prepared (in the classical harmony meaning) modulations that will generate several kind of errors and chromatic passages that are not allowed in classical harmony. We need to disable some of the classical rules that are likely to cause problem.
- In the Rules section of the window, disable the rules number 6, 27, 28, 30 and 31:
- If you now ask the program to suggest solutions, it will work. You can do it step by step or in one time. As the chords are already precisely defined, there is less interest to work the arrangement step by step than when you compose a new song. However, you may do it for instance to control the way the voices are lead (the general aspect of the chords : open or tied, the range of pitches used,...).
- When you ask for one complete solution at once, the program will most probably work in progressive mode and it will propose you only one solution. You can force it to propose 100 solutions by setting the slider Number of solutions to find to 100 and by setting the research method to Integral research in the menu that displays by default Automatic research. It may take more time, but the program will then propose 100 different solutions and you can browse through them in the frame entitled Selection of displayed solution.
There can be hundreds of variations and one of them is for instance:
You can also influence the range of the arrangement, simply by adjusting the vertical thick green bars found to the left of the composition area. There is one bar for each voice of the arrangement.
Example 4 - 2 parts counterpoint with a given melody [Professional] [Composition Light] [Composition Pro]
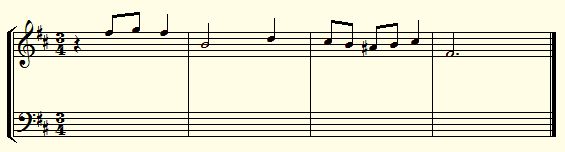
- Open the example number 103. It shows a simple melody with a 6/8 time signature:
In this example, we will first add a bass line playing with eighth notes.
- Right-click the first measure of the first staff and select Composition rules, Add... Choose the 2 parts counterpoint with 4 measures, on two staves and click OK.
- Enable the Figured bass and Display degree check boxes. If you click on Compute you will notice that the program will find no solution, showing only rests in the second staff. One of the first thing to do in such a case is to check if the original melody has itself some errors according to the rules we are using.
- In the Errors panel, click the Check button. Click on the first error line and the program tells you that there is one note that is not in the range of the voice. Original ranges come from the range of the 4 voices in a choir. These are not absolute rules and they depend on the instruments being used. Here we are using the flute and the bassoon, so we can modify the range to fit the melody. Extend the upper limit of the range by dragging the top handle of the thick green bar visible in front of the first measure, so that it reaches over the faulty note. Click the Check button again and the error will disappear.
- Trying again to Compute still gives no solution. If you look at the range of both instruments, they are quite far away from each other, which means that most combination of two notes will easily goes beyond one octave. There is a rule in the counterpoint that prevents more than one octave between consecutive voices. In this kind of arrangement, it does not matter, as we are building a bass line against a melodic line and the distance between them may be arbitrary. In the Rules section, disable the Distance between the voices check box. Now try again the Compute button and there will be solutions, for instance like this:
You can also work it step by step, which would be more creative, as you can influence the way the bass is playing all over the melody.
By default, the rhythmic structure is exactly the same as the original melody, but the music would be more interesting if the second voice has a different time structure. Let's say we would like only eighth notes at the bass, so that the bass line would give the feeling of a regular flow against a changing melody.
- In the Staves section, Rhythmic structure, select the Every 1 Eighth note choice. This divides all measures into 6 time slots. Then click on the Custom rhythmic structure and delete the last two time slots (we want the bass line to finish at the same time as the main melody). You can do this simply by right-clicking a time slot and selecting Remove this time marker. The time slots are now displayed as follows:
If you ask the program to suggest new solutions, you will get a continuous bass line using eighth notes except for the second part of the last measure.
If you listen to it, you may notice that the bass line for that instrument may be too low in pitch. You can adjust the range of the bass so that it occupies a higher range and you can get a solution like this:
- As an additional step, let's place staccato marks over the bassoon staff. Click on the selection tool in the main palette
and click in front of the second staff. The staff is selected. Go in Edit, Apply symbols..., select the first symbol (staccato) and click OK:
Once the composition is finished, remember that you can click on the Set button to fix all green notes. You can also remove the composition module and only the result of your work is left in the score.
Please note that this type of exercise can be done while interactively composing the melody, so that both melody and bass line progress according to what you feel.
Example 5 - 3 parts counterpoint with dissonances and rhythmic transfer [Professional] [Composition Light] [Composition Pro]
- Open the example number 104, that contains a short and simple bass line:
We will first add two voices with different time structures. This is one example on how to use the various species of counterpoint.
- Add a composition area starting on the first measure of the second staff and choose the 3 parts counterpoint on 3 staves for 5 measures.
- Adjust the vertical position of the green band so that it does not collide with the existing staff. Check the Figured bass and the Display degree check boxes.
- In the Staves section, select the Rhythmic structure choice and click the Define... button. For the upper voice, select two half notes and for the middle voice select half notes in syncopation (to select or unselect one rhythmic pattern, simply click on it):
- Click on OK. As this type of counterpoint can accept dissonances, you can enable dissonances by checking the Use dissonances box in the Solutions section of the window. The first two types are selected by default, but you can here also check the last one, Suspension which means that the program is able to use a syncopation (for the middle voice, as show above) that becomes dissonant in the next measure.
- You can now click the Compute button to see an example of arrangement. In practise, it is better to use the step by step method, to have a better control on the direction of the music. Here is an example:
Notice that the use of dissonances is shown by drawing the notes in orange.
You can influence the general solution by adjusting or moving the ranges of the two voices.
As the program displays the figured bass and degree by using the lyrics tool of Pizzicato, it will always add them on the time slots where a note starts (here on the first beat of each measure). If you want to have them on all time slots, select another staff for the placement of the figured bass. In this case the first staff would show it for each time slot.
If you compose for a group or for a whole orchestra, each part coming from the composition module may in fact be automatically assigned to one or more other instruments. We will use a simple example with the first empty staff of this example and we will use the rhythmic transfer mode with a transposition of one octave up.
- With the note entry tool, enter the following rhythmic line (or design you own), with no care about the note pitches (as they will be arranged in the next step):
- In the Staves section, click on the Voice 3 folder with the right mouse button and select Add a staff. Click on the new staff item that appears in it ("1/1"). In the lower part of the window, change the Original choice to Rhythmic and set the transposition value to 12 (in semitones, so one octave up). The Rhythmic choice means that the program will use the rhythmic values that exist in the given staff (the ones you entered here above) and will change the pitches of the notes according to the results of the composition module.
- Now click on the Apply this solution button (to use the last solution that was computed) or simply use the Compute button for a new solution. For the above example, it would be:
The idea is that the main parts can then be assigned to various groups of instruments. You can even do this before starting to compose or arrange, so that you can directly hear the combination resulting from the rhythymic transfer to the other instruments.
To introduce new rhythmic values and rhythmic variations, you can also use the rhythmic variations dialog box, as explained in the Help menu, in Intuitive music composition, Composition tools - Rhythmic variations.
Example 6 - Checking for errors in an existing score [Professional] [Composition Light] [Composition Pro]
You can use the program to correct existing exercises, from a MIDI file or by simply entering the notes with the note tools, as you yourself work on a harmony or counterpoint exercise. Let's open an existing score and check for any error according to the rules.
- Open the example number 105, that contains a short excerpt from a chorale from Bach:
- Add a composition module on the first measure of the first staff, selecting 4 parts harmony - All sevenths, on 4 staves and 5 measures.
- As we want to avoid the transition notes (the second eighth notes in the score), first select Every quarter note for the rhythmic structure and then click on Custom rhythmic structure and remove the last time slot. Enable the Figured bass and Display degree check boxes.
- Click on the Assign button in the Solutions panel, so that the program will display the figured bass as follows:
- You can now display the Errors panel and click on the Check button. The program will find several "faults". As this composition comes from one of the big masters of music, this may seem strange and requires a few comments here.
First of all, this program only implements a simplified set of the main rules of harmony. There are several special cases and exceptions to these rules and even then, they vary amongst different treaties on harmony.
But most importantly, harmony comes from the observation of the masters of the past. General rules and more specific cases have been deduced from the music already composed. That does not mean that each master piece of the past could have been written from that set of rules. They can serve as guiding rules and should never prevent nice music to be written. If you prepare an examination in harmony, you better learn the rules and be able to apply them. This program will help you in this way. But if you simply want to compose freely, then use the rules as a guide and never as a master.
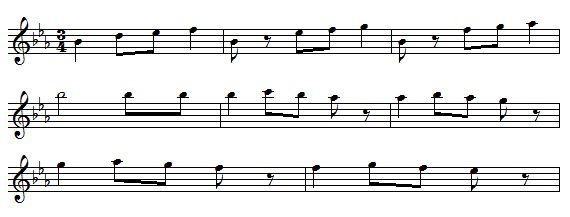
Example 7 - Starting from a MIDI file [Professional] [Composition Light] [Composition Pro]
As a last example, we will show how to import a melody from a MIDI file and to add counterpoint on it.
- Go in File, Import MIDI file... and select the file entitled Ex106.mid in the DataEN / Examples folder. Click the Import button in the next dialog box and you get:
It is a melody extracted from Chopin. We will copy the content and use it in a 2 parts counterpoint score.
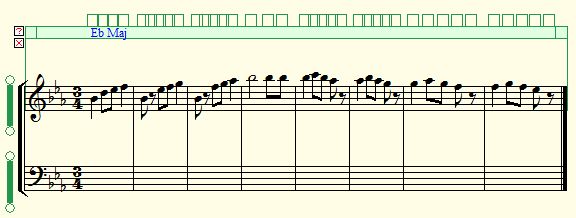
- In the File menu, select the Harmony and counterpoint wizard... Select the 2 parts counterpoint (on 2 staves). For the key signature, select 3 flats (Eb Maj) and for the time signature, 3/4. Set 8 measures per system in the popup menu and click on Create. Select the piano instrument for both staves.
- Go to Edit, Select all, then Edit, Paste. The measures are copied into the score and you get:
- In the Staves section, select the choice Every quarter note in the Rhythmic structure. This will give us three notes per measure, as a regular beat. Check the Figured bass and Display degree boxes.
- If you check for errors, you will see that the melody has several notes outside the range and measure 3 does not respect rule number 11. Disable the rule 11 as well as rule 4, as the distance between the two voices may be greater than one octave. Extend the range of the melody in its upper part by moving the top handle of the thick vertical green bar.
- You can now click on Compute to see a first solution. Try to adjust the range of the bass so that it has less space. This will force the bass line into a smaller range with less motion. Here is one possible solution:
As you may expect, the harmony is not the one that Chopin used. Using the Compute button for a one shot suggestion is of course leaving the direction of the music to chance. Using the step by step method or measure by measure would let you give more direction to the resulting music.
What to do if the program finds no solution [Professional] [Composition Light] [Composition Pro]
As we have shown in the above examples, there will be many cases when the program will not find any solution to your request. This always means that there are too many constraints used and here is a list of things to check and correct so that the program can find solutions.
- First of all, check if the notes present in the score (the original melody, the bass line or any note that you entered yourself) are not in conflict with one of the active rules. Go in the Errors panel and check. If notes are outside the range, simply extend the range of that voice to include all notes. If a specific rule shows an error and you want to keep your melody, then simply disable that rule.
- If the composition area does not cover a whole musical phrase, it often happens that the part of the phrase covered will not start or end on the first degree of the scale, which will result in an error. This may even be true for a whole musical phrase. In that case, disable one or both of the two check boxes entitled Disable beginning rules and Disable end rules.
- Be sure that the scales displayed in the green band correspond to the existing notes and chords. Click the Estimate scales and/or change the scales. In most cases, the program should find valid scales, but you may sometimes find more logical scales that will provide more possible solutions. If the music is written in minor, be sure to enable the augmented VII and/or VI if such notes are present in the existing music.
- To extend possible solutions, you can disable the rule entitled Distance between the voices. By default, the interval between two consecutive voices is no greater than the octave (except for the bass in four parts harmony). This may sometimes prevent any solution from being found, specifically in free composition.
- In the same order of idea, you can increase the range of the voices. It will help the program to find more possible combinations that may satisfy the rules.
- When using the program outside the frame of an harmony or counterpoint exercise, you may disable some of the rules regarding the melodic intervals.
- In the Solutions panel, you can decrease the global and local minimal evaluations required.
- When using chord progressions with much scale modulations and seventh chords (the set of rules with all sevenths), you can disable one or more of the following rule numbers : 6 // 27-28 // 30-31 // 7-8-9
- By using the step by step mode for a given note, you can click the Compute button while holding down the CTRL key of the computer. This will force the program to suggest all possible solutions for that time slot, not taking into account what is before or after that chord. This may help you to explore the area where the program cannot find any solution, so that you can locate the reason why no solutions were found. By checking for errors you can then see what is possibly the cause and find which rule to disable.
- As a last resort, you can also disable most of the rules. But never disable rule number one. The use of chords is also present in the rules, like for instance Fifth chords. If you disable that rule, then the program can no more use fifth chords. By disabling everything except rule 1, then no solutions are possible anyway, as there are no more chords to use. If everything else fails, then there may be indeed no solution to your request...!
Professional |
Composition Light |
Composition Pro |