Professional


Composition Pro
| Instruction manual - Pizzicato 3.6.2 | EN855 - Revision of 2013/05/29 |
Professional |
Composition Pro |
Composition tools - The graphic vectors
Subjects covered:
Drawing a melodic curve [Professional] [Composition Pro]
In a previous lesson, we explained the music vector. Even if the music vector is quite powerful to represent a melody, it may seem too complex or esoteric to the musician, as its description speaks a language that is more mathematical than an intuitive musical language. With Pizzicato version 3.4, six intuitive tools help you to manipulate the music vectors in a much more natural way for a musician. You will find here the description of these new tools, as practical examples.
With this tool, you can draw a melodic shape on the staff and Pizzicato will find the notes that fit the chords already present.
- Open the Ex88.piz file in the DataEN / Examples directory. The score already contains a series of chords. This is an example, as you may change or define your own chords with the chord tools of Pizzicato. Select the
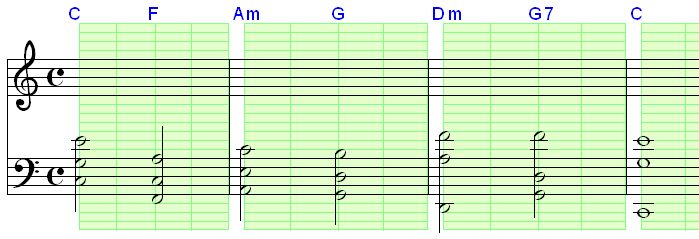
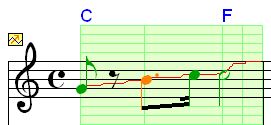
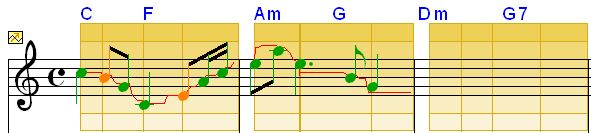
tool in the Composition palette. The score now presents itself like this:
The green grid array is use as a reference mark. Vertical lines show the beat position in the measure and extended horizontal lines show where the ledger lines are outside the staff. They help you to orient the drawing of the melody.
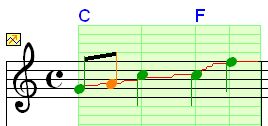
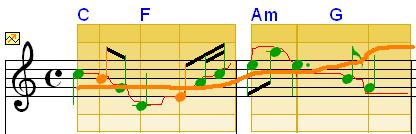
- You will now draw a melody that goes from the first beat of the first measure and covers the four measures. Click at the beginning of the first vertical green line, in the first staff and hold down the mouse button. Then move the mouse slowly through the 4 measures. A red line shows you the melodic curve. You may go up and down freely. Just before releasing the mouse button, you may have something like this:
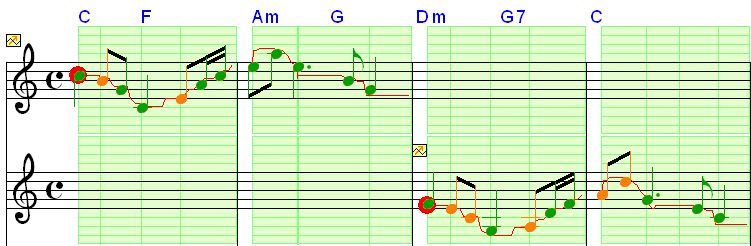
- You can now release the mouse button. Pizzicato displays something like this:
What happened really? Pizzicato analysed the melodic curve according to its position inside the staff as well as to the chords present at each point of the curve. The closest note of the chord was selected in each case.
You will notice that the melodic line is automatically broken into quarter notes. This is beacuse no rhythmic pattern existed before you draw the melodic curve. If you enter a rhythmic pattern in the first staff before drawing the curve (the note pitch of the pattern does not matter, you may use all the same notes), the melodic curve would have been designed on that same rhythm. For instance, if the following rhythm was entered:
The melodic curve would then become something like this (the exact notes depends on the precise movements of the mouse during the drawing of the curve, so even if you try to approximate the same shape, you may not get exactly the same result):
In each case, you will notice that the staff also displays your original curve as a thin red line. You also see right at the beginning of the first measure, the icon of a music vector, as explained in a previous lesson. If you double-click that icon, you can edit the vector in a more mathematical way and you should then refer to the lesson on music vectors for more details. But this is not necessary at all, as the 6 tools described in the present lesson will let you handle these vectors much more intuitively.
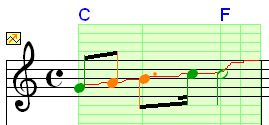
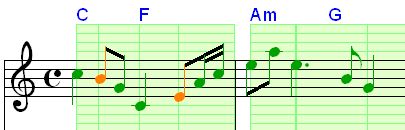
- At any moment, you can redraw a part of the curve, to reshape the melody. The rhythmic form will stay the same. For instance, try to reshape the second measure, just by clicking at the beginning, drawing the shape you want up to the end of the measure and then releasing the mouse.You may start anywhere inside the existing curve and draw a small part or the entire melody again. To start drawing, you should not click on a note head, because this will be interpreted by Pizzicato as if you want to move the note itself. Pizzicato will move the notes accordingly. You may for instance change the melody to have:
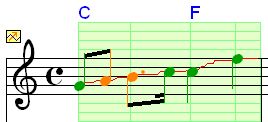
If you analyse the notes generated by Pizzicato, you will notice that some notes are not part of the chord. Click the
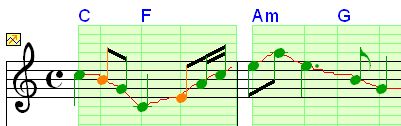
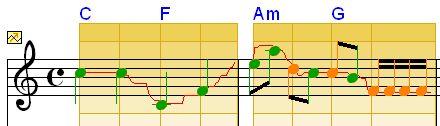
tool to display the note colors. The above melody will display like this:
Green notes are part of the chords and orange notes are part of a scale that Pizzicato automatically assigned to that chord as the more probable scale. Red notes are chromatic notes, not part of the scale and chord.
When you draw a melodic curve on the staff, Pizzicato tries to find the closest note to the chord if the rhythmic duration of that note is longer than a dotted 8th note. If the duration is less than that but longer than a dotted 16th note, Pizzicato will select a note from the scale (this note may also be part of the chord). For a shorter duration, Pizzicato selects the closest chromatic note, whether or not part of the scale or chord. In that case, the note is displayed in red.
This is the default behaviour, but you can modify this by using the SHIFT and/or CONTROL keys while drawing the melodic curve. Here are the possible combinations.
- CONTROL key: if you keep this key down while drawing any section of the melodic curve, Pizzicato will only use notes from the chords.
- SHIFT key: if you keep this key down while drawing any section of the melodic curve, Pizzicato will limit the notes to the scale (some of which may of course be also part of the chord).
- CONTROL+SHIFT keys: if you keep these two keys down while drawing any section of the melodic curve, Pizzicato will take any closest note to the melodic line.
While drawing the melodic curve, you may use these key combinations. Temporarily, Pizzicato draws the curve in green/orange/yellow to show what mode you are in (chord/scale/any note). These combinations are important to give shape to the melody. You can also use these combinations when you correct the existing curve.
When you draw one melodic curve, the duration and shape of that curve are represented by the vector icon. This means that this vector is still able to generate this melodic curve, on the existing chords or on any other chords if you change them. Whenever you ask Pizzicato to compute all vectors of the score (shortcut CTRL + R or on Mac: Apple key + R), any change in chords and scales may modify the existing melodic lines.
- Try to change one or two chords of this progression (double-clic a chord symbol, with the arrow tool selected), then use the Edit, Update smart links and you will see the melodic curve modified.
As a vector is a note generator, when you move the notes attached to a vector, the vector is in fact not modified. So when you recompute the vectors, all vector notes will be again computed and the custom changes will be deleted.
- At any time you can remove a vector, by pointing its icon with the mouse and by using the delete key (or backspace key). The vector as well as its notes are removed from the staff.
- Once you have designed a melodic line and if you do want to keep it exactly the same in the future, you may remove the vector and keep the notes. To do that, point the vector icon, hold down the SHIFT key and use the delete key (or backspace key). The vector disappear but the notes are not removed. They are now normal notes and will never be changed automatically by Pizzicato.
- You can have many vectors in the same staff or on any staff. They may even superimpose themselves. The only restriction is that to create a new vector, you must start outside an existing one, otherwise Pizzicato consider that you want to correct or lengthen the existing one.
Please note that this is NOT a contrapuntal tool, as Pizzicato only selects the notes from the existing curve and the chord/scale present at that time. It does not take into account any rule of counterpoint. This can help you to design a melodic shape, but YOU are the composer !
Assigning a rhythmic structure [Professional] [Composition Pro]
The rhythmic vector tool
is used to adjust the rhythmic pattern of an existing vector.
- Open the Ex089.piz document, in the DataEN / Examples directory. Select the
The first way to use this tool is to split an existing note into two notes.
- Click the mouse exactly between the first two vertical green lines of measure one, so that the first beat is cut into two. This is a simple click, you may immediately release the mouse. You can click anywhere vertically, inside, above or below the staff as long as you avoid clicking on any note head. This cuts the first quarter note into two 8th notes:
The precision level is by default half of the duration of one beat, so here it means an 8th note precision. If you hold down the CTRL key, you can increase this precision up to a 16th note.
The idea of cutting a note into two notes is that you must click between the horizontal position of that note and the horizontal position of the next note. The resulting note durations will be proportional to the position where you click and whether or not you hold down the CTRL key.
- For instance, hold down the CTRL key and click to 3/4 of the length of the first C quarter note in measure 1. You should have:
Another way of using this tool is to group two or more existing notes into one note. To do that, you must click on the vertical line of the first note you want to group, hold down the mouse button, drag the mouse to the right up to the end of the duration of the last note you want to group, then release the mouse button.
- Click at the beginning of the above C quarter note, hold down the mouse button and drag the mouse so as to cover the duration of that note as well as the duration of the next note, then release the mouse button. You should now have:
You may use this method even accross measure boundaries. The notes will be tied together. Each time the notes of the vector are computed again, so as to match as closest as possible to the original melodic shape. You will notice that the reference point of the note pitch is the starting point of the note. So if you make a note tied over three different chords, only the first chord will be taken into account to decide which note pitch must be choosen.
You can also use this tool to add a note duration at some point of the melodic shape where a rest exists.
The last way to use this tool is to create rests in the melodic shape. You must click, hold down the SHIFT key, drag the mouse over the expected duration of the rest, then release the mouse button. A rest will be placed to cover that duration.
- To change the second 8th note (A) to a rest, hold down the SHIFT key, click at the beginning of that note, drag to the right, up to the end of that 8th note, then release. You should have:
Here also, you can cover more than one note and that area will be filled with rests.
Moving and transposing a melodic line [Professional] [Composition Pro]
The next tool is used to transpose, move or duplicate a melodic curve associated to a music vector.
- Open the Ex090.piz document from the DataEN / Examples directory. Select the
tool on the Composition palette. The following score appears:
This is an existing melodic curve. You can see a big red spot on the first note of the melody. You can move this spot to another location. Moving it horizontally will just shift the melody to another time position. This may be in the same measure, another measure or even another staff. If you move it vertically, you will transpose the melody and Pizzicato will reshape it to the target note. So in fact this is not exactly transposition. The curve will be transposed exactly, but the closest notes to the curve will be computed by Pizzicato according to the chord, scale and mode of the melodic curve. The resulting melody will keep the general shape, but may have different intervals.
- Click the red spot, move it to the middle of measure 2, to a pitch that is a bit higher. The score becomes for instance:
- If you hold down the CTRL key while dragging the melody, it will be duplicated, so that the original melody stays in the score. For instance, move the melody back to its original position. Then, while holding down the CTRL key, drag the melody to the 3rd measure, but in the second staff. You will have for instance:
This simple way of manipulating a melodic line may be very useful when composing an orchestral arrangement, as you may very quickly try and hear many variations, change chords (as they will influence the melodic shape) and reshape a part of the curve with the previously explained vector tools.
Vectorization of an existing melodic line [Professional] [Composition Pro]
What if you already have an existing score with melodic lines, for instance imported in MIDI or written without using the vector tools? The next tool will transform an existing melodic line into a music vector. Once this is done, you can manipulate the melodic line with the other tools (move, transpose, reshape, adapt to other chords,...).
- Open the Ex091.piz document in the DataEN / Examples directory. Select the
tool in the Composition palette. The score contains one single melody, with no vector:
Note: to display the notes in color, just select the
- Click somewhere on the first beat of the first measure and drag to the right while holding down the mouse button, to enclose the melody. A red line follows the mouse. When you release the mouse button, Pizzicato creates a vector with the melody. The vector is created so that the notes will stay exactly the same. The original melody is not modified. The score becomes:
You can create a vector for the complete melody or create several vectors to split a longer melody into various sections. You can then manipulate them with all other tools. This operation is called the Vectorization of a melody.
- If you hold down the CTRL key during the vectorization, the vector will be created in the context of the existing chords and scales, so that when you move or transpose the vector, the melody will be adapted to fit the chords and scales in the same way as in the original melody.
Applying a rhythmic density [Professional] [Composition Pro]
The
tool is an experimental tool to design the rhythmic density of an existing melodic shape. Rhythmic density is here defined as the number of notes per unit of time.
- Open the Ex090.piz document in the DataEN / Examples directory and select the
You will notice 6 different color shades displayed vertically on the staff. They represent the rhythmic density levels. Each level is displayed covering the space of two lines of a staff. The following table shows the rhythmic correspondance (from dark to light, from top to bottomof the staff):
32nd notes 16th notes 8th notes Quarter notes Half notes Whole notes There is no relationship between these density levels and the notes displayed at a given time on the staff. This scale is only used as a reference to draw the rhythmic density with the mouse to influence the rhythmic dimension of the melodic line.
- Click in the quarter note range (for instance at the level of the G note, seond line of the staff) of the first measure, on the first vertical line and hold down the mouse. Move the mouse to draw the following curve (as an example) :
- Release the mouse button and the score will become something like this (it may be a bit different, depending on the precision of the drawing):
By drawing inside a density level, the corresponding sections of the melodic curve get assigned to that rhythmic value. You will notice that the density is not continuous. There are only 6 levels of density.
Combined with the vector drawing tool, this tool can help you to design a melodic curve. You can use it on the full range of a melodic line or just for a section of it.
Changing the velocity [Professional] [Composition Pro]
This last vector tool is used to define the velocity associated with each note of the curve. You can of course establish velocity with the musical effects view, but if you define it inside the vector, any change or move of the vector will keep the original velocity curve. Velocity is a MIDI parameter that originally expresses the force with which a note is struck on a keyboard. The use of velocity has been extended to any instrument, meaning the force of the attack of a note. Its main influence is of course on the volume level of the sound, but it often also influences the sound quality and timbre.
- Open the Ex090.piz document from the DataEN / Examples directory and select the
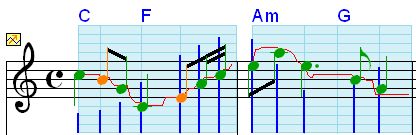
tool on the Composition palette. The score is displayed as follows:
Each note is displayed with a vertical dark blue bar. They represent the velocity values of the notes, in a scale made of 12 staff line intervals. The values are in fact in the [1, 127] range. The above score displays a value of about 100 for each note.
- Using this tool is very easy. Click and drag horizontally, at the level of velocity you want. Whenever you go accross a note, this note will be assigned that level of velocity. Then release the mouse button. Try to draw a velocity curve on the score, you may for instance get:
With this tool, you can influence the expression of the melodic curve you are designing.
The 6 tools explained here are music experimentation tools. If you have any idea or suggestion as how they could be improved or what new similar tools could be added, just tell us!
Professional |
Composition Pro |