Light


Beginner
Professional
Notation
Composition Light
Composition Pro
Guitar
| Instruction manual - Pizzicato 3.6.2 | EN545 - Revision of 2013/05/29 |
Light |
Beginner |
Professional |
Notation |
Composition Light |
Composition Pro |
Guitar |
The guitar tools
Subjects covered:
Principles of fretted instruments [Light] [Beginner] [Professional] [Notation] [Composition Light] [Composition Pro] [Guitar]
There are numerous instruments that are based on frets, like the guitar, the banjo, the electric bass guitar, the mandoline,... They all use the same principle: the vibration speed of a tighten string may be changed by shortening the length of that string so that they can produce a scale of notes.
These instruments have a series of strings (usually 4 to 6), each tuned on a specific note. By pinching a string, it starts to vibrate and to produce the corresponding musical note. These vibrations are amplified by the body of the instrument or by microphones (as in electric guitars).
By shortening the length with which the string can vibrate, the frequency (speed of vibration) increases, so the corresponding note sounds higher. So there is a series of bars, called frets, against which a string can be pushed with a finger, so that its free vibrating length is shortened and the corresponding note higher.
The series of notes produced when all strings are not pushed against a fret (this is called an open string), is called the open tuning of the instrument. For the standard guitar, the notes are respectively E, A, D, G, B and E. These are the notes produced when pinching one of the open strings.
If you push your finger so that the string is pressed against the first fret and if you pinch the same string with the other hand, the note produced is one half step (semi-tone) higher. The second fret will produce a note two half steps higher than the open string, and so on. For each string, you have a full chromatic scale that covers ordinarily one to two octaves. As the open string notes are based on different notes from different octaves, the full set of notes that can be played is ordinarily 2 to 4 octaves. Often, one given note can be produced by two or more strings pushed on different frets.
According to the physical distances of the frets, to the open tuning of the strings and to your ability, you can produce a chord by various combinations of strings and frets played together.
The guitar fretboard window [Light] [Beginner] [Professional] [Notation] [Composition Light] [Composition Pro] [Guitar]
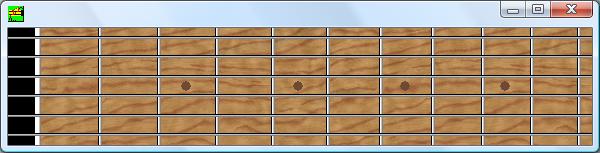
To illustrate these principles, you can start Pizzicato and open the Guitar fretboard... item of the Windows menu. The following window appears:
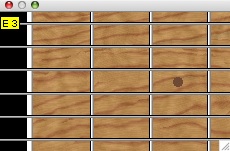
The strings are represented horizontally. The lowest string is the lower note. When you click on a string in the left black part, you hear the open string note and the name of the note appears as follows:
Clicking a string in the next column of the window will produce the note of a string pushed on the first fret. And so on for the second fret, the third fret,... Take some time and play on various strings and frets to see and hear which notes are produced. This window acts exactly like the piano keyboard window but for a guitarist. Here are some tips that you can use with this fretboard:
You can click and hold down the mouse button while moving it around on the various strings and frets. The notes are played as you move on them.
You can hold the CTRL key while playing on the fretboard so that the notes are held when you release the mouse button. It acts in a similar way as the piano sustain pedal, except that only one note of a given string can be held at a given time (so a maximum of six notes can be heard here). You can use this to test and try various chords. To release the playing notes, use the ESC key on the computer keyboard.
You can use this window to enter the notes step by step on a staff, exactly as explained for the keyboard window.
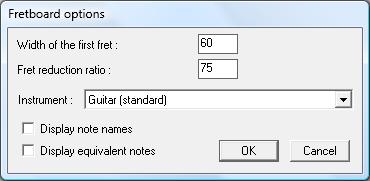
You can reach an option dialog by using the right mouse click (ALT+click on the Mac) inside the window. The following dialog box appears:
You can modify the graphic width of the frets by changing the first two numbers. The first one specifies the width of the first fret, in pixels (smallest graphic point on a screen). By increasing the second number, you shorten the following frets.
The Instrument menu is used to select the fretted instrument you want the fretboard to simulate. By default it is the standard guitar, but you have a selection of about 240 instruments.
Checking the Display note names will display the names of every note on the full fretboard. It can be useful to explore the fretboard if you are a beginner.
Checking the Display equivalent notes will display all equivalent notes of the notes you play on the fretboard. If you play one note, this will help you to locate the other ways you can play that same note on other strings.
Tablatures [Light] [Beginner] [Professional] [Notation] [Composition Light] [Composition Pro] [Guitar]
The way notes are written on a 5 lines staff is quite alien to the physical position of the fingers on the guitar strings. So a more convenient way to write music for the guitar has been developed: the tablature. Basically, we use one line of the staff for each guitar string. For the standard guitar, we get a 6 lines staff. The bottom line is the lowest note. There is no sense using a G or F clef, so we use a special (TAB) symbol, showing that the staff should be interpreted as a tablature. Often, the lines of a tablature are more spaced than for a normal staff. The vertical bar lines can be used to separate measures, as in a normal staff. Here is an example:
You should notice that in this representation, the left to right direction represents time going on, as in a normal staff. You should not confuse the bar lines with frets (as these are also vertical lines).
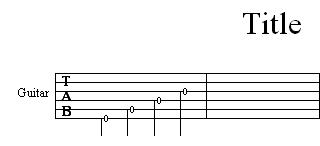
On a tablature, notes can only be placed on a line, not between lines. Indeed, we have to keep in mind this unique association of each line staff with a guitar string. If we specify a string by placing a note on the staff, there is still one information missing: on what fret should we press a finger to get that note? This is solved by placing the fret number in place of a standard note head. Here is an example:
The "0" number means that the string is played open (with the string not pushed against a fret). Number "1" means that the string is pushed on fret 1 and so on. You can notice that rhythmic notation may also be used, as in a normal score. We can use rests and others symbols specific to the guitar or not.
Using tablatures [Light] [Beginner] [Professional] [Notation] [Composition Light] [Composition Pro] [Guitar]
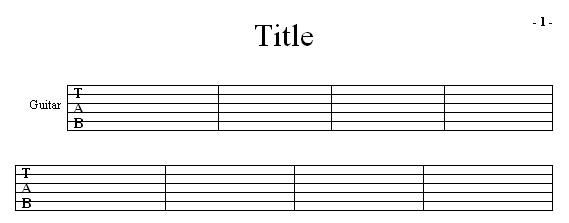
Let us open a tablature template. Go in the File menu, Open template... and select a template with a guitar tablature. Here is one example:
Open the Notes and rests palette in the Tools menu and select the quarter note tool
. Add four notes on the four first lines of the tablature, in the first measure, so as to have:
The same principle may be applied with the other rhythmic values as well as with rests. The main difference with a normal staff is that the note head is always a number, so there may be in some case some confusion whether a note head is a quarter note or an half note, but most of the time the layout of the measure will solve this confusion.
There are three ways to change the fret number assigned to a note:
- You can select the sharp or flat tool and click on the notehead. A sharp increases the note by a semitone, thus it increases the fret number by one. The flat decreases the note and so decreases the fret number. You may also use their shortcuts, which are the '+' and '-' keys of the computer keyboard. To apply the shortcut, move the mouse so that the cursor points on the notehead and hit the shortcut on the keyboard.
- You can use the contextual menu of the notehead with a right-click on the notehead and a menu gives you a list of fret numbers from 0 to 32. You can then select a number directly.
- Or you can with the same contextual menu open the Edit note play... dialog box and change the corresponding fret popup menu directly.
You can move a note on the tablature and you will observe that Pizzicato will try to adapt the fret number so as to keep the same note pitch. For instance, if you move the note from line 1 to line 2, Pizzicato will keep the same fret number, as it is not possible to play the lower note on a higher string. But if you move it back on the first line, Pizzicato will change the fret number to 5, which is how to play the same note as the second open string but by using the first string.
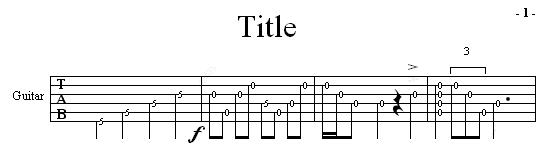
Most of the graphic symbols may be placed on a tablature in the same way as with a normal staff (dynamics, tempo change, accents, tuplets, chords,...). Using these principles, fill in the tablature to display:
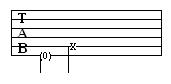
By using the note contextual menu (right click on the notehead), you can also check the two following options:
They will respectively give the following results:
The Fingering menu lets you specify which finger is used for that note. Presently, this information is not displayed automatically on the tablature but may be used to color the notes according to the fingering.
You can of course play the tablature as any other staff. You can change the assigned sound, volume, reverb and all other effects by using the instruments window (in the Windows menu).
In the Tools menu, you will find a tool palette with several symbols that can be used specifically for the guitar. You can use them as explained in the lesson about graphic and MIDI symbols.
Tablature parameters [Beginner] [Professional] [Notation] [Composition Light] [Composition Pro] [Guitar]
You can modify some tablature features or you can change a normal staff to a tablature and vice versa.
- In the File menu, select a template with a guitar staff (not a tablature). Add a second staff under it, with a right-click in the first measure and select Measures and staves... then Add one staff below.
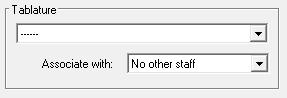
- Double-click in front of the second staff (with the cursor tool active; to activate it, use the ESC shortcut on the computer keyboard) and a dialog appears showing the staff characteristics as we have seen it in another lesson (Characteristics of staves). The frame entitled Tablature in this dialog is used specifically for the fretted instruments using tablatures:
With the first popup menu, you can select the type of instrument you want. The first available choice when you click it is the standard guitar with 6 strings, tuned on E1,A1,D2,G2,B2 and E3.
- Select the Guitar in that first menu.
In the guitar world, you will often find scores that have both normal and tablature notations. The score has two staves, one is a tablature and the other a normal staff. The melody or chords are written in both staves so that guitar players and other instrument players alike can read the score. With Pizzicato, this can be created very easily as follows.
In the above dialog; the menu entitled Associate with: provides a way to associate a normal staff to a tablature staff. By default, no association is done. The other choices are Upper staff or Lower staff.
- Select the Upper staff choice in that menu. This means that any note that will be added or moved in the tablature staff will be automatically transcribed in the normal staff associated with it (here it is the upper staff). In the other way around, any modification done in the normal staff will also be transcribed in the tablature.
This can help you to write a melody or some chords in normal music notation and have it automatically translated into tablature notation. Or, if you do not know normal notation very well and can use a tablature, you get the normal notation automatically when you write the notes in the tablature.
As there may be more than one way to play a given note with a guitar, the normal to tablature translation only suggests one possibility. You can then move the note to another string if you want. But when you add a note on the tablature, there is only one note corresponding to the normal notation, so in that direction, the translation is always correct. The only trouble can be the transcription of accidentals, but the problem is the same as with a keyboard (is it a F# or a Gb ?).
- Click OK and try to enter some notes on the normal staff and then also on the tablature staff. You will notice the automatic translation from one to the other.
You should be aware that when you ask Pizzicato to play the score, both staves will be played, so you may want to mute one of them by unchecking the P (for Play) check box of the Instruments window.
Using tablatures, you can also copy/paste measures from/to a normal staff and the conversion will also be executed by Pizzicato.
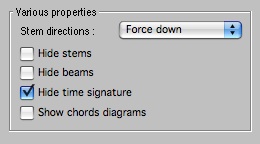
- Double-click once again in front of the tablature staff so as to reach the above dialog again. The following part of the dialog contains various features that can be used in combination with a tablature (but also for any other staff):
- The stem direction of the notes of any staff can be Forced down, Forced up, or Automatic. Notice that on a tablature, all stem ends are set to the same height.
- You can hide/show the stems and/or beams of the notes. When using both standard and tablature notations, you often find scores where only the fret numbers are displayed on the tablature, without any rhythm, as the rhythmic aspect is just above it in the normal staff. You can do that by hiding both stems and beams.
- For the same reason, the time signature is often omitted in the tablature. By default, Pizzicato hides the time signature.
- You can show guitar diagrams associated to any chord symbol you add. This aspect is explained later in this lesson.
Notice that when you specify a tablature instrument in this dialog, Pizzicato automatically sets the staff size to 150% so as to have a standard tablature size. You may change that number if you want to (in Pizzicato Professional only). The same remark is valid for thelines number of the staff, which is automatically set to the strings number of the chosen fretted instrument.
Chords diagrams [Light] [Beginner] [Professional] [Notation] [Composition Light] [Composition Pro] [Guitar]
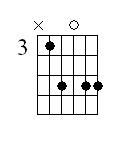
We have seen that Pizzicato has a specific tool to add chord symbols above the measures of a staff. For guitarists, each chord symbol may also be displayed as a standard fretboard diagram, showing how the fingers should be placed on the frets to play the chord. In Pizzicato we call this a chord diagram. Here is an example:
Here is a description of its various elements:
- The vertical lines represent the strings, the left line being the lower pitch string.
- The horizontal lines represent the frets. The second line (starting from top to bottom) is normally the first useable fret but the presence of the number "3" to the left indicates that it is the third fret. When there is no number, it means that it is the first fret. This number is used to avoid drawing many empty lines above the diagram when a chord is played far from the first fret. The next frets are the consecutive horizontal lines.
- A plain circle on a string and between two horizontal lines shows the position of a finger. This finger must press the string against the corresponding fret.
- An empty circle above a string means that the corresponding string must be played open, i.e. without pushing the string against a fret.
- A cross above a string means that the string should not be played.
So to play a chord, the corresponding finger (from the left hand) must be placed according to the diagram, and the right hand must pinch all strings except the ones with a cross sign above it.
We will now see how to place chords diagrams in a score. Do the following.
- Create a new document with the File, New item.
- To enable the display of chord diagrams with normal chord symbols, double-click in front of the staff that will receive the chords symbols and check the Show chords diagrams box, then click OK.
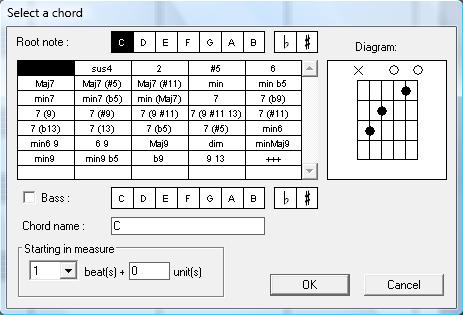
- Select the chord symbol tool
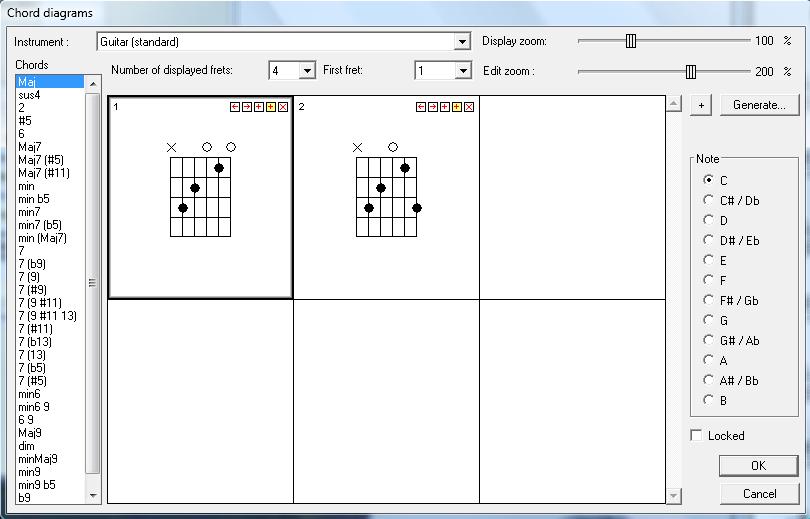
in the main palette and click above the first measure. The chord selection dialog box appears and you can change the chord characteristics as you want. While you change the chord specifications, Pizzicato searches the chord diagram library to find a matching diagram and displays it to the right:
The chord specficiation parameters have been explained in a previous lesson, so please refer to the lesson entitled The chord tool. When Pizzicato does not find a corresponding diagram, it displays an empty diagram or a big cross.
As there are often several ways to play a given chord on the guitar, Pizzicato suggests only the first one that is present in its library.
- Click in the middle of the diagram. This opens the chord diagram library, where you can select another chord diagram to associate with the chord symbol:
- To select another diagram, you can click on it. You may also change the chord type in the left column or the root note on the right part. Pizzicato displays the chord diagrams that are available in its library.
- With advanced versions of Pizzicato, you can customize the library by adding diagrams or by asking Pizzicato to generate new diagrams based on specific criterias. To do this, uncheck the Locked check box and refer to the next section of this lesson that explains how to do it.
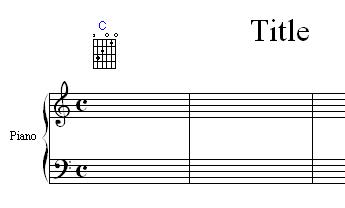
- Click on OK and OK again. The chord symbol and the diagram appear on the staff:
You can move the chord symbol by clicking on it (not on the chord diagram; the chord diagram will always be drawn just below the chord symbol) as explained in the chord symbol lesson.
In a similar way, you can use the chords progression window to enter and view chords and their diagrams (Windows menu).
The diagrams library [Beginner] [Professional] [Notation] [Composition Pro] [Guitar]
You can customize the default library of chord diagrams. This is done when you select a chord diagram as explained above (and by unchecking the Locked box). But you can also reach this dialog in the Options menu, by selecting the Chords diagrams library... item:
This library is organized by instruments, by chords and by notes:
- The top menu entitled Instrument is by default the standard guitar. The Pizzicato library contains diagrams for this instrument only, but as you will see, we can build a library for any other instrument in a few clicks. By changing this menu, you can work the diagrams for other instruments.
- The list to the left contains all chords that are present in the chord library of Pizzicato (remember that in the Professional version you can customize that library too). To see the diagrams that correspond to a given chord, select the chord by clicking on it in the list.
- The list to the right gives the twelve root notes for a chord. By selecting a note, you see the corresponding diagram(s) in the middle panel.
So a set of diagrams can exist for each combination of an instrument, a chord type and a note. The corresponding diagram(s) are displayed in the middle part of the window. You can see up to six diagrams together, but if there are more available, a vertical scroll bar appears so that you can scroll down to see the other ones.
The current diagram is displayed with a thicker border, as you can see here for the first diagram. The diagrams are numbered at the upper left corner from one to the total number of diagrams available for that chord.
A set of five small icons are visible in each diagram. When you click on them, you can produce the following actions:
- Clicking the small left arrow will move the diagram to the left (not possible for the first diagram) so that you can change the order of diagrams when more than one are available. You should know that the first diagram for a given chord and note will be the one selected by default by Pizzicato.
- Clicking the small right arrow will move the diagram to the right (not possible for the last diagram). With these two arrows, you can reorganize the library.
- The "+" on white will create a new empty diagram after the current diagram.
- The "+" on yellow will duplicate the current diagram after the current diagram, so that you have a new diagram that is a copy of the current diagram.
- The "x" will remove the diagram.
If there is no diagram in the table, you can add a first empty diagram by clicking on the "+" button available to the right (left to the Generate... button).
When a diagram is selected (thick border), you can change the number of frets displayed with the menu entitled Number of displayed frets and you can define the first fret (the number that is placed to the left of the diagram) by using the menu entitled First fret. Both are just above the diagram table.
The Edit zoom slider helps you to zoom in and out inside that window so that the diagram can be bigger or small to edit it.
The Display zoom is a factor that will influence the size of the diagrams when they will be displayed in the score. A value of 100 gives a correct size, but you can customize it as you want.
Here is how to edit a diagram:
- By clicking on a string (vertical lines), between two horizontal lines, you can switch on/off a plain circle. Of course, there can be only one plain circle on a given string.
- By clicking just above a string, you first get an empty circle (which means an open string). Clicking again gives you a cross (which means the string must not be played). Clicking again removes the cross.
- Sometimes, the number of the finger to use is also displayed, just below the string. If you click just below a string, you first get a "T" (for Thumb), then 1, 2, 3, 4 for the four other fingers. Clicking again removes the fingering.
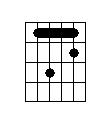
- Another special case is the bar chord. It is produced by pushing the finger flat on several strings at a given fret. It is often written as a long bar covering the corresponding strings. You can display it by first putting a plain circle on the corresponding first string and then click on the corresponding last string while holding down the CTRL key of the keyboard. Here is for instance what you get when you do that for the four middle strings on the first fret:
- You can remove that bar by clicking on its left part.
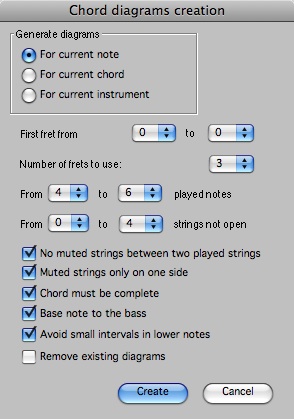
Pizzicato offers you a powerful way to create a full library of chords diagrams automatically. Click the Generate... button and the following dialog appears:
The idea is to ask Pizzicato to automatically generate chords diagrams by giving precise specifications. Here are the various possible specifications.
- The first set of three choices gives the scope of the diagram generation. Pizzicato can generate only the diagrams of the current selected note. Pizzicato can generate them only for the current chord (but for all notes). Or Pizzicato can generate diagrams for the current instrument (for all chords and all notes of the current instrument).
- The two popup menus under the title First fret from ... to ... let you define on which frets a chord diagram may be built. If you set it for instance to 1 and 4, Pizzicato will only generate diagrams where the first fret is 1, 2, 3 or 4.
- The next popup menu gives the number of frets that can be used to create a chord diagram. Pizzicato will only create diagrams where the chord is stretched on a maximum of frets given by this menu.
- The next menu is used to specify the number of notes (including the open strings) that the diagram should contain. Six on a standard guitar would mean that all 6 strings should be played together.
- The next menu specifies how much strings can be used with a finger (which means how many strings not open will be playing). For example, by limiting it to two strings, you could select possible chords that are quite easy to play, as they only need two fingers from the left hand.
- The first check box specifies that no muted (= not played) string should be present between played strings. This makes the chord notes group in one block and it is more easy to play with the right hand.
- The next check box only accepts muted (not played) strings on one side of the strings.
- The next check box forces Pizzicato to allow only diagrams where all the notes of a chord are present at least on one string.
- The next one forces the root note of the chord to be the lowest (the bass note). This gives the natural position of a chord.
- The next check box is used to avoid a small interval to be used in lower notes, because it tends to render the chord too confused.
- By checking the last check box, Pizzicato will remove all existing diagrams prior to the creation of new diagrams, at least for the notes and chords for which diagrams will be generated.
You can then easily recreate the full library by specifying your preferences in this dialog and then by clicking Create. If you ask to create diagrams for all notes and all chords, it may take some time, depending of the speed of your computer and the above selection of choices.
When you click on OK in the library window, the library is then saved. If you make changes and then click Cancel, the changes are not saved and Pizzicato loads again the library that was present before you opened that dialog. So you can try generating libraries of diagrams and if you are not satisfied with them, just click Cancel.
The tablatures library [Beginner] [Professional] [Notation] [Composition Pro] [Guitar]
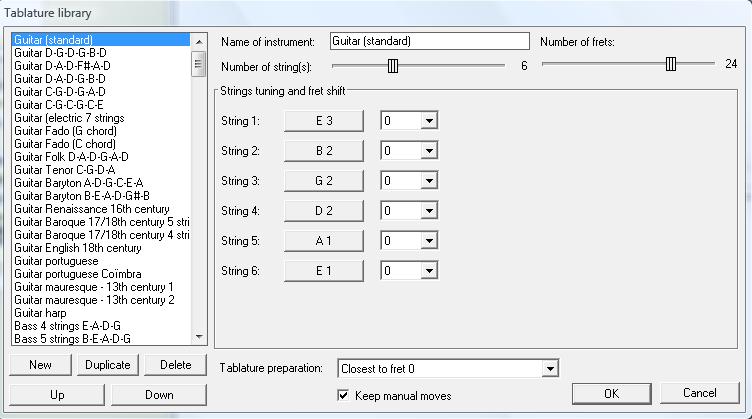
There are many instruments that are based on strings and frets. With Pizzicato, you have a library of about 240 predefined fretted instruments. You can access that library in the Options menu, with the Tablatures library... item. The following dialog appears:
The guitar instruments are first in the list, as they will be the most commonly used. Then, the other instruments are ordered by name. To select an instrument in the library, click on it in the list. The right part of the window displays the following information about the instrument and you can modify this information:
- The name of the instrument, as it will appear whenever you need to select a fretted instrument in Pizzicato.
- The number of strings of the instrument
- The number of frets of the instrument
- From 1 to 16 notes, determining the tuning of each string. String number 1 is the highest pitch and the following go down in pitch. By clicking on a note button, you have a keyboard that let you specify the note associated with that string.
- Just next to the note button, you will find a popup menu that can be used in special cases where a string has one or more missing fret, compared to the other strings.
You can add, duplicate or remove instruments with the New, Duplicate, Delete buttons and sort them with the Up / Down buttons.
Two other controls will influence the way Pizzicato translates a normal staff to a tablature staff (this is global and not specific to one instrument):
- The first one is the Tablature preparation popup menu, which can be set to Shortest move (Pizzicato optimizes the distance between two consecutive notes so as to minimize the move), to Stay on same string (Pizzicato tries to stay on the same string if possible) or to Closest to fret number 0...20 (in this case, Pizzicato tries to place notes as close as possible to a given fret position).
- The Keep manual moves helps Pizzicato to remember manual changes that you could have done to a tablature when Pizzicato has to translate that measure again.
Light |
Beginner |
Professional |
Notation |
Composition Light |
Composition Pro |
Guitar |