Light


Beginner
Professional
Notation
Composition Light
Composition Pro
Drums and Percussion
Guitar
Choir
Keyboard
Soloist
| Instruction manual - Pizzicato 3.6.2 | EN060 - Revision of 2013/05/29 |
Light |
Beginner |
Professional |
Notation |
Composition Light |
Composition Pro |
Drums and Percussion |
Guitar |
Choir |
Keyboard |
Soloist |
The computer and its interface (3)
Subjects covered:
Using the keyboard [Light] [Beginner] [Professional] [Notation] [Composition Light] [Composition Pro] [Drums and Percussion] [Guitar] [Choir] [Keyboard] [Soloist]
The keyboard of the computer lets you introduce characters, figures and symbols. It also has several keys with special functions.
It is divided at least in two parts. The main block of keys contains the letters. In the higher part of this block, you will find the figures from 0 to 9. The long key located in front of the keyboard is the space bar. It lets you introduce spaces between words. To the right of the keyboard, you will find a small block of keys called the numeric keypad. It contains figures from 0 to 9 as well as some other symbols.
When you press and release a key, the keyboard communicates it to the computer. The software takes consideration of the key and executes the necessary actions required by the user. If you press and hold down the key of a character, a figure or a symbol, after a certain time the keyboard will automatically repeat the action several times. Thus take care not to hold down your finger too long on a key, except if you really want to repeat it.
When you press a key with a letter, the lower case letter is activated. Several keys contain two or three symbols. By using the key alone, the lowest symbol is activated. If there are two symbols in the lower part of the key, it is the left one that is activated.
To activate the upper case letters or the higher symbols, press and hold down the SHIFT key, press the key and then release the SHIFT key. The SHIFT key is located at the two sides of the main group the keys, at the two ends of the second line. It looks like:
You can use the left or right SHIFT key. When you hold down this key, you have access to the higher symbols or the upper case letters for all the keys.
Above the left SHIFT key, another key lets you lock the upper case letters (Caps Lock). When you press this key, a small light shows it on the right part of the keyboard (except on the small Mac keyboards). To disable this light, press the same key again (on Mac) or press on the SHIFT key (on PC). When this key is activated, all letters are used in their upper case form. Unlike the SHIFT key, the symbols and figures are not modified.
The key located above the Caps Lock key (thus on the fourth line, on the left) is the tabulator key. We will often use it in dialog boxes. Its aspect on PC and MAC is respectively:

The erase key is located at the top right corner of the main block of keys. It lets you erase graphic characters and objects:
The Return key, also called Enter key, is located below the erase key and on the bottom right corner of the numeric keypad. It is used to validate something or to go to the next line in a text box. Its shape may vary according to the design of your keyboard.
The Escape key (ESC) is the top left key of the keyboard. On small Mac keyboards (i.e. having only two groups of keys), it is located to the right of the space bar. It is used to cancel a dialog box.
On PC, the menu shortcuts are activated in combination with the Ctrl key, located on the left and right sides of the first line of keys. On Mac, the "Apple" key is used for the menu shortcuts.
The SHIFT and Ctrl keys will be very often used to modify the effect of a mouse click.
On Mac for Pizzicato, the Option key (often named "alt", but not to be confused with the equivalent key on PC) is located between the "ctrl" and "Apple" keys, at the two sides of the space bar. It is used in Pizzicato to compensate the fact that the mouse of the Mac only has one button. When you click the mouse button of the Mac while holding down this key, you get the equivalent of a right click of a PC mouse.
Text boxes [Light] [Beginner] [Professional] [Notation] [Composition Light] [Composition Pro] [Drums and Percussion] [Guitar] [Choir] [Keyboard] [Soloist]
A text box lets the user introduce information in alphanumeric form with the computer keyboard. They are used to introduce a name, a title, a number, a comment, etc.
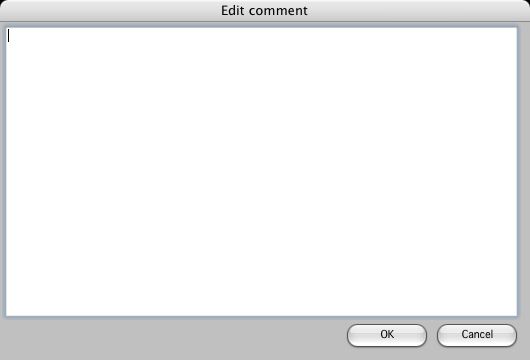
A text box is represented by a rectangle with one or more lines of text. In the Windows menu of Pizzicato (when a musical document is open), select the Comments... item. The following dialog box appears:
The large rectangle indicates the limits of the text box. In its left corner, a small line flashes. It is the cursor of the text. When it is visible, it shows the position where the next character will be inserted. In the above example, the text box is empty. The next character will be placed in the top left corner of the rectangle.
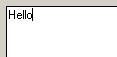
Using the keyboard, type the word Hello. Each character appears in the text box and the caret moves to indicate the position of the next one. When the complete word is introduced, the higher part of the text box becomes:
To correct a character, you can use the erase key of the keyboard:
It is located at the top right corner of the main block of keys. Its effect is to erase the character just left to the caret. Use it to erase the letter O of Hello. Your text becomes:
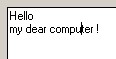
When the text box is high enough, you can use the Enter key to go to the next line. Add a O letter and then use the return key. The caret goes to the next line and the text box becomes:
Complete the text by typing the words my dear computer! They are displayed at the caret position, on the second line:
You can move the caret by using the 4 arrow keys located on your keyboard:
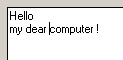
By using 4 times the left arrow, the caret moves 4 characters to the left and arrives between U and T:
Note that a white space is considered as a character and corresponds to the long space bar located in front of the keyboard. The arrows let you move the caret only in the areas where text is present. Try to bring the caret down with the downwards arrow. It does not move, because there is no third line. Use the upwards arrow. The caret goes to the upper line, but it is placed just to the right of the word Hello, because there are no characters above the word computer. Now bring the caret right before the word computer:
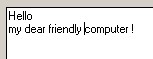
Type the word "friendly" followed by a space. The new characters are inserted at the caret position and progressively move the remainder of the line to the right. The text box becomes:
To correct a spelling mistake, place the caret just to the right of the wrong character, use the erase key and insert the new character.
It is also possible to click directly where you want to set the caret. Click for instance just after the word my. The caret moves directly there. If you click where no text is present, the caret will be set at the nearest position where text is present.
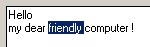
Using the mouse, you can select a text section. Place the mouse just to the left of the word friendly. Click and drag slightly to the right. A coloured area follows your movement and covers the text. Drag to widen the area up to the left of the word computer and release the mouse button:
The word friendly and the space which follows are now selected. This text section is called the selection. You can now erase in one shot the selected text by using the erase key. Your text becomes again:
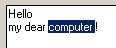
The selection disappeared. The caret blinks at the position of the previous selection. Select the word computer now. You get:
When part of the text is selected, you may cancel this selection by clicking anywhere in the text. The blinking caret comes back and the text takes again its normal color without being erase. Click before the word computer.
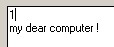
When a selection is present, you can directly replace it with the next character you type in with the keyboard. Select the word Hello and type number "1". The text becomes:
We have seen how to select text by clicking and dragging. You can also do it in two operations. Click at the starting position of the area you want to select and put the caret there. Then, while holding down the SHIFT key, click at the end of the area you want to select. Try to select the word computer using this method.
When you use one of the 4 arrows whereas a selection is present, the text is normally redrawn and the blinking caret comes back.
Notice that the line return is considered as a character. Place the caret just before the word computer and use the Return key. The word computer is put on the next line:
You can select more than one line at a time. Let us select the words dear computer. The principle remains the same, you click just in front of the word "dear", you drag the mouse to bring it to the right of the word computer and you release:
Click in the text to cancel the selection. By using the same principle, here is how to remove a line, for instance the second line. Place the mouse to the left of the first word of the line to be removed. Click and drag to bring the mouse to the beginning of the following line, in front of the word computer and release the mouse. Your selection becomes:
The second line is now entirely selected. Use the erase key and the line disappears.
You can also select a word by double-clicking in this word.
Click the cancel button. In the Options menu, select the Graphic options... item. A dialog box appears and displays in its upper part several text boxes. The first text box is selected :
This text box lets the user introduce a figure. Its height makes it possible to introduce only one line of a few characters. These boxes are very common in the dialog boxes of Pizzicato. When you open a dialog box including one or more text boxes, the first is automatically selected. It is very practical because you can directly type in a new value with the keyboard. For example, type in the figure "5". As we explained, the character replaces the selected text.
When a dialog box includes several text boxes, the tabulator key lets you go from one box to the other without needing to click to set the caret. This key is located on the left border of the main block of keys:
Now press this key. The caret disappears from the first text box and the second text box is selected, ready to be modified if needed:
The succession of the text boxes by the tabulator is usually left to right, top to bottom. When the last text box is reached, the first is selected again. You can also click directly in a text box to set the caret.
Now click Cancel.
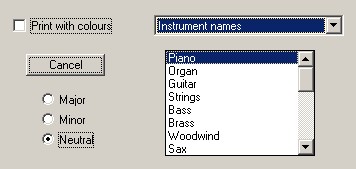
In Windows, the use of the tabulator in a dialog box also covers the check boxes, the lists, the popup menus, the buttons and the radio buttons. When one of these elements is selected by the tabulator, Windows displays a dotted rectangle around it, to show that it is selected. It can then be modified via the keys of the keyboard (space bar and the arrows keys). Here are some examples of elements selected by the tabulator:
Light |
Beginner |
Professional |
Notation |
Composition Light |
Composition Pro |
Drums and Percussion |
Guitar |
Choir |
Keyboard |
Soloist |