Light


Beginner
Professional
Notation
Composition Light
Composition Pro
Drums and Percussion
Guitar
Choir
Keyboard
Soloist
| Instruction manual - Pizzicato 3.6.2 | EN050 - Revision of 2013/05/29 |
Light |
Beginner |
Professional |
Notation |
Composition Light |
Composition Pro |
Drums and Percussion |
Guitar |
Choir |
Keyboard |
Soloist |
The computer and its interface (2)
Subjects covered:
Buttons [Light] [Beginner] [Professional] [Notation] [Composition Light] [Composition Pro] [Drums and Percussion] [Guitar] [Choir] [Keyboard] [Soloist]
We will review the various elements which can be found inside a dialog box. They are all represented by a graphic area inside the dialog box. Via the mouse, the user can handle these elements to make a selection or execute an action.
A button is a rectangular area containing one or more words. Here are examples:


The purpose of a button is to execute an action when you click inside it. The only handling one can make with a button is to place the mouse cursor inside it and click. When you press the mouse button, the drawing of the button gives you the impression of being pressed. It is maintained this way until you release the mouse.
If you release the mouse when the cursor is still inside the button, the button takes again its normal appearance and the action is executed. If you move the cursor outside the button before releasing it, the action is not executed. It is a manner of avoiding at the last second executing an action when you already pressed the button.
We had already seen the Cancel and OK buttons which let you close a dialog box. When a button is surrounded by a thicker black border, like the second example here above, it means that you can activate it with the Return or Enter key on the keyboard. The Return key is located on the right side of the main key block and also on the bottom right corner of the numeric keypad, at the extreme right side of your keyboard. This key acts like a shortcut key to activate the thick border button. There is only one button of this type in a dialog box.
When a Cancel button is present, it can be activated by the keyboard using the ESC or Escape key, which is very often at the top left corner of your keyboard or right beside the space bar of the small Mac keyboard.
These two shortcuts are practical, because they can be used in almost all Pizzicato dialog boxes.
Check boxes [Light] [Beginner] [Professional] [Notation] [Composition Light] [Composition Pro] [Drums and Percussion] [Guitar] [Choir] [Keyboard] [Soloist]
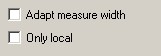
A check box is represented by a small square followed by a text. The square can be empty or can be checked. Here are two examples:
The text on the right of the square indicates in a few words an option or a choice that the user can make. A check mark in the square shows that this option or this choice is selected. An empty square shows that the option or the choice is not selected.
When a dialog box displays a check box, the user can decide if it is necessary to select or unselect this option by checking it or by leaving it unchecked. To do that, you must simply click in the small square or on the associated text. If a check mark is already present, it is erased and if it is not present, it is added.
When you modify a check box and click the OK button of the dialog box, the option is memorized and the next time you call the same dialog box, the option is still visible the way you selected it.
Radio buttons [Light] [Beginner] [Professional] [Notation] [Composition Light] [Composition Pro] [Drums and Percussion] [Guitar] [Choir] [Keyboard] [Soloist]
When a choice must be more explicit or when there is more than two possibilities, the check box is no more appropriate. Multiple choices are a series of round check boxes grouped under a label. Only one box of the group can be checked at the same time. When you click one of them, the others are automatically unchecked.
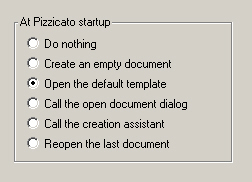
Here is an example of radio buttons with six choices, with the fifth choice selected:
The label of the radio buttons indicates that it relates to the starting of Pizzicato and it gives 6 choices to the user.
In radio buttons, there can be two or more choices available and the text depends entirely on the subject covered by the dialog box. It is a manner of letting the user make a choice.
Popup menus [Light] [Beginner] [Professional] [Notation] [Composition Light] [Composition Pro] [Drums and Percussion] [Guitar] [Choir] [Keyboard] [Soloist]
This is another way of making a choice among several possibilities. A popup menu, also called drop-down list or combo box (in Windows), is represented as follows:
or on Mac
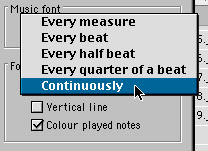
The visible text displays the selected choice. By clicking inside a popup menu (sometimes simply called menu) or on the black arrow which is on its line, the list of possible choices is displayed:
or on Mac
At this time, you can slide the mouse towards any choice of the list. By releasing the mouse on one item, the new choice is selected and displayed on the popup menu.
On Windows, when a menu contains too many choices (no space to display them all on the screen), a scroll bar appears to the right of the list. By clicking on the higher and lower arrows, the list starts scrolling to reach the higher or lower items. Here is an example:
You can also click and drag the gray button located between the two arrows, to scroll the list of items. On Mac, sliding the mouse above or below the menu causes the scrolling of the invisible items.
Scroll bars [Light] [Beginner] [Professional] [Notation] [Composition Light] [Composition Pro] [Drums and Percussion] [Guitar] [Choir] [Keyboard] [Soloist]
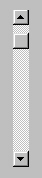
A scroll bar is a long and narrow rectangular area that comprises five parts. It can be horizontal or vertical. Here are examples:
They are mainly used to go up and down or left and right in the contents of a window or in a list of items.
The small gray square is called the scroll box. The scroll box indicates the position of the scroll bar. It can be moved throughout the light gray rectangle, between the two arrow buttons. According to the graphical model, this small square can take the aspect of a widening rectangle that you can move in the same way. The scroll box can take a number of intermediate positions according to the context in which it is used.
When it is disabled, the scroll box is not drawn, which means for example that the image visualized in the contents of the window is entirely visible:
There are five ways to move the scroll box in the scroll bar:
- By clicking in the left (or top) arrow button, you move the scroll box one unit to the left (or top). If you hold down the button, it continues to move one step at a time.
- By clicking in the right (or bottom) arrow button, you move the scroll box one unit to the right (or bottom). If you hold down the button, it continues to move one step at a time.
- By clicking and dragging the scroll box itself, it follows your movement and you can move it directly to the position you want.
- By clicking between the scroll box and the left (or top) arrow button, you move the scroll box to the left (or top) several units at a time. If you hold down the mouse, it continues to move quickly.
- By clicking between the scroll box and the right (or bottom) arrow button, you move the scroll box to the right (or bottom) several units at a time. If you hold down the mouse, it continues to move quickly.
Try to move the vertical scroll box located in the window containing what you read now, by using the five methods.
Sliders [Light] [Beginner] [Professional] [Notation] [Composition Light] [Composition Pro] [Drums and Percussion] [Guitar] [Choir] [Keyboard] [Soloist]
A slider is a simplified form of a scroll bar. It is used mainly to let the user determine or modify a number or a ratio. In the Pizzicato Options menu, select the Global options item. You will find two sliders:
They are used here to determine graphic parameters.
A slider consists of a bar on which a small cursor can slide. To move this cursor, you need to click inside it and drag it left or right (up or down for a vertical slider). When you release it, it maintains its position. For example, move the first slider so that it shows a value of 50.
To bring the cursor directly to a specific position, you can directly click at this position. The cursor is placed directly at the indicated position. For example, you will find sliders that will enable you to adjust the sound volume for each instrument, exactly like a sound mixing table. Now click the Cancel button.
Lists [Light] [Beginner] [Professional] [Notation] [Composition Light] [Composition Pro] [Drums and Percussion] [Guitar] [Choir] [Keyboard] [Soloist]
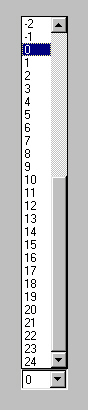
A list is another form of a popup menu that offers more possibilities. It is represented by a rectangular area in which several lines of text display the various items making up the list. On the right side of the list, you will find a vertical scroll bar, enabled if the list is not high enough to display all the items it contains. Above the list you will find a title specifying the purpose of the list.
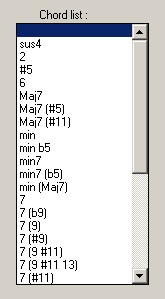
In the Options menu, select the Chord library... item. The dialog box which appears contains a list in its left part:
The first line is selected because it has a reversed contrast. Select the third line by clicking on it. The first line becomes normal again and the list shows a contrast on the third line.
The rectangular scroll box is drawn in the higher part of the scroll bar. That means that the first item of the list is visible but that there are items that follow the last line. By clicking and holding the mouse button in the lower arrow of the scroll bar, the list scrolls and display the hidden items.
When the scroll box is at the bottom, it means that you are at the end of the list and that there are no more items after the last visible one. This method gives access to very long lists that can be consulted by moving the scroll box by one of the 5 methods explained here above. By clicking on a line, you select your choice to the program. Now click the Cancel button.
Light |
Beginner |
Professional |
Notation |
Composition Light |
Composition Pro |
Drums and Percussion |
Guitar |
Choir |
Keyboard |
Soloist |