Professional


Composition Light
Composition Pro
| Instruction manual - Pizzicato 3.6.2 | EN740 - Revision of 2013/05/29 |
Professional |
Composition Light |
Composition Pro |
Composing music (2)
Subjects covered:
Using the accompaniment styles [Professional] [Composition Light] [Composition Pro]
We will first learn how to use an accompaniment style. We will then study how a style is structured and how you can modify it or create a new style.
Pizzicato contains 20 documents with musical libraries oriented towards styles of light music:
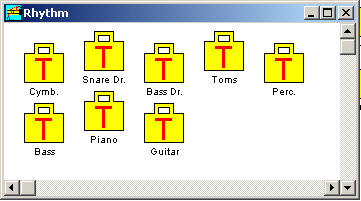
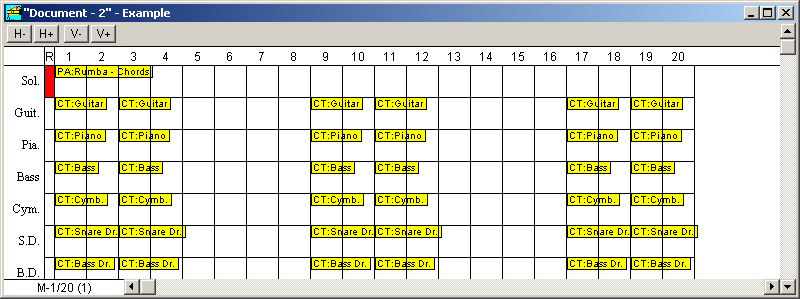
They are available in the File menu , Open template… item in the Accompaniments sub-category. As an example for this lesson, we will work with the Rumba style. Open this document. Its main view appears as follows:
This structure is the same for all styles. Only the instruments and the library contents are different. The basic idea of an accompaniment style is as follows: each instrument of the group plays the rhythmic and melodic structures repeated in a regular way (on 1 or 2 measures or more). At every instant, the notes played by all instruments are coordinated by a chord progression which is the same for each instrument. This common chord progression leads all instruments in an harmonious way.
Let us take the simplest case to start. A chord progression is provided as an example for each style. By holding the Control key , double-click on the Example score. The sequencer view opens:
This view displays the libraries contained in the measures. You will notice that the chords progression is present in the first measure of staff 1. For all styles, the selected option is that the chords progression is valid for all staves (see the Libraries... item in the Options menu). In the Edit menu, select the Generate score item. Pizzicato calculates the score by combining the musical libraries contained in the measures. Once the operation is finished, press the space bar to hear the sound result. Also open the score view of the Example score to view the generated notes. It is the easiest manner to use a style.
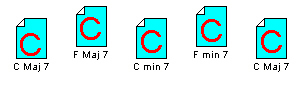
Let us see now how to create a chord progression and use it with a style. Close the score example views and open the Chords library - 1.piz document located in the Music folder. We will create the following progression:
C Maj 7 - F Maj 7 - C min 7 - F min 7 - C Maj 7
In the document Chords library - 1.piz, select in the Edit menu the New element… then New chord… item. In the dialog box that appears, select the Chords progression option. Call it Test and check the Duration associated in multiples of Whole note box. Click OK.
Open the Test folder and to make the next handling easier, drag this Test window to the bottom right corner of the screen. Double-click on the Maj 7 icon. Its contents displays all seventh major chords:
Drag the CMaj 7 chord into the window of our Test folder. Do the same for the FMaj 7 chord. Close the Maj 7 folder. The first two chords are placed. Open the Min 7 folder now and drag the Cmin 7 chord and then F min 7. Close this folder and copy again the CMaj 7 chord from the Maj 7 folder. Your Test folder becomes:
Close this folder and drag the main window to the bottom of the screen, so that the main Rumba window is still visible. Now drag the Test icon into the Rumba document main view. Close the Chords library - 1.piz document without saving the changes.
This way of proceeding is recommended to create a new chord progression. Here is a step by step description:
You can also use the 20 progressions which are in the Chords library - 3.piz document. Open this document to drag the chords progression in the working document and close Chords library - 3.piz.
Let us continue our example. By holding down the SHIFT key, double-click the Test folder of the Rumba window. The following dialog box appears:
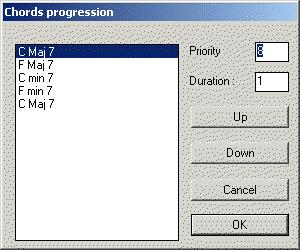
As we have seen in the lessons about libraries, the text boxes labeled Duration allows to specify how much time the chord will be used. As we have chosen the whole note as the basic duration (during the creation of the chord folder), the duration associated with a chord specifies how long this chord will be heard. For the first, fill in "4" in the duration box. Click then on the second chord and fill in "2". For the others, fill each one of them with "2". Our progression will contain 4+2+2+2+2 whole notes, i.e. 12 "4/4" measures. Click OK.
The basic duration of a chord folder must be the shortest that will be used in the score. The longer chords are adjusted with the above dialog box, by specifying for each one of them how long it must be held.
Open the sequencer view of the Example score. Drag the Test folder into the first measure of track 1. Then generate the score. Listen to the sound result. You will note that after measure 12, the same chord is kept up to the end. As our progression contained only 12 measures, Pizzicato continues with the last chord. The Example score contains 20 measures and its structure is fixed. Let us see how to build a new score and how to structure it.
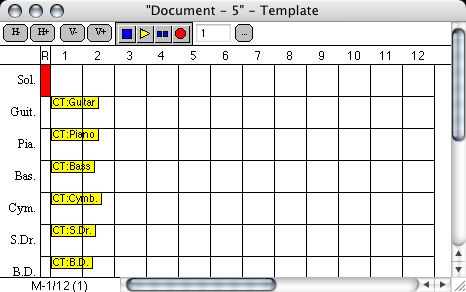
Close the sequencer view of the Example score and open the Template score. This score contains only one measure. Our chord sequence has a total duration of 12 measures.
Double-click on the first measure of track 1 and add 11 measures with the measures dialog box.
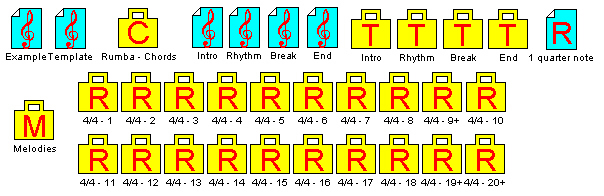
The instruments are prepared for the style, but the measures are empty. We will complete this score by dragging the rumba musical libraries in it. The main view contains 4 musical score : Intro, Rhythm, Break and End (blue icons, not to confuse with the yellow folders to the right, bearing the same names).
Intro contains library elements which form an introduction of the instruments. It is used at the beginning of a piece to form a transition to the main rhythm.
Rhythm contains the main repetitive rhythmic. It is this element which constitutes most of the score.
Break forms a break in the main rhythm. It is used for example between the verses or the chorus. It can also be used to break the monotony of a long passage with the same rhythm.
End is formed with one or two measures of conclusion for a score. It is a transition between the main rhythmic and the complete stop of the music. It is commonly used in the last measure.
By combining these 4 elements in the score, you can structure the accompaniment so that it is well adapted to a melody and a chord progression. The main structure of a score could break up as follows:
or
We will structure our 12 measures in the following way:
When you add an element in a measure, it remains valid until you add another one. In other words, if you add a rhythm in measure 1 only, this rhythm will be heard from there up to the end.
To add one of these 4 elements in the score, you need to drag the score (Intro, Rhythm, Break or End) on the first track (staff) of the sequencer view measure. Drag Intro into track 1 measure 1. The sequencer view becomes:
Do the same with the other elements and successively drag (in track 1):
Drag the Test chords folder into track 1 measure 1. Generate the score and listen to the result. Open the score and observe the notes. The first staff is ready for a melody. You can record it with the sequencer or fill it directly on the score. You can also use the rhythms and melodies libraries to help you find a melody which sounds well on the chords. You can modify the distribution of the instruments, the bass, guitar or piano type.
Once the score is generated by Pizzicato, you can of course modify what you want in the score to personalize the percussion effects or the bass line, or to modify the position of a chord. You can thus use the accompaniments system to structure your score and then to personalize it with all the other tools of Pizzicato. At this time, you can erase the musical libraries: your score becomes independent and you can also print it.
When you compose in this manner starting from an accompaniment model, save your document under a new name (Save as... item in the File menu). In this manner, you will not lose the original accompaniments.
Structure of a style [Professional] [Composition Light] [Composition Pro]
To use a style does not require a complete understanding of the musical libraries principles. On the other hand, if you wish to modify or create a style, you need to carefully read the lessons concerning the Pizzicato composition libraries. Let us see now what is the link between what we have just done and the musical libraries explained in the course.
Just beside the 4 basic scores (blue), you can observe 4 theme folders (yellow, with a capital letter T) bearing the same names. It is in these folders that the construction blocks of each instrument of the score are prepared. Double-click on the folder named Rhythm. Its contents appear:
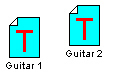
Each instrument is inside a sub-folder. Double-click on the Guitar folder and its contents appear:
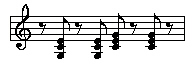
Double-click the Guitar 1 element and the contents of the measure appear:
It is here that you can modify the contents of what the guitar will play during the main rhythmic. The notes must be introduced as if it was a C major chord. When Pizzicato finds other chords, it will adapt the notes but will respect the rhythmic structure and the number of notes. Close the score. In this case, there are two elements. Open Guitar 2 to see what it contains then close it.
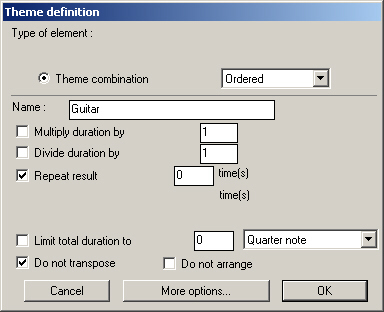
Open the options dialog box of Guitar 1 (double-click with the Control key). Notice that the total duration of the theme is limited to 4 quarter notes. Close this dialog box. Close the Guitar window. Open the Guitar folder options now:
It is an ordered combination which is repeated ad infinitum (repeat "0" times). The Guitar 1 and Guitar 2 elements in this folder will thus be alternated during the rhythm. It will not be transposed. Pizzicato will thus simply adapt the contents to the closest notes of the current chord. Close this window.
Consult several other elements now in order to find what they contain.
Close all windows other than the main view. We will see now how the Rhythm score is built. Double-click on this score (blue). The score view appears and shows you the libraries contained in the measures. The score (just like the 3 others) contains 1 measure and the same number of instruments as the template. The themes folders are placed by instrument in the measures. When you drag this score in the sequencer as we did, the contents of each instrument is copied in the destination measure. It is a very easy way to structure an accompaniment. Without that, it would be necessary to separately drag each folder into the correct measures of the score, for each instrument and each type (intro, rhythm, break and end).
To build a new type, you need to create a score of only one measure and that contains the same number of staves as the template. Then create and place library elements (themes, rhythms, melodies) in the measure of each instrument. The new elements created can remain in the main view or be grouped in a new folder.
To modify a style, here are the points on which you can act:
- Directly modify the theme element of a measure contents. You can use the notes, chords and accidentals tools as explained in the course.
- Add theme elements in the instruments folders. You need to select the New element… then New theme… item in the Edit menu and to complete them as explained in the course about the musical libraries.
- Modify the elements and folder options. You can make them random, ordered, or inverted sequences. You can repeat the notes and the rhythms and use all characteristics of the composition libraries.
- Modify the characteristics of the instruments with the instruments view associated with the Template score (volume, sound,…).
- Add other scores to the 4 Intro, Rhythm, Break and End scores. You can for example create Rhythm A and Rhythm B scores which are alternatives of the style. You need each time to complete these scores with theme elements.
Close the document without saving the changes. To create a style, you can either start from an existing style and modify its elements, or use the New style template located File menu, Open template, Accompaniments item. The structure is similar to the 20 accompaniment styles but the library elements are empty. We advise you the following steps to create a new style starting from this document:
- Decide which instruments will play and adapt the instruments view of the Template and Example scores. You can of course remove or add staves, but it will have to be done for each score of the document. You can create in this manner complete symphonic orchestra styles and create scores corresponding for example to chords or effects by families of instruments or melodic lines of accompaniment, arpeggios, etc.
- Decide the time signature with which you will work (by default 4/4). Correct the musical scores accordingly. Also modify the duration of each library element (by default limited to 4 beats).
- In the Rhythm folder, complete the musical elements of the main rhythm. Test them progressively by using the Rhythm score in the Template score.
- Complete then the Intro, Break and End folders. Adjust what is necessary by testing the style with chords progressions and scores structures.
- If you wish to add it to the 20 Pizzicato accompaniment templates, save this style in the Accompaniments folder in the Templates folder (Pizzicato main folder). It will then automatically appear in the templates available in the Open template item from the File menu.
Professional |
Composition Light |
Composition Pro |