Light


Beginner
Professional
Notation
Composition Light
Composition Pro
Drums and Percussion
Guitar
Choir
Keyboard
Soloist
| Instruction manual - Pizzicato 3.6.2 | EN720 - Revision of 2013/05/29 |
Light |
Beginner |
Professional |
Notation |
Composition Light |
Composition Pro |
Drums and Percussion |
Guitar |
Choir |
Keyboard |
Soloist |
Learning the musical keyboard
Subjects covered:
How to learn the keyboard with Pizzicato? [Light] [Beginner] [Professional] [Notation] [Composition Light] [Composition Pro] [Drums and Percussion] [Guitar] [Choir] [Keyboard] [Soloist]
In this lesson, we will see how to use Pizzicato various tools and windows to learn playing the musical keyboard. The purpose is to learn how to read a musical score with progressive exercises on the level of rhythms and notes.
To learn how to play a musical score with the keyboard, we will use the following aspects of Pizzicato:
You must well understand the handling of the first four aspects. For the musical libraries, we advise you to read the Composition libraries (1) lesson to have at least an outline of what they are. If later you wish to personalize the exercises and really understand what happens in this lesson, we highly advise you to read all lessons about musical composition libraries.
You must also understand the content of the main music lessons, in particular the lessons speaking about notes, rhythms and the musical keyboard layout.
The keyboard learning exercises will be done each time with the following steps:
The regular practice of these steps will increase your ability to play a musical score. The rest of this lesson will explain you each step in detail.
Organizing the screen [Light] [Beginner] [Professional] [Notation] [Composition Light] [Composition Pro] [Drums and Percussion] [Guitar] [Choir] [Keyboard] [Soloist]
Several documents are prepared for keyboard learning. They are located in the Music folder, in the DataEN folder.
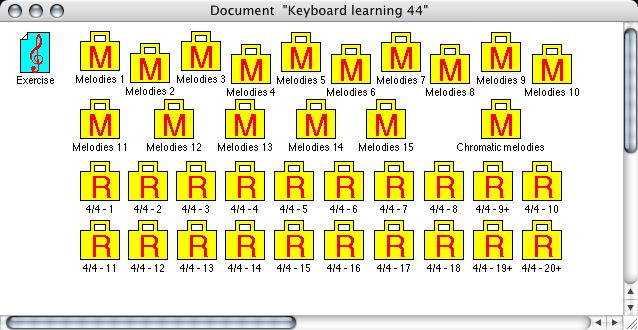
Start Pizzicato and close the default document. Check that the Windows, Windows management option is well set on Free. Then open the Keyboard learning 44.piz document, located in the Music folder, inside the DataEN folder. It is a set of melodies and rhythms written for a 4/4 measure. The main view appears as follows:
The element of the top left corner is a musical score that comprise 12 4/4 measures. The folders with an "M" contain random melodies, classified from 1 to 15 per increasing difficulty. By going from Melodies 1 to Melodies 15, the notes are more and more dispersed and it increases the difficulty of reading. The chromatic melodies folder (by half tones) is even more difficult, because it also contains the accidental notes (keyboard black keys). The folders with an "R" contain rhythms of an increasing difficulty. They are numbered from 1 to 20. When the number is followed by a +, it means that the folder contains several different rhythms.
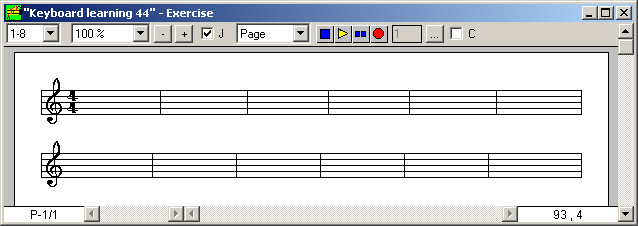
Double-click on the element named Exercise. Disable the document manager or resize the window to see all measures. The score displays 12 measures:
It is in this window that you will be able to place melodies and rhythms in order to generate the exercises.
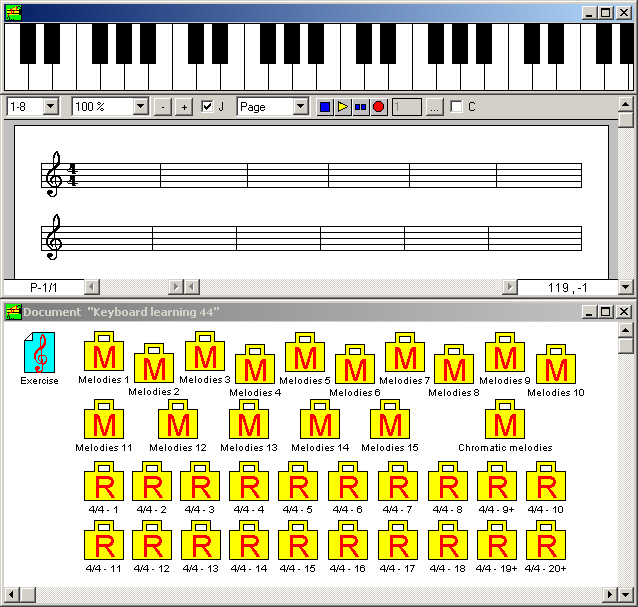
Open the keyboard window, using the Window menu. In the Options menu, select the Keyboard item. In the dialog box that appears, check (if it is not already done) the Fixed key width box and fill in value "8". Click OK.
According to the size of your screen, organize the windows to easily reach each one. Here is for example how to organize the screen:
With that screen, you can easily view the score and the keyboard keys. You also have an easy control of the metronome, the tempo (via the "..." button of the recorder) and the START and STOP recorder keys.
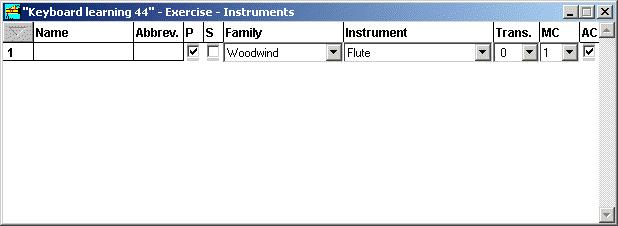
In the Windows menu, select the Instruments item:
The Family and Instrument columns let you select the sound with which you will play. By default for a GM synthesizer, the flute (woodwind family) is selected. You can modify this choice if you want. We highly advise you to use a sound that can be maintained as long as you keep the key pressed (organ, woodwind, brass…). It is not the case for the piano, guitar or percussion sounds because these sounds stop themselves after some time, even if you hold the key pressed. By following this advice, you will better hear the exact duration of the notes of the exercise. Close the instruments view now.
Progressive exercises generator [Light] [Beginner] [Professional] [Notation] [Composition Light] [Composition Pro] [Drums and Percussion] [Guitar] [Choir] [Keyboard] [Soloist]
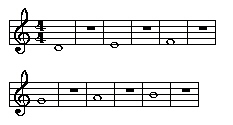
The measures of the score are for the moment empty. To create an exercise, you just need to drag a melody and a rhythm in the first measure. Click and drag Melodies 1 into the first measure of the score. Then do the same with the rhythm 4/4-1. At this time, Pizzicato calculates the exercise combining these two elements and you get for example:
As the notes are randomly selected, you will not necessarily get the same result. Your first exercise is thus ready. You can generate other exercises of the same difficulty by dragging again the same rhythm into the first measure of the score. Each time, Pizzicato will calculate a new exercise based on the two elements which you dragged into the first measure.
To change the type of rhythm, drag the desired rhythmic element into the first measure. Pizzicato automatically removes the previous rhythm and calculates a new exercise with the new rhythm. Drag for example the 4/4-7 element into the first measure. The score will display for example:
The same principle is valid to change the difficulty of the melody: drag the new melody into the first measure.
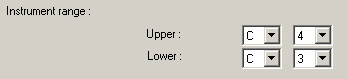
An additional factor may be used to vary the difficulty of the melody. By default, the notes are generated in a random way between the low C and the high C of the treble clef, i.e. eight different notes at the same time. If you do not have any notion of score reading, it would be wiser to start with only the first four notes C, D, E and F. The following adjustment may be done to modify the exercise range, i.e. the lowest and the highest notes of the exercise.
By holding down the Ctrl key, double-click the Melodies 1 element. In the dialog box that appears, click the button labeled More options… A part of the dialog box contains the following parameters:
By modifying for example the upper note to F 3, the notes generated in Melodies 1 will be limited between C3 and F3. This adjustment is specific to each melody, it will thus be necessary to do it each time you change the melody. It can also be used to increase the playing range. Once you control the 8 first notes, you will be able to widen the exercises upwards and/or downwards. With this, you can delimit the notes which will be used in the exercises. Click twice OK.
For the rhythms, you can also increase the difficulty. Once you control the exercises with the suggested rhythms, you will be able to do them again by dividing their duration by 2 or even by 4. You will then obtain eighth notes and 16th notes in the exercises.
To do that, double-click for example on the 4/4-1 icon by holding down the Ctrl key. In the dialog box that appears, the following area is used to activate the division of the durations and to select for example a value of 2 or 4:
Do this only when you perfectly handle the exercises. Click for the moment on Cancel.
Listening to the exercise and learning how to play it [Light] [Beginner] [Professional] [Notation] [Composition Light] [Composition Pro] [Drums and Percussion] [Guitar] [Choir] [Keyboard] [Soloist]
Now that you can generate an exercise according to the rhythms, melodies and range difficulties, you need to listen to it and to learn how to play it. Let us see this in practice for a very simple exercise.
- Modify the range of Melodies 1 as indicated here above, in order to have notes between C 3 (lower note) and F 3 (higher note).
- Drag the 4/4-1 rhythm in the first measure.
- Drag Melodies 1 in the first measure. You get your first exercise which contains a whole note every two measures. The notes are limited to the required ranger (4 notes).
- See that the score windows, recorder and keyboard are well visible.
- Activate the metronome ("..." button on the recorder). In the Options... menu, select the MIDI Play Options... item and to the right of Metronome measure, select Before playing. Click on OK. This forces Pizzicato to play an empty measure before starting the exercise. You can thus easily forecast the first beat to play.
- With the space bar, ask Pizzicato to play the exercise. You hear 4 metronome clicks (because it is a 4/4 measure) and then the exercise starts. A small black triangle follows the playing measure and the playing note is coloured in red during its time length. You can hear the notes and see them appear on the keys of the keyboard window. The first step of the exercise consists in locating in a passive way all what happens:
- Which note is played on the score?
- To what musical keyboard key does this note correspond ?
- How long is it played?
- Make the exercise play as many times as necessary so that you can easily forecast what happens at every moment. The metronome clicks help you to locate and count the beats. Do not go further before fully controlling this step.
- Now you will play with Pizzicato. With the space bar, start the exercise. Play the notes on your musical keyboard at the same time as Pizzicato does. If you do not have a musical keyboard, you can use the corresponding keys of the computer keyboard (see the lesson about the window keyboard).
- Play the exercise as many times as necessary. Your goal is to play each note at the correct time and with a correct duration. Compare your play with the one of Pizzicato and correct according to what you hear. For this, check if the moment during which you hold the key corresponds well to the colouring of the note, and if the pressed keyboard key on the screen is the same as the one played by Pizzicato.
- Be sure to understand why each note is played at such a time and with such a duration. If you do not understand why Pizzicato plays the notes like it does, read again the lessons about music, because something was not understood correctly about this subject.
- Once this exercise is under control, you can go to the next one. Drag another melody, another rhythm, or the same ones to have an exercise of the same difficulty level. The continuation of this lesson will give you the advised progression of difficulty (range, melodies, rhythms, tempo).
Fingering [Light] [Beginner] [Professional] [Notation] [Composition Light] [Composition Pro] [Drums and Percussion] [Guitar] [Choir] [Keyboard] [Soloist]
It is the art to correctly select the fingers to use when playing the notes of a score. All the exercises can be done as well with the right hand as the left hand, but use only one hand for all notes of the same exercise. Study each exercise with the right hand and then with the left hand (or the reverse if you are left-handed). You will notice that some exercises will appear more difficult with one hand than with the other. Here are some basic rules to select your fingering:
- The fingers are numbered from 1 (the inch or thumb) to 5 (the auricular or little finger) for both hands. In a study score, it is common to see these numbers placed just above the notes to specify to the student which fingering technique he must use.
- The purpose of the fingering technique is to be able to play a piece as easily as possible, with precision, flexibility and speed. It is a practice to use from the beginning. By playing a score very slowly, it may seem easier to you to play with only one finger. Nevertheless you will not be able to tie two notes correctly because it always takes a certain time to raise the finger, to move it and to press the other key. Take directly the good practice, even when you play very slowly: use all your fingers.
- As far as possible, avoid any useless motion of the hand. If you must play the 5 notes from C to G, use fingers 1,2,3,4 and 5 (right hand) or 5,4,3,2 and 1 (left hand). Thus take care to use your fingers in a natural way according to their position in front of the notes and move your hand only when necessary.
- When you must play more than 5 consecutive notes (a scale for example), the hand needs to be moved. To keep a continuity between the notes, one uses the passage of the inch (1) or the major (3) during the scale. Here is for example how to play the C scale with the right hand:
C(1) D(2) E(3) F(1) G(2) A(3) B(4) C(5)
- The inch (1) causes the moving of the hand. By going down, the fingering technique remains the same and it is the major (3) which causes the moving of the hand. For the left hand, the fingering technique becomes:
C(5) D(4) E(3) F(2) G(1) A(3) B(2) C(1)
- For series of longer notes, you can also make a passage of the fourth finger to get for example:
1 2 3 1 2 3 4 1 2 3 1 2 3 4…
- When the notes are not related any more (for example C, E, G), keep the same principle: minimize the motions and use the fingers in the most natural way compared to their position. Here is an example for the right hand:
C(1) E(2) G(3) C(5)
- You can also make a passage of the third or fourth finger for longer sequences:
C(1) E(2) G(3) C(1) E(2) G(3) C(5)
- On the left hand, that would give:
C(5) E(3) G(2) C(1)
C(5) E(3) G(2) C(1) E(3) G(2) C(1)
- To envisage the fingering techniques correctly, it is necessary to look at the notes being played a little in advance. The most obvious example is the scale. If you need to play only the first 5 notes, the most natural fingering technique is:
C(1) D(2) E(3) F(4) G(5)
- But the fact that the progression continues further forces to modify the fingering technique to be able to play in a continuous way the 8 notes:
C(1) D(2) E(3) F(1) G(2) A(3) B(4) C(5)
- For the exercises of the course, take care to play the notes in a tied way. When two notes follow each other (i.e. there is no rest between them), the first note must exactly stops when the next note starts, without leaving a vacuum between the two and without superimposing the sounds of the two notes. Therefore you must raise your finger at the same time as you press the next finger. Work slowly to develop that ability from the beginning.
Sounds [Light] [Beginner] [Professional] [Notation] [Composition Light] [Composition Pro] [Drums and Percussion] [Guitar] [Choir] [Keyboard] [Soloist]
In order to better distinguish the melody played by Pizzicato and the one you play, you can ask Pizzicato to play with another sound. This is only possible with Pizzicato Beginner or Professional. For this, do what follows.
- Add a second staff in the score view.
- Open the instruments view. For the first line, select the sound with which Pizzicato will play. For the second line, select the sound with which you will play. Remove the cross in the two boxes of the AC (automatic channel) column. In the MC (MIDI Channel) column, select "2" for the first line and "1" for the second line. Close the instruments view.
- Start the score and play at the same time.
Another possibility (without making this) consists in playing the notes an octave higher. The exercise is the same but you play a whole octave higher (or lower) in order to better distinguish the notes you play from the notes Pizzicato plays.
Learning progression [Light] [Beginner] [Professional] [Notation] [Composition Light] [Composition Pro] [Drums and Percussion] [Guitar] [Choir] [Keyboard] [Soloist]
Here is the advised progression of study for the keyboard training. Use this progression well, with the following principles in mind:
- Apply each step explained in this lesson.
- Do not go to a new exercise before you perfectly handle the current one.
- If an exercise really seems too difficult to you, do the following steps:
- Decrease the playing speed (tempo) with the recorder,
- If it still does not work, return to the previous exercises, until the moment you can do them easily. Then come back to the more difficult exercise.
- If you need it, read the lessons about the musical theory again, because there can be something which you did not understand well and which prevents you from playing the exercises correctly. Use the glossary to be sure to understand all words of these lessons.
- If exercises really seem too easy for your level (provided that you can play them without fault), do not hesitate to skip some exercises to increase the level of difficulty. To force yourself to make exercises for principle of doing them all whereas you master them can be discouraging, because one does not feel a progress. To keep it interesting, take care to adapt the difficulty level throughout your progression.
Here is the list of the basic steps. Mark on paper each finished step.
With the Keyboard exercises 44.piz (measure 4/4) file, do the following exercises:
- Range from C3 to F3 with Melodies 1; take a tempo of 60 to start and increase gradually to 100; use the following rhythms, in order from 1 to 20:
1 - 2 - 3 - 4 - 5 - 6 - 7 - 8 - 9 - 10 - 11 - 12 - 13 - 14 - 15 - 16 - 17 - 18 - 19 - 20
- Range from C3 to C4 with Melodies 1; take a tempo of 60 to start and increase gradually to 100; use the following rhythms, in order from 1 to 20:
1 - 2 - 3 - 4 - 5 - 6 - 7 - 8 - 9 - 10 - 11 - 12 - 13 - 14 - 15 - 16 - 17 - 18 - 19 - 20
- Range from C3 to C4 with rhythm 19; take a tempo of 60 to start and increase gradually to 100; use the following melodies, in order from 1 to 15:
1 - 2 - 3 - 4 - 5 - 6 - 7 - 8 - 9 - 10 - 11 - 12 - 13 - 14 - 15
- Range from C3 to C4 with the chromatic melodies; take a tempo of 60 to start and increase gradually to 100; use the following rhythms, in order from 1 to 20:
1 - 2 - 3 - 4 - 5 - 6 - 7 - 8 - 9 - 10 - 11 - 12 - 13 - 14 - 15 - 16 - 17 - 18 - 19 - 20
With the Keyboard exercises 34.piz (3/4 measure) file, do the following exercises:
- Range from C3 to C4 with melodies 1 to 15; take a tempo of 100; work with the following rhythms:
1 - 2 - 3 - 4 - 5 - 6 - 7 - 8 - 9 - 10 - 11 - 12 - 13 - 14 - 15 - 16
- Range from C3 to C4 with the chromatic melodies; take a tempo of 100; work with the rhythms:
16 - 15
With the Keyboard exercises 68.piz (measure 6/8) file, do the following exercises:
- Range from C3 to C4 with melodies 1 to 15; take a tempo of 40 and increase gradually up to 60 beats per minute; work with the following rhythms:
1 - 2 - 3 - 4 - 5 - 6 - 7 - 8 - 9 - 10 - 11 - 12 - 13 - 14 - 15 - 16 - 17 - 18 - 19 - 20
- Range from C3 to C4 with the chromatic melodies; take a tempo from 40 to 60; work with the rhythms:
22 - 21
Here is the additional suggestions to increase the difficulties and the variety of the exercises:
- You can do the same exercises by dividing the duration of the rhythms by 2 and then by 4. You will obtain eighth notes and 16th notes and the rhythmic aspect will be more difficult.
- You can extend the range of the playing notes. By placing it for example between C 3 and C 5, you will have a range of 2 octaves. If you lower the range (from C 2 to C4) you will get exercises with notes in bass clef and treble clef.
- You can work each exercise with the right hand, the left hand or even the two hands at the same time (by playing the right hand for example an octave higher).
- With a good understanding of the composition libraries operation, you will be able to give free course to your imagination. You will be able in particular to create scores with several staves (to work with both hands at the same time) and to add accompaniments with chords progressions. You will be able to learn how to play all generated exercises.
Learning to play with an accompaniment [Light] [Beginner] [Professional] [Notation] [Composition Light] [Composition Pro] [Drums and Percussion] [Guitar] [Choir] [Keyboard] [Soloist]
Only Pizzicato Professional
will allow the following exercises.
If you do not have that version, use
the demonstration version to give it a tryHere is a series of exercises accompanied in various light music styles. You are not forced to finish all the other exercises to begin them. We nevertheless advise you to work some exercises from the beginning of the lesson, in order to understand the basic principles.
Pizzicato contains various styles of light music accompaniment (Disco, Reggae, Jazz, Rock, Funky…). To exploit these styles of accompaniment as well as possible, see the lessons about the composition libraries. We will see here the steps necessary to learn the keyboard by being accompanied by a small light music orchestra.
- Open the document corresponding to the style you wish to work. The styles are available in the File menu, in the Open a model item, Accompaniments sub-item. Open for example Jazz. The main view displays a whole series of icons which constitute the basic elements of the style.
- By holding down the Ctrl key, double-click on the Example icon located in the top left corner. The sequencer view opens.
- Drag the Melodies icon into the second measure of the sequencer view first track (Labeled Sol. for Soloist).
- Do the same with one of the rhythm icons (folders with an "R").
- Click on the sequencer window to activate it, and in the Edit menu, select the Generate score item. Pizzicato then calculates the melody and the accompaniment. The notes of the melody are selected in a random way but they respect the chords progression associated with the style.
- Open the scrolling view or the score view, the keyboard and the recorder windows and organize your screen as explained at the beginning of this lesson.
- First listen to the melody with its accompaniment. Visualize the notes and the keyboard keys. Then try to play with Pizzicato. Correct yourself by listening to the version of Pizzicato.
- When you control the exercise, you can either generate others of the same level, modify the rhythmic element or change the style (close all windows without saving and go back to the beginning).
To work accompanied melodies, we advise you:
- For the rhythmic aspect, work the rhythms folders by increasing difficulty (from 1 to 20). When you control these levels of difficulty, use a division by 2 or 4 of the rhythmic elements, as explained in the first part of this lesson.
- To get a different melody of the same difficulty, select all measures and select the Generate score item in the Edit menu. Pizzicato computes another melody for you.
- The notes of the random melodies have by default a range of one octave (from C3 to C4). You can decrease or increase these values as explained in this lesson.
- Although these exercises with accompaniment are more pleasant than playing alone, do not neglect the exercises indicated at the beginning of this lesson. In a general way, the accompanied exercises are more difficult. The other exercises propose more continuous melodies, because the notes are not related to any chord.
- Do not hesitate to decrease the tempo of some accompaniments.
- When you control an exercise well, you can disable the play of the melody by Pizzicato (P column of the instruments view) and play it as a soloist with Pizzicato accompanying you. Then you can try to play other notes and to amuse yourself to improvise on the accompaniment. Listen to the notes which sound good and locate the moment where it happens. Compose your own melodies based on each accompaniment.
If you modify the documents of the Music folder used for learning, you can easily get the originals back by reinstalling Pizzicato. Your other documents will remain present.
It is by a regular practice of this lesson exercises that you can manage to read scores. You will progressively feel progress with these exercises. Alternate the exercises alone and the accompanied exercises. Vary the styles of accompaniment and the types of rhythms. Good learning and have fun!
Light |
Beginner |
Professional |
Notation |
Composition Light |
Composition Pro |
Drums and Percussion |
Guitar |
Choir |
Keyboard |
Soloist |