Professional


Notation
Composition Pro
| Instruction manual - Pizzicato 3.6.2 | EN690 - Revision of 2013/05/29 |
Professional |
Notation |
Composition Pro |
Editing graphic and Midi symbols (5)
Subjects covered:
Midi effects on the score performance [Professional] [Notation] [Composition Pro]
We now approach the other side of symbols. One or more Midi effects may be associated with a symbol so as to produce a sound effect when Pizzicato find this symbol in the score.
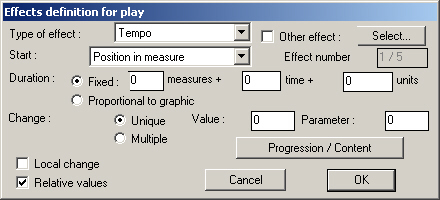
- Start Pizzicato and open our Test palette. Double-click on the created symbol. Activate the MIDI Play option and click the Define play… button. You get the play effect definition dialog box:
This dialog box defines how the symbol will influence the score performance.
- The first menu is entitled Type of effect. It is used to specify the sound effect produced by the symbol. By opening this menu, you get the following choices:
- The Tempo influences the speed with which the score is played. A symbol will be able to modify the tempo at a given time of the score.
- The Velocity represents the force with which notes are played on the keyboard. A symbol can modify this force, for example to accentuate a note.
- By selecting the MIDI Controller item, you can directly influence some parameters of your synthesizer, like the sound volume, the reverberation, the panoramic… at least if your synthesizer answers to these messages. To select the controller number to use (between 0 and 127), fill it in the text box labeled Parameter.
- The Instrument-patch item changes the instrument playing. The symbol sends an instrument number to the synthesizer.
- Poly / Mono After touch are used to simulate an effect executed with some musical keyboards. After a key is pressed, it is possible to press or release the pressure of this key to produce a sound effect. Such a symbol placed on the score can thus simulate this pressure on the key. The poly is a total pressure which affects all notes while the mono only affects the pressed key.
- The Pitch Bend simulates the adjustment lever often present beside the musical keyboard. It influences the pitch of the sound in a continuous way. A symbol can thus simulate this effect on the score.
- The Transposition can be modified by a symbol. Notes are shifted up or down.
- The Note duration and the Start of notes can be influenced by a symbol.
- The Note sequence in a symbol adds new notes in the measure. It is used for example to create trills.
- The Midi data can be used to transmit any Midi message.
Keep the Tempo choice for the type of effect.
- The choice entitled Change is used to select between Unique and Multiple. It specifies the duration in which the effect will be active.
By selecting Unique, the change is instantaneously done. In this case, the single value must be specified in the text box entitled Value. By placing for example "120" with the Tempo effect, when Pizzicato finds this symbol in the score, it will at once modify the tempo to 120. By placing "100" for a reverberation controller, the level of reverberation will be set to 100 when the symbol is played.
By selecting Multiple, the change can be done over a specific duration. This duration can be specified by a multiple choice labeled Duration and with 3 text boxes. By selecting a Fixed duration, you can specify this duration in the text boxes as a number of measures, beats (quarter note) and beat units (480 units = 1 quarter note). In this case the duration of the effect is very precise. By selecting Proportional to graphic, the duration of the effect is calculated proportionally to the graphic width of the symbol in relation to the measure. Thus a symbol which extends itself on half the measure width would last half of the measure duration. This method is less precise than the fixed duration.
Fill in the duration so that it last one measure.
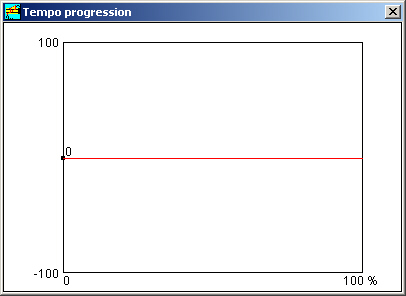
- In the Multiple case, one value is not enough to specify the full effect. You need to specify how the effect value will progress within its duration. Click on the multiple choice and then on the Progression/content button. The progression dialog box appears:
The horizontal axis is graduated between 0 and 100 % and represents the total duration of the effect as it was previously specified. The vertical axis is graduated from -100 to 100 units of tempo. The vertical scale depends in fact on the type of effect.
Close this dialog box (on Mac, this window has no closing box, use the return key to close it). Notice that the Relative values box is checked. It means that the value shown will be added to the value already present in the score. This is why the graph above goes from -100 to +100, in order to either decrease or increase the tempo. The effect of this box is also valid for a Unique value. Thus, if you place a unique value of -20 and if you place this symbol on the score, Pizzicato will slow down by 20 units of tempo. If the tempo was playing 100 quarter notes per minute, it will thus slow down to 80 quarter notes per minute. The effect relates thus to the value existing before the symbol. The principle is the same for the other effects like volume, etc.
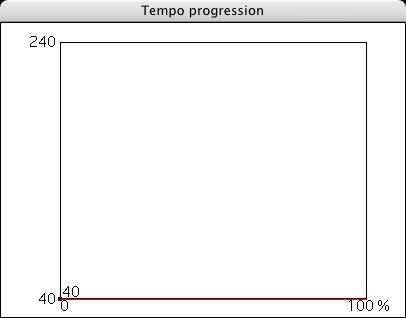
- Now disable the Relative values check box and click on the Progression/content button again. The dialog box becomes:
The vertical axis displays the possible values of the tempo between 40 and 240. In this case, Pizzicato will not take into account the preceding value of the tempo and will use the values specified here.
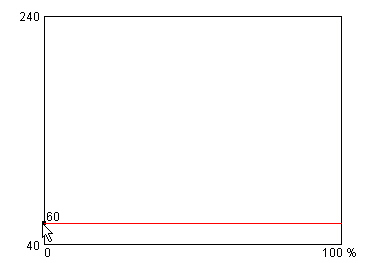
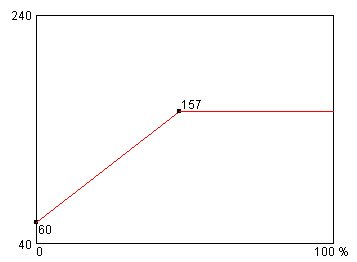
The red line specifies the value of the tempo throughout its progression. The value of the tempo is represented by a small black square that you can move. Click and drag this value upwards to bring it to 60:
To get more precision, you can zoom to increase the window size. The red line follows the value.
- The progression may consist of several points connected by lines. Locate the mouse cursor in the middle of the graph and double-click. A new point is created and the progression becomes:
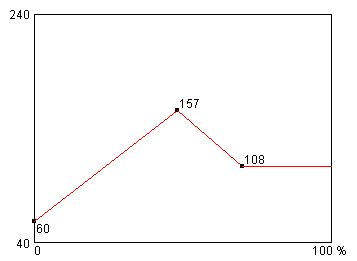
The added point may also be moved by clicking and dragging it with the mouse. Add another point to get:
When Pizzicato finds this symbol in the score, it first sets the tempo to 60 and accelerates up to 157. It then slows down to get to the tempo of 108 and keeps this tempo from there on. The time during which this progression occurs depends on the duration specified in the first dialog box.
To erase a point of the progression, click on this point while holding down the control key. Erase the second point and close this window.
- In the lower part of the dialog box you will find the Local change option. By checking this box, the modifications produced by the symbol will only have a local effect. The preceding value of the effect will automatically be set back as soon as the progression is finished. In our example, if the tempo was 100 before this symbol, it will be set back to 100 as soon as the progression is finished.
- In the upper part of the dialog box you will find a menu labeled Start. It is used to determine the precise moment when the progression or the unique effect will be triggered.
The first choice, Position in measure, fixes the start of the effect proportionally to the graphic position of the symbol in the measure. This positioning mode is rather inaccurate because the graphic distribution is not always proportional to the time distribution in a measure.
The following choice, Attached note, is very precise when the symbol is associated with a note or a rest. The start of the effect occurs exactly when the note is played.
The third choice, Start of measure, fixes the start of the effect exactly at the beginning of the measure.
The choice depends on the precision to which the effect must be played as well as on the importance of a synchronization with a note.
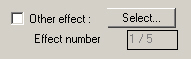
- The upper right part of the dialog box contains the following elements:
You can cumulate up to 5 independent Midi effects, activated by the same symbol. The numbers "1 / 5" show that it is the first effect that is presented in this dialog box. Check the Other effect box now and click the Select... button. The text area now displays "2 / 5" and the other elements of the dialog box take their default values again. This dialog box displays the second effect that you can specify. It can be of a different type and may have durations and starts different from the first effect.
To add a third effect, check the Other effect box again and click on the Select... button. The text displays "3 / 5" and the dialog box may be used to introduce the values of the third effect. You can continue like this to cumulate 5 effects.
Once an effect is defined, you can return to the previous by clicking OK. The number decreases for example from 3/5 to 2/5 and the values of effect 2 are displayed in the dialog box. By clicking again OK, you come back to 1/5. Clicking once more would close the dialog box.
- In the menu labeled Type of effect, select the Midi data item. This type of effect does not contain any duration, value or progression. By clicking on the Progression/content button, you get a dialog box to specify its contents:
The text box is used to introduce Midi data which will be transmitted to the synthesizer. This kind of action is addressed to the Midi specialists. The data must be introduced in hexadecimal form and separated by a comma or a line break. Here is an example:
9A, 5F, 40, 8A, 5F, 40
Click OK to confirm the data and close the dialog box.
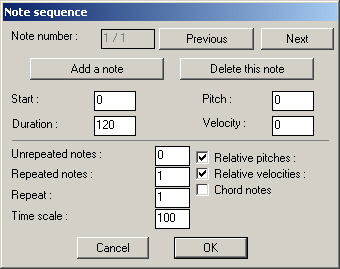
- Another effect requires some explanations. Select the Note sequence item in the type of effect menu. Click then on the Progression/content button. Here is the dialog box which appears to specify a sequence of notes:
The upper part defines one or more notes. This aspect is rather difficult to understand, be ready! Each note is defined by 4 parameters: Start, Duration, Pitch and Velocity. The string "1/1" shows that the displayed parameters are those of note number 1 and that there is a total of one note.
Two buttons are used to add a new note or to erase the current note. Two other buttons let you visualize the next note or the previous note.
When Pizzicato plays the score, a note sequence will be played to replace the note to which the symbol is attached.
By default, the pitches and velocities define the notes relative to the note to which the symbol is attached. The option can be disabled for the pitches or the velocities thanks to the check boxes located in the lower part of the dialog box. When relative, a pitch of "0" means the same pitch than the associated note, +2 means 2 half tones higher and -2 means 2 half tones lower than the reference note.
The pitches can be extracted from a chord, if the symbol is associated with a chord in the score. To achieve that, check the Chord notes box. This feature is used to create chords played in arpeggios.
The start of the first note relates to the associated note. The other starts of the notes always relate to the beginning of the previous note. They are expressed in units of 480th of a quarter note.
The durations are expressed in the same units. When a duration is negative, it means that it relates to the duration of the reference note.
In the lower part, four text boxes give additional indications on the way in which these notes will be played.
The first box specifies Unrepeated notes. It is the number of notes that will be played only once.
The second box specifies Repeated notes. The number specified here is the total of the notes that will be repeated, the third box specifying the number of repetitions to do. If the sequence has 5 notes and that you set 2, 2 and 10 in these 3 text boxes, it means that the first two notes will be played once, the two next notes will be repeated 10 times and that the last note will be played once to finish the sequence. By placing "0" as the number of repetition, Pizzicato will repeat the notes so as to fill the full duration of the associated note. This system is used to create trills and rolls of various kind.
The fourth box modifies the time scale. 100 % corresponds to the values indicated in the start and duration boxes for each note. By increasing this percentage, you multiply its durations, so as to loosen or tighten a trill. This parameter can be modified locally, so as to adapt a trill in each particular case.
Examples of Midi effects [Professional] [Notation] [Composition Pro]
After the theoretical side, we will consult several examples of the original symbols library, by focusing the attention on the most significant points.
- Close the dialog box by clicking OK and click twice on Cancel. Open the Main Symbols palette. Double-click on the symbol:
and click the Define play... button. This symbol acts on the velocity, i.e. on the hitting force of notes. The effect is produced on the exact start of the note associated with the symbol. Its value is unique and it sets the velocity to 96. The relative option is not checked, it is thus the real velocity value. The local option is not checked, the velocity of 96 is thus valid from this moment up to the next change. Click twice on Cancel.
- Double-click the symbol:
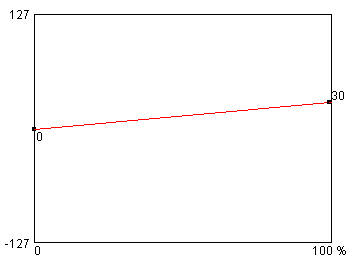
and click on Define play... button. The effect used is also the velocity. It starts when the associated note is played. It is a multiple change which extends over the symbol length. Click on Progression/content. The following progression defines the evolution of the effect over its overall duration:
It gradually adds 30 units of velocity to the value present at this point in the score, because the Relative values option is checked. The Local change option being disabled, the velocity value will be increased by 30 units throughout the symbol and will keep the same value up to the next change. Close this dialog box and click twice on Cancel.
- Double-click the symbol:
and click on Define play... button. This symbol affects the notes duration. The effect is taken into account at the beginning of the note and lasts 10 units (i.e. sufficiently to include the note start). The duration of the note is fixed at 50 % of its normal value. As the effect is only local, the notes that follow will not be affected. Click twice on Cancel.
- Double-click the symbol:
and click the Define play button... It affects the transposition by adding +12 half tones to the current value (the Relative values option is checked). This transposition remains valid from then because the change is not local. The effect is taken into account when the note is played. Click twice Cancel.
- Double-click the symbol:
and click the Define play... button. It locally affects the duration of notes by setting durations to 100 %. It occurs for a duration proportional to its graphic width in the measure, starting from the associated note. Click twice Cancel.
- Open the Other symbols palette and double-click the symbol:
and click the Define play... button. It simulates the piano pedal. It is the Midi controller 64 which allows to command this effect on a synthesizer. This number (64) is thus specified as the parameter of the controller. The duration is proportional to its graphic width. It is multiple, the progression goes to +127 (pressed pedal) at the beginning and goes down to 0 (released pedal) just at the end. Click twice Cancel.
- Open the Ornamentations palette and double-click the symbol:
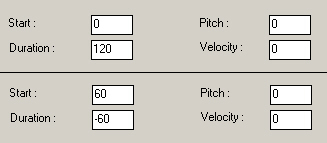
Then click the Define play... button. The effect uses a sequence of notes. Click Progression/content. Two notes are defined (use the buttons Previous and Next to reach them):
The pitches and the velocities are relative to the associated note. The first note starts at the beginning of the effect and lasts 60 units (= 32nd note). As its pitch is -1, this note is located one half tone lower than the associated note. The following note begins 60 units after the start of the first (it thus starts when the first notes stops). Its pitch is 0, i.e. the pitch of the associated note. Its duration is negative, which means that it is the duration of the original note minus 60 units.
In the lower part of the dialog box, the first area specifies that the 2 notes are played only once (not repeated). The global effect of this symbol is thus to replace the associated note by a short note one half tone lower followed by a note which lasts the rest of the original duration with the original pitch. Click three times on Cancel.
- Double-click the symbol:
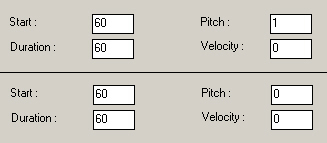
and click on the Define play... button. Click Progression/content. It is another example using the sequence of notes, this time with a repetition. Two notes are defined:
Each note has the duration of a 32nd note. The first is one half tone higher than the associated note. There are no unrepeated notes and the 2 notes are repeated. As the number of the repetitions is 0, Pizzicato will repeat these notes to fill the duration of the original associated note. The produced effect is thus a trill between the original note and the note located one half tone higher. The time scale is 100 % per default and can be modified locally. Click three times Cancel.
- In the Main Symbols palette, double-click the symbol:
and click the Define play... button. Click Progression/content. The Chord notes option is checked. 10 notes are defined with decreasing durations and starts shifted by 30 units (64th note). This case constitutes an exception which is used only for this particular symbol. The pitches of notes are taken on the notes of the chord with which this symbol must be associated. This chord can contain a maximum of 10 notes. If less notes are available, the values defined in excess in this dialog box are without effect.
The effect of this symbol is to play the notes of the chord in arpeggio, by shifting the notes successively and by reducing their durations proportionally so that they stop at the same time. In this precise case, the starts of notes are given in relation to the associated chord and the duration of a note is equal to the duration of the chord minus the start of the note. Click three times Cancel.
We advise you to consult other symbols, until the moment you can easily understand how they are defined. Do not hesitate to read again the lessons about the edition of symbols. Also use these symbols in simple measures in order to hear the result produced with the synthesizer. This aspect of Pizzicato is used to considerably enrich the performance of a score played by the computer. It requires a good theoretical and practical understanding of these lessons. By reading them several times and by making your own experiments, you will master them.
To erase the Test palette created for these lessons, open this palette and with the right mouse button, click inside it. Select the Delete this palette…item. Click Yes to validate.
Professional |
Notation |
Composition Pro |