Light


Beginner
Professional
Notation
Composition Light
Composition Pro
Drums and Percussion
Guitar
Choir
Keyboard
Soloist
| Instruction manual - Pizzicato 3.6.2 | EN430 - Revision of 2013/05/29 |
Light |
Beginner |
Professional |
Notation |
Composition Light |
Composition Pro |
Drums and Percussion |
Guitar |
Choir |
Keyboard |
Soloist |
Real time recording (1)
Subjects covered:
Watch also the following video:
Real time recording [Light] [Beginner] [Professional] [Notation] [Composition Light] [Composition Pro] [Drums and Percussion] [Guitar] [Choir] [Keyboard] [Soloist]
The real time expression means that the exact time sequence of musical events is taken into account. Up to now, the methods explained to introduce notes on the staff let you work without time constraint. The time factor appears only when Pizzicato plays the score.
If you can play a score on the musical keyboard (even slowly), it is interesting to ask the computer to record your performance. This is called real time recording, because the computer memorizes the precise sequence of notes coming from the keyboard and it can reproduce them exactly as you played them. Pizzicato becomes a MIDI recorder.
A MIDI track is associated to each staff of a score. It is a memory used to accumulate time sequences of MIDI information. The real time recording is the method used to fill a track with notes you play on the keyboard and then to transform them into music notation on the corresponding staff (automatically or not).
You can thus record one track at a time and listen to the result of all tracks together. Pizzicato acts as a MIDI sequencer, i.e. as a multi-track MIDI recorder. With only that, you can already build a whole piece of music. By working in the sequencer view, the notes appear as small horizontal bars. You can copy, paste and erase measures. You can record a track or a part of a track several times, until it is finalized. In the score view, Pizzicato analyzes the keys which you played and converts them in notes with rhythmic values. The result of your performance appears on the staff and you can print your score.
A corrective step can be introduced just after the play, it is called quantization. This operation tries to smooth your performance so that it is more precise. Use it with moderation because it may affect the final result too much.
In this lesson and the next, we will see how to use these concepts in practice and with examples. Let us start by analyzing the recording area, present in most views and also called the recorder.
The recorder and its options [Light] [Beginner] [Professional] [Notation] [Composition Light] [Composition Pro] [Drums and Percussion] [Guitar] [Choir] [Keyboard] [Soloist]
The recorder determines the control of the MIDI playing and recording. It is present for instance in the score and sequencer views.
- Start Pizzicato and open the Ex045 document of the Examples folder. The score view shows the recorder:
The left part contains 4 traditional pictures found on a tape recorder.
- Click on the START key, represented by a yellow triangle
- The score starts playing. We had already used its shortcut which is the space bar. Click on the STOP key to stop the score, represented by a blue square.
- To the right of these keys and since release 3.2 of Pizzicato, you will find in almost all music views the presence of the following graphical area:
With it, you can play some measures in a loop, starting at the first measure that is played. To do that, check the box and select the number of measures that will form the loop, with the - and + buttons.
When Pizzicato plays, the space bar is also used as a shortcut for the STOP.
- Click again on START. In the right part of the recorder, a text box displays the current playing measure. Click on the PAUSE button, represented by two little blue squares. The score stops instantaneously where it is, holding the possible playing notes. It is fixed at a precise time of the score. Click again on the PAUSE and it continues playing again from there. With it, you can listen to (or visualize using the keyboard window) the constitution of a chord. You just need to use the PAUSE during the chord.
The recording button will be used further; it is represented by a red circle.
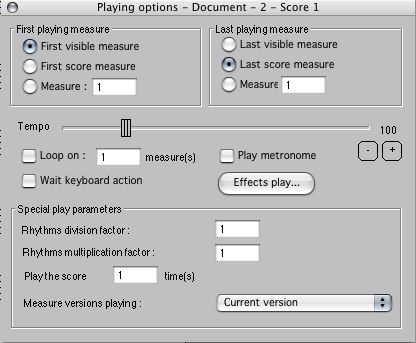
A button entitled "..." is used to reach the play options of the score. Click on this button and the following dialog box appears:
This dialog may stay open and do not impede working on the score. You may move it so as to ease the access to the score.
- The first two frames let you select the measures that will be played when using the START button. By default, the first visible measure will start playing and this up to the end of the score. But other choices can be made.
- Just below, there is a tempo slider, used to determine the speed with which the score will be played. Press on START and while listening to the score, modify the tempo value by moving the slider to the left to slow down, then to the right to accelerate. It can vary between 1 and 500. The "-" and "+" buttons allow a precise adjustment of the tempo, one step at a time.
- Just below is a check box entitled Loop on ... measures. Check this box and complete the text box value with "2" if it is not already done. Go to the first measure of the score and press START. The score starts playing the first 2 measures and then plays the first again. It makes a continuous loop with the first 2 measures. Note that during this time, you can continue to work the score by erasing, moving or adding notes. Pizzicato continues its loop with the first two measures. By using the corresponding text box, you can modify the width of the loop. Click on STOP.
- A check box lets you activate the metronome. In music, a metronome is a small device used to indicate a tempo using a regular movement and an audible "click". The performer uses these clicks as a time reference to play his score with an exact tempo and with a precise sequence of measure beats. The metronome is a reference mark to guide its performance. By checking this box, Pizzicato simulates the sound of a metronome by marking each measure beat and beginning. Check this box and press on START. If you have a synthesizer or a GM (general midi) sound card, the beats and the beginnings of measures are marked using percussion instruments. Note that the beginning of the measure is marked with a sound of different intensity. If your synthesizer is not GM compatible, the beats and measures will be marked with a short and high pitched sound. Press on STOP.
- Check the Wait keyboard action box. This box is used to control the recorder with the musical keyboard (also from the keyboard window). Press on START. The button is activated, the triangular cursor shows the first measure on the score, but Pizzicato waits until you press a musical keyboard key to really start playing. When you need to record a passage in real time, you may prepare yourself to play on your keyboard before giving the OK to record. Press a musical key to start playing or on a window keyboard key if you do not have a MIDI keyboard. For the rest of this lesson, uncheck this option.
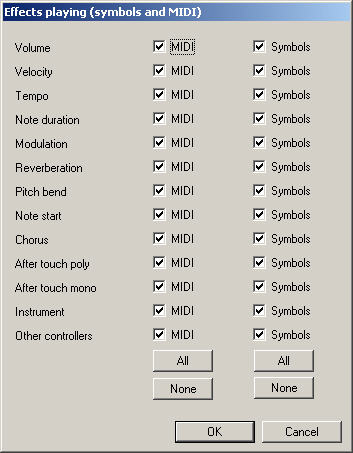
- The Effects play... button is used to define the way in which MIDI and symbol musical effects will be played through the score:
This dialog lets you disable/enable the musical effects generated by the MIDI tracks and/or the symbols placed on the score that influence the playing, like nuances, tempo symbols,... For more details about musical effects, see the lesson on musical effects.
- The Tuning button let you specify the exact frequency of each note. However, this function is only applicable to the playing of virtual audio instruments by Pizzicato and does not affect the tuning of MIDI notes. See the lesson entitled The virtual instruments for more details.
- In the play option dialog, we find a frame entitled Special play parameters with the following options:
- The rhythm division and multiplication factors let you divide/multiply the duration of all rhythmic values in the score.
- A text box determines how many times the score must be played.
- A popup menu specifies which measure version is played as well as the order of playing if the score is played more than once.
Those parameters are mainly used in the frame of the composition help and the conductor view, only available in the Professional version of Pizzicato. See the lesson on composition help and on the conductor view.
- The Audio playing mode menu specifies how the virtual audio instruments are played. See the lesson entitled The virtual instruments for more details.
- In Pizzicato Professional and Composition, you will find several check boxes used mainly within the music composition tools of Pizzicato. They will be explained in the lessons that concern that subject.
Start recording from the musical keyboard [Light] [Beginner] [Professional] [Notation] [Composition Light] [Composition Pro] [Drums and Percussion] [Guitar] [Choir] [Keyboard] [Soloist]
- Open the Ex050 example.
Before starting to record, you need to specify where recording will start and which track will be recorded. That can be done starting from the sequencer or the score view.
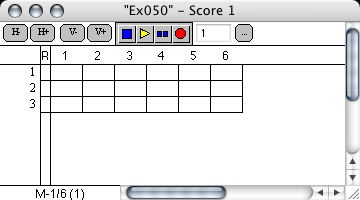
- Open the sequencer view:
Just before the first measure, you can see a column entitled R for Record. On a recorder, this term is often used under the Rec abbreviation. All boxes of this column are blank right now, which means that no track is active to record. By clicking on the recording button (red circle) of the recorder, nothing happens.
- Click inside the R column, in front of staff (track) 1. The box is coloured to show that recording is activated for track 1. Only one track can be recorded at a time.
- Click now in the column R in front of track 2. Track 2 is activated and the track 1 is disabled. To disable all tracks, click a second time in the active track box.
The recording will start from the first measure played according to the playing mode selected in the recorder options.
- Activate track 1. Ensure that the metronome box is checked in the recorder options and that the loop is disabled. We will record our first notes in real time. If you do not have a MIDI keyboard, open the piano keyboard window. Click the record button or use its shortcut which is the Return or Enter key.
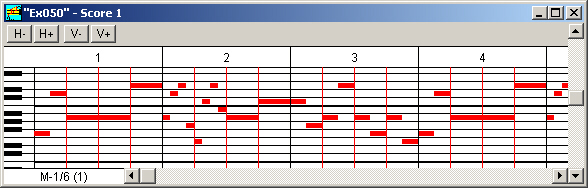
- An empty measure is counted. After that, play some notes with the musical keyboard (or in the piano keyboard window, with the mouse or the shortcuts), and continue until the recording stops itself after measure 6. The sequencer view redraws itself and graphically displays the recorded notes as small horizontal lines in track 1:
Notice that the score located below has also transcribed the notes in musical notation.
- Press on START. Pizzicato plays the exact sequence of notes you played during the recording. You can modify the tempo to hear it more quickly. If you use the piano keyboard window, the played keys are progressively showed as the measures progress.
- Open the piano roll view. By adjusting the position of the vertical scroll bar, you will get something like:
You can start the record again. If you do it on the same track, the previous recording will be automatically erased and replaced by the new notes. If you work on another track, the two tracks will be heard at the same time.
MIDI play options [Light] [Beginner] [Professional] [Notation] [Composition Light] [Composition Pro] [Drums and Percussion] [Guitar] [Choir] [Keyboard] [Soloist]
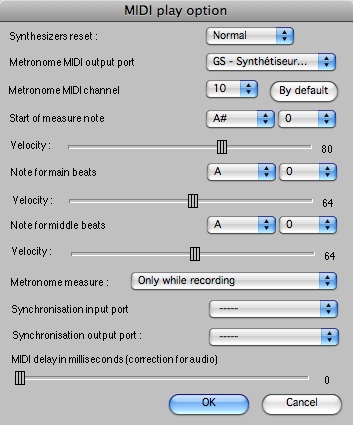
The Options, MIDI Play Options menu, gives you access to the following dialog:
- The first menu, entitled Synthesizers reset, specifies the reset mode of synthesizers. When you stop playing a score, Pizzicato sends MIDI commands to stop any note in progress. There are several conventions to reset notes. In most cases, the Normal choice will be correct. If you hear notes remaining "stuck" when you stop a score, you will have to take the maximal option and things will be better.
- The next two menus select the port and MIDI channel used to send the notes to the metronome. The By default button loads the optimal metronome for your synthesizer.
- The next two menus and the slider select the pitch and velocity of the note used to mark the beginning of a measure.
- The same setup is available just below to specify the note used to mark each beat of a measure. In the case of a 6/8 measure, this will mark every dotted quarter note.
- The same setup is available just below to specify the note used to mark each subbeat of a measure. In the case of a 4/4 measure, this is not applicable. In the case of a 6/8 measure for instance, this will mark every eighth note. By clicking in the By default button, Pizzicato will load the values best adapted to your synthesizer and will display them.
- When several musicians play together, the conductor of an orchestra or one of the performers first counts one measure without playing, in order to give the tempo and to allow everyone to start exactly together. The Metronome measure menu displays the Only while recording choice. It means that when you will record, Pizzicato will first play the metronome during a whole measure. During this measure, nothing will be recorded. It is only used to give you the reference tempo so that you can envisage the beginning of the next measure where the recording will really start. Two other choices are possible for this menu. The first is named Never and disables the measure count. The second, Before playing, allows to count one measure as well when recording as when Pizzicato plays the score. It is useful if you wish to play together with the computer, to keep one measure in order to perceive the tempo with the metronome.
- The Synchronization input port allows to synchronize Pizzicato to an external MIDI device (rhythm generator,...). When you select a synchronization input port, Pizzicato does not use its own tempo any more to play the score, but it waits synchronization orders coming from the specified input. An external equipment may then control the tempo used by Pizzicato. If you do not have an external MIDI device used to control the playing of Pizzicato, it is essential to select "----". Otherwise, Pizzicato has no tempo at all, because its internal clock is disabled.
- The Synchronization output port is used to synchronize an external equipment (rhythm generator, arranger…) to Pizzicato. When a MIDI port is selected, Pizzicato sends during the play through this port information used to transmit the time reference to another device so that it can follow the tempo imposed by Pizzicato. Similarly, when you use the START, STOP and PAUSE recorder buttons, Pizzicato sends these orders through the MIDI output, to control the external equipment. If you do not use an external MIDI device, select "------".
- Since version 3.1, there is an additional slider in this dialog, labelled MIDI delay in milliseconds (correction for audio), as well as a text box to enter a precise value. Depending on the sound card you have, if you add audio tracks to a score, the audio tracks may be played slightly late in relation to the score. This delay may be compensated here by specifying a MIDI delay, so that audio and MIDI are heard together. The exact value to use should be set according to what you hear. Try several values and keep the one that plays the MIDI exactly with the audio. This value can be negative, in which case the audio tracks are delayed in reference to the MIDI playback.
- The Enable audio/Midi synchronisation check box is active by default and this makes the internal MIDI clock of Pizzicato to synchronise on the audio samples played by the audio card.
Light |
Beginner |
Professional |
Notation |
Composition Light |
Composition Pro |
Drums and Percussion |
Guitar |
Choir |
Keyboard |
Soloist |