Light


Beginner
Professional
Notation
Composition Light
Composition Pro
Drums and Percussion
Guitar
Choir
Keyboard
Soloist
| Instruction manual - Pizzicato 3.6.2 | EN080 - Revision of 2013/05/29 |
Light |
Beginner |
Professional |
Notation |
Composition Light |
Composition Pro |
Drums and Percussion |
Guitar |
Choir |
Keyboard |
Soloist |
MIDI Setup
Subjects covered:
Watch also the following videos:
What is MIDI? [Light] [Beginner] [Professional] [Notation] [Composition Light] [Composition Pro] [Drums and Percussion] [Guitar] [Choir] [Keyboard] [Soloist]
MIDI stands for Musical Instrument Digital Interface. It is a language enabling synthesizers and computers to exchange musical information.
Thanks to this system, the computer can record the notes you play on your musical keyboard and take control of a musical synthesizer to play your scores and compositions.
Physically, this communication is established by one or two cables connected between the computer and your musical instrument. Note that low quality synthesizers do not always have a Midi interface, which makes them unable to communicate with a computer. To be certain of a MIDI compatibility, look at the back panel of the instrument. There must be at least one or two connectors of the following type :
with a label In, Out or Thru
A Macintosh or a PC does not natively contain a MIDI connector. This adaptation is done using a Midi interface.
On Macintosh, a Midi interface is a small external box. It comprises connectors necessary for Midi cables and it has a cable which can be connected on the back panel of the Macintosh (USB port).
On PC, the Midi interface is very often presented in the form of an electronic card installed inside the computer or also a little box connected to USB. An adapter is connected to the back and lets you connect the Midi cables to your musical instrument.
Midi devices have one or more Midi connectors. A Midi cable only allows a one way communication. If you have for example a Midi synthesizer with a keyboard, it must at least have 2 Midi connectors. The first will be labeled Midi In (Midi input) and enables the synthesizer to receive musical data from your computer. The second Midi connector will be labeled Midi Out (Midi output) and lets the synthesizer send the notes you play on the musical keyboard to the computer. A third Midi connector is often present, labeled Midi Thru. It is a Midi output sending a copy of the data coming from the Midi In connector of the instrument. It is a Midi echo which can be used to connect another Midi devices that needs to receive the same MIDI messages.
When you connect Midi devices together, it is necessary to keep that information in mind. A connector is either an input (Midi In) or an output (Midi Out or Midi Thru). A Midi cable must ALWAYS be connected between an output of a device and the input of another device. Any other combination will not work.
Here are diagrams of most current connection setups between a MIDI device and a computer.
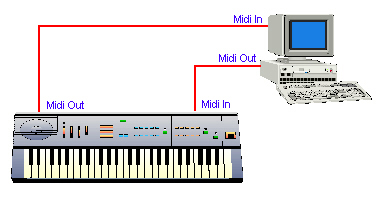
- Synthesizer with a keyboard:
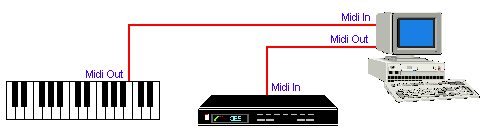
- Midi keyboard (without integrated synthesizer):
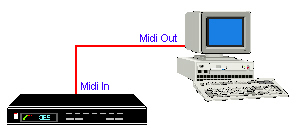
- External sound module without a keyboard:
- Midi keyboard (without integrated synthesizer) + external sound Module:
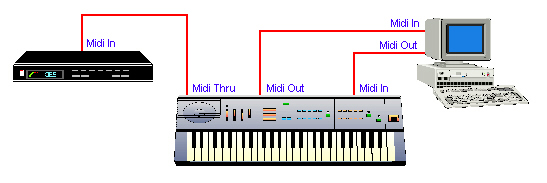
- Synthesizer with external keyboard + sound Module:
To install your Midi interface correctly, read its installation manual. Also take care to install the driver software of the interface (MIDI and sound card drivers for Windows). This installation should normally be explained in the MIDI interface user manual.
A Midi cable does not transport sounds but only information concerning the notes which are played on the keyboard as well as other information used to configure a synthesizer. The connections explained above relate only to the Midi aspect. If your synthesizer does not have an internal speaker, you need to connect its audio output to an amplification system connected to loudspeakers, such as a Hi-Fi system. If you have a sound card, its audio output must be connected either to an external loudspeaker provided with the card or to your Hi-Fi system. Consult your card or synthesizer manual.
The rest of this lesson will explain to you how to tell Pizzicato what is your musical material and your Midi interface. Before doing so, be sure that your Midi interface or sound card is correctly installed. Be certain that connections are correctly established, by looking at the above examples. Also check that your musical material is switched on.
An important remark applies if you have a MIDI cable for a sound card (Windows). On one side, it is a large plug adapted to a sound card connector, also called Joystick port (sometimes this cable has a similar female domino plug, enabling the connection of a joystick at the same time). Two MIDI connectors can be found on the other side of this cable. One is called MIDI IN and the other MIDI OUT. These names correspond respectively to the MIDI input and the MIDI output from the computer viewpoint. Considering the preceding diagrams, it is thus necessary to connect the MIDI IN plug into the MIDI OUT connector of the synthesizer and vice versa. The inversion of this connection is a very frequent cause of MIDI failure. To connect it wrong fortunately does not destroy anything, but MIDI communication is not established.
At installation, Pizzicato selects itself a simple MIDI setup that should work in most cases without any further modification. In case of problems, or if you want to fully use all MIDI resources from your sound card, here is how to adatp MIDI setup. If you have problems with the MIDI setup, do not hesitate to contact our support department.
MIDI configuration [Light] [Beginner] [Professional] [Notation] [Composition Light] [Composition Pro] [Drums and Percussion] [Guitar] [Choir] [Keyboard] [Soloist]
In the Options menu, select the MIDI setup... item. The following dialog appears:
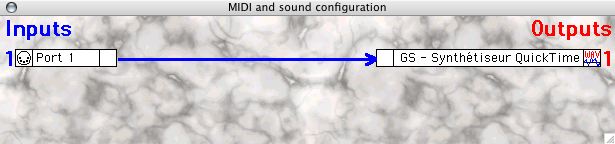
Pizzicato communicates with a MIDI device through what is called a MIDI Port. Each Midi port is a bi-directional terminal communication between Pizzicato and your musical instrument. When a Midi message is sent to your musical instrument, it goes through the Midi port. Similarly, when you play notes on your keyboard, this information is received by the Midi port and Pizzicato can process them.
The Midi configuration dialog box shows MIDI inputs on the left (in blue) and MIDI outputs on the right (in red). Most Pizzicato versions let you use one input and one output, and Pizzicato Professional or Composition Pro may use up to 16 inputs and 16 outputs. In most cases, one or two Midi port(s) will be enough.
After the first installation, Pizzicato selects an input port and an output port according to your computer configuration.
To test an output port, click the little white square just left to the port. A series of notes is sent to this MIDI port by Pizzicato. If you hear them, the port is well connected.
You may modify the input and output ports by double-clicking on one of them.
- Configuration of a MIDI output port
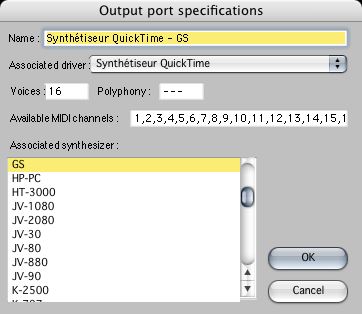
Double-click on the output port. The following dialog appears:
Here is a description of each field:
- Name: it is the title you give to the MIDI port. By default, it is the type of associated synthesizer (see below) followed by the original name of the MIDI port. You may personalize and/or simplify it, for instance as "Audigy card", "Yamaha Synth",... This name will be used whenever you will need to select an output port (in cas you have more than one) for the different staves of a score.
- Associated driver: This menu contains all MIDI output drivers installed on your computer. Each one corresponds either to a MIDI synthesizer on your sound card or to a MIDI interface to which an external MIDI device may be connected.
- Voices: When this box contains a number, it is the number of simultaneous voices that can be played.
- Polyphony: When this box contains a number, it is the number of simultaneous notes that this output can play. According to the synthesizer model, one note may need more than one voice to be played. Most of the time, for a sound card, those two numbers are identical.
- Available MIDI channels: specifies explicitly the MIDI channels that may be used by this output. Those three last boxes are displayed as information and may not be modified.
- Associated synthesizer: For Pizzicato Professional and Composition Pro, this list contains almost 100 synthesizer models. This list does not mean you can play the sounds of each model. Those models only contain the list of sounds and the specifications of those models from the market so that when you need to select a sound to play, you may do it realistically for your synthesizer, choosing from the real list of sounds contained in the model. To hear the sounds, you need the real synthesizer, connected to the MIDI output. See the remark below on selecting a synthesizer.
The other versions of Pizzicato only contain the standard GM (General MIDI), GS (Roland), XG (Yamaha) or a list with numbers only (MODELE-1).
- Configuration of a MIDI input port
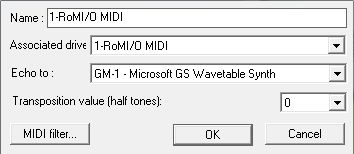
Double-click on the input port. The following dialog appears:
Here is a description of each field:
- Name: it is the title you give to the MIDI port. By default, it is the original name of the MIDI input port. You may personalize and/or simplify it, for instance as "My keyboard",...
- Associated driver: This menu contains all MIDI input drivers installed on your computer. Each one corresponds to a MIDI interface to which an external MIDI device may be connected.
- Echo to: You may specify here one of the output ports, so that each MIDI information received by the input port are sent in echo to the selected output port. If you have a synthesizer with a keyboard, you do not need to specify an echo because the notes you press are immediately played by the synthesizer. If your MIDI keyboard is separated from your synthesizer (keyboard + external sound module), you need to activate an echo so that you hear the notes played by your sound module.
- Transposition value: all incoming notes will be transposed with this value.
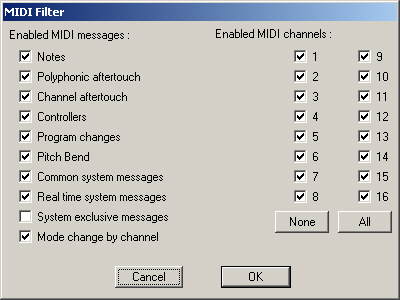
- MIDI filter...: this button calls a dialog box to selectively filter MIDI events and MIDI channels that may get through this MIDI port :
To add or delete a MIDI input or output port, right click with the mouse to get the contextual menu. One item lets you delete the clicked port and two others let you add an input or output port. With the same menu, you may ask Pizzicato to automatically configure MIDI. By doing so, the present MIDI setup is removed and Pizzicato creates a port for each input and output found existing in the computer. You may then personalize it as explained above.
According to the material you possess, here are the most common situations.
- You do not have a musical material nor a sound card :
In this case, no Midi interface needs to be connected. On Mac, providing that the "QuickTime Synthesizer" extension is installed, you can select this choice on the MIDI output port. You can close this dialog by clicking on its close box.
- You have a Midi interface in your PC/Mac:
Double-click the input port and select the Associated driver corresponding to the name of your interface, such as Mpu-401, MusicQuest, Midi Input, SB MIDI IN… and validate. Do the same for the output port. If no item is available in the Associated driver menu, it means that the Midi interface card was not installed properly. Re-examine the instruction manual of your card and take care to correctly install, otherwise Pizzicato will not have access to MIDI.
If your Midi interface has several inputs and outputs, they will be available in the Associated driver menus. With Pizzicato Professional, you may add input and/or output ports, as explained above, and configure them so they will answer to each MIDI interface available.
- You have a sound card (with or without a MIDI interface):
The principles exposed in the previous step also apply. Use the Midi input port to select the Associated driver corresponding to the MIDI input of your card, such as Mpu-401, MusicQuest, Midi Input, SB MIDI IN…
With regard to the output, this kind of card contains at least 2. If you use an external synthesizer connected in Midi, use the output MIDI port to select it (for example the item Mpu-401, MusicQuest, Midi Output, SB MIDI OUT…).
A sound card generally has an integrated synthesizer which can be selected in the Associated driver output menu. You may add another MIDI output port (Pizzicato Professional and Composition Pro only) to access it. According to the sound card you have, you will probably find two possible choices others than the MIDI output. Modern sound cards often contain an FM synthesizer - FM Synthesis (Yamaha OPL3) - and another more sophisticated but whose name depends on the constructor of your card.
The order of the output and input ports is not very important. MIDI port 1 is selected by default for instruments in a new score, so preferably use Midi port 1 for the synthesizer you will use the most.
If you use a Midi keyboard without an integrated synthesizer, you will need to set the echo associated with the MIDI input to the MIDI output port associated to the synthesizer of the card. This will let you play on your keyboard and directly hear the notes executed by the sound card synthesizer.
Select a synthesizer [Light] [Beginner] [Professional] [Notation] [Composition Light] [Composition Pro] [Drums and Percussion] [Guitar] [Choir] [Keyboard] [Soloist]
In Pizzicato Professional and Composition Pro, the synthesizer selection list contains almost one hundred synthesizer models. The other versions only contain the standard GM (General MIDI), GS (Roland), XG (Yamaha) lists, as well as a generic list by numbers (MODELE-1).
The synthesizer selection list enables you to specify the model of card or synthesizer you have. Pizzicato must be able to know the sounds available on the instruments, the MIDI channels that can be used, the special effects available (reverberation, chorus…) as well as various specific characteristics of your instrument.
The list of synthesizers contains several synthesizers and sound card on the market. If your synthesizer or sound card is not in the list, see the remark below. Most sound cards use the GM standard, GS (Roland) or XG (Yamaha). For GM, select the Gm-1 item in the list.
If necessary, you can connect several synthesizers on the same Midi interface. It is the case for the last connection example drawn at the beginning of this lesson (synthesizer with keyboard + sound module). You just need to configure two MIDI ports (only with Pizzicato Professional or Composition Pro) with the same interface and respectively associate them to the first and the second synthesizer names. It will be necessary to disable some MIDI channels of your synthesizers and to slightly reconfigure your synthesizer in order to avoid communication conflicts. For more details, see the lesson on the synthesizer configuration.
Remark
If you do not find your synthesizer or sound card in the prepared list, here is how to proceed.
- Consult the manual of your synthesizer to see if it is compatible with GM standard (General Midi). This standard is more and more used . It standardizes the behavior of the synthesizers. If it is the case, select the Gm-1 line in the synthesizers list. Also see if it is compatible with GS standard (General System), a standard more specific to the Roland synthesizers. In this case, select line GS in the list. Try also the XG model (Yamaha). Check if the model of your synthesizer is very close to another model of the same brand and test it.
- If it is not the case, know that Pizzicato (Professional or Composition Pro) enables you to create and configure a new synthesizer which can be added to the provided list. This requires a good knowledge of synthesizers and MIDI technology. The instructions to be followed are explained in the lesson treating the configuration of synthesizers. In some cases, we may do the encoding ourselves for a specific synthesizer, but it depends on the model. Anyhow, you may always contact us for advices.
Light |
Beginner |
Professional |
Notation |
Composition Light |
Composition Pro |
Drums and Percussion |
Guitar |
Choir |
Keyboard |
Soloist |